Job Lien Waiver Config
Complete the following steps to configure the lien waiver tracking settings that are used by your job:
From My Paperless, click .
In the ClearToPay™ left navigation, click .
Choose the job from the list.
Click .
A page similar to the following displays:
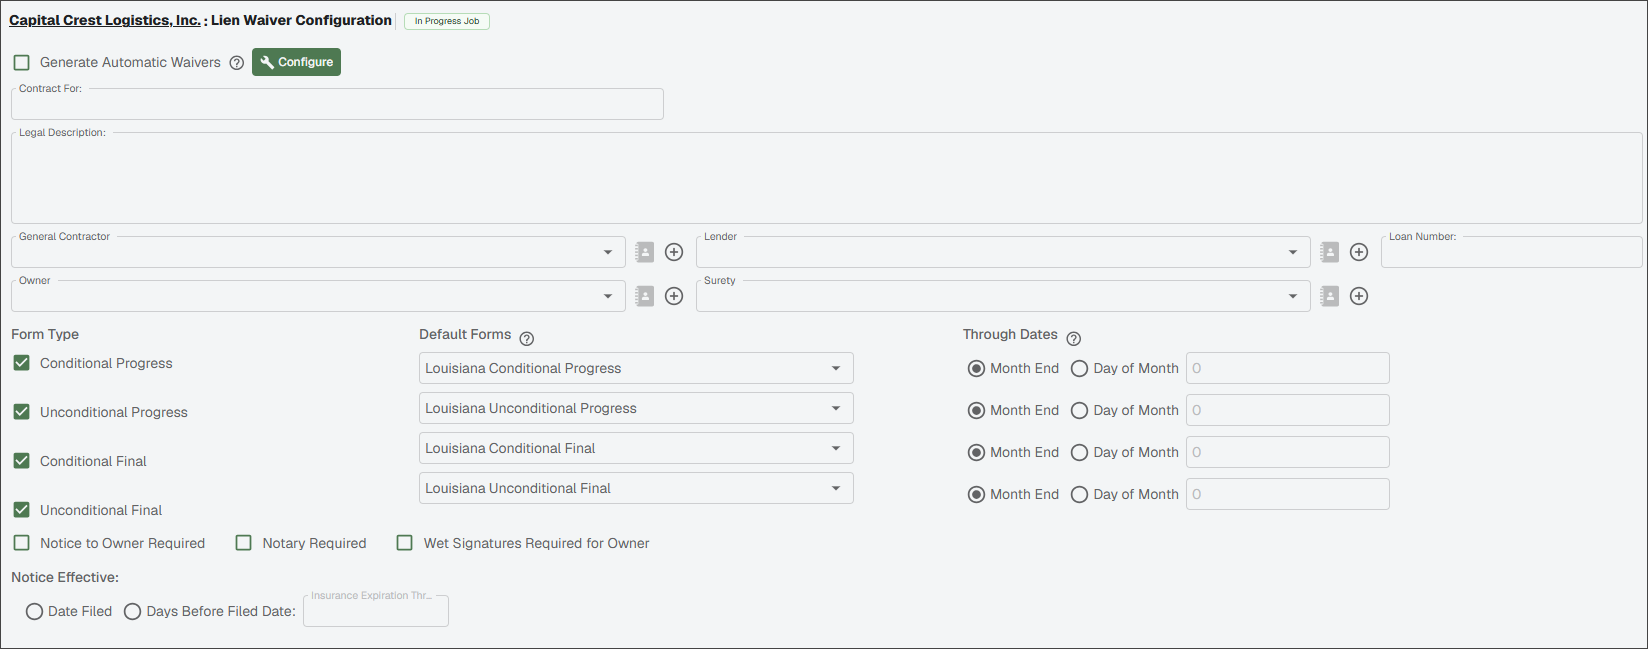
Select to allow for the automatic creation of Conditional and Unconditional Progress waiver records on scheduled intervals for all vendors that meet your criteria. If you select this check box, click the button to set the parameters:
Note
Automatic waivers must be enabled at the job level and on the Settings page for each vendor utilizing this automation.
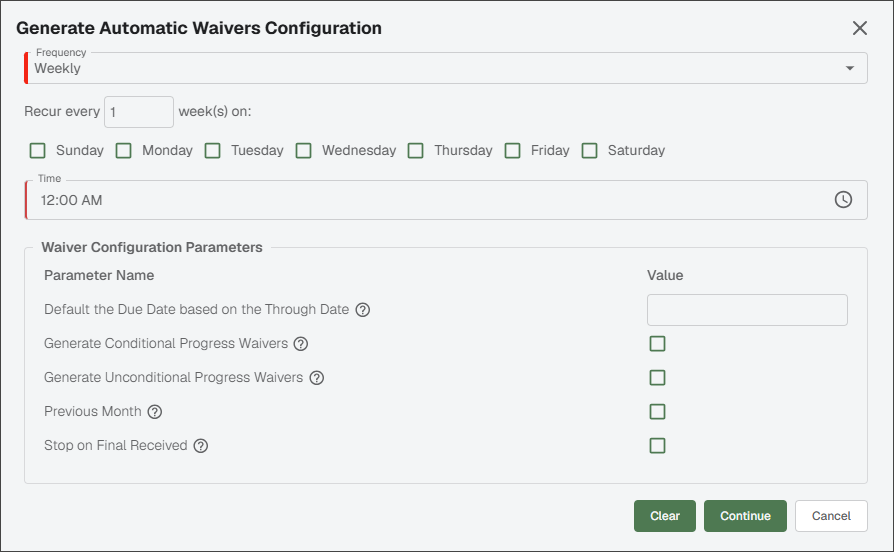
In the Frequency dropdown, select how often you want lien waivers generated. You can select , , or .
Enter recurrence date, day or time information. These options vary based on the option selected in the Frequency dropdown.
Default the Due Date based on the Through Date: Enter the number of days to add to the calculated through date as the default due date in the Value field.
Tip
For example, if the Default Due Date value is 20, then the due date occurs 20 days after the through date.
Note
Through Date represents the end of the work billing period, and the waiver should cover all work performed since the previous waiver and through date. Due Date is the deadline for the vendor to sign the waiver or be considered out of compliance.
Generate Conditional Progress Waivers: Select this check box if you want to create conditional progress lien waiver records as part of the automated lien waiver generation process.
Generate Unconditional Progress Waivers: Select this check box if you want to create unconditional progress lien waiver records as part of the automated lien waiver generation process.
Previous Month: Select this check box to specify that lien waivers scheduled to generate early in the month that have a through date near the end of the month should generate for the previous (not current) month.
Stop on Final Received: Select this check box to stop the automatic generation of lien waivers once the unconditional final lien waiver is received.
Tip
It is recommended that this option is selected.
Click to exit the Generate Automatic Waivers Configuration dialog.
Enter the job-specific name to be used in the waiver form templates in the Contract For field.
Enter the job-specific description to be used in the waiver form templates in the Legal Description field.
For the General Contractor, Lender, Owner and Surety fields, select the proper entity for this job from each respective dropdown. Click to enter new values, which are then added to the Address Book.
(If applicable) Enter the loan number for this lien waiver in the Loan Number field.
Select which form types are tracked for this job in the Form Types fields.
Note
These settings can be overridden at the vendor level.
For each of the form types you selected, select either or . If you select Day of the Month, you need to also enter the numeric date value.
Note
Through Date represents the end of the work billing period.
Select the check boxes below to enable the following requirements, if needed. These options are strictly informational and do not impact the lien waiver tracking process.
Notice to Owner Required
Notary Required
Wet Signatures Required for Owner
In the Notice Effective section, select either or . If you select Days Before Filed Date, you need to also enter the number of days in the Insurance Expiration field.
Click .