Jobs
The Jobs page provides a list of all the jobs being tracked in ClearToPay™. From this page, you can:
Search and filter to find jobs in the list
Review jobs, quickly identify if they have met their compliance requirements and access job detail pages
Add new jobs, edit existing jobs, import jobs or inactivate a job
Favorite jobs
Note
If your company has changed the labels used for jobs or vendors in Company Settings, these options follow your company's terminology. Job, sub-job and vendor are the default terms.
Important
You must be configured as a Compliance Manager, an Auditor or have Job Level access for the current vault to be able to view this page.
Complete the following steps to access the main Jobs page:
From My Paperless, click .
In the ClearToPay™ navigation bar, click .
A jobs list grid similar to the following displays:
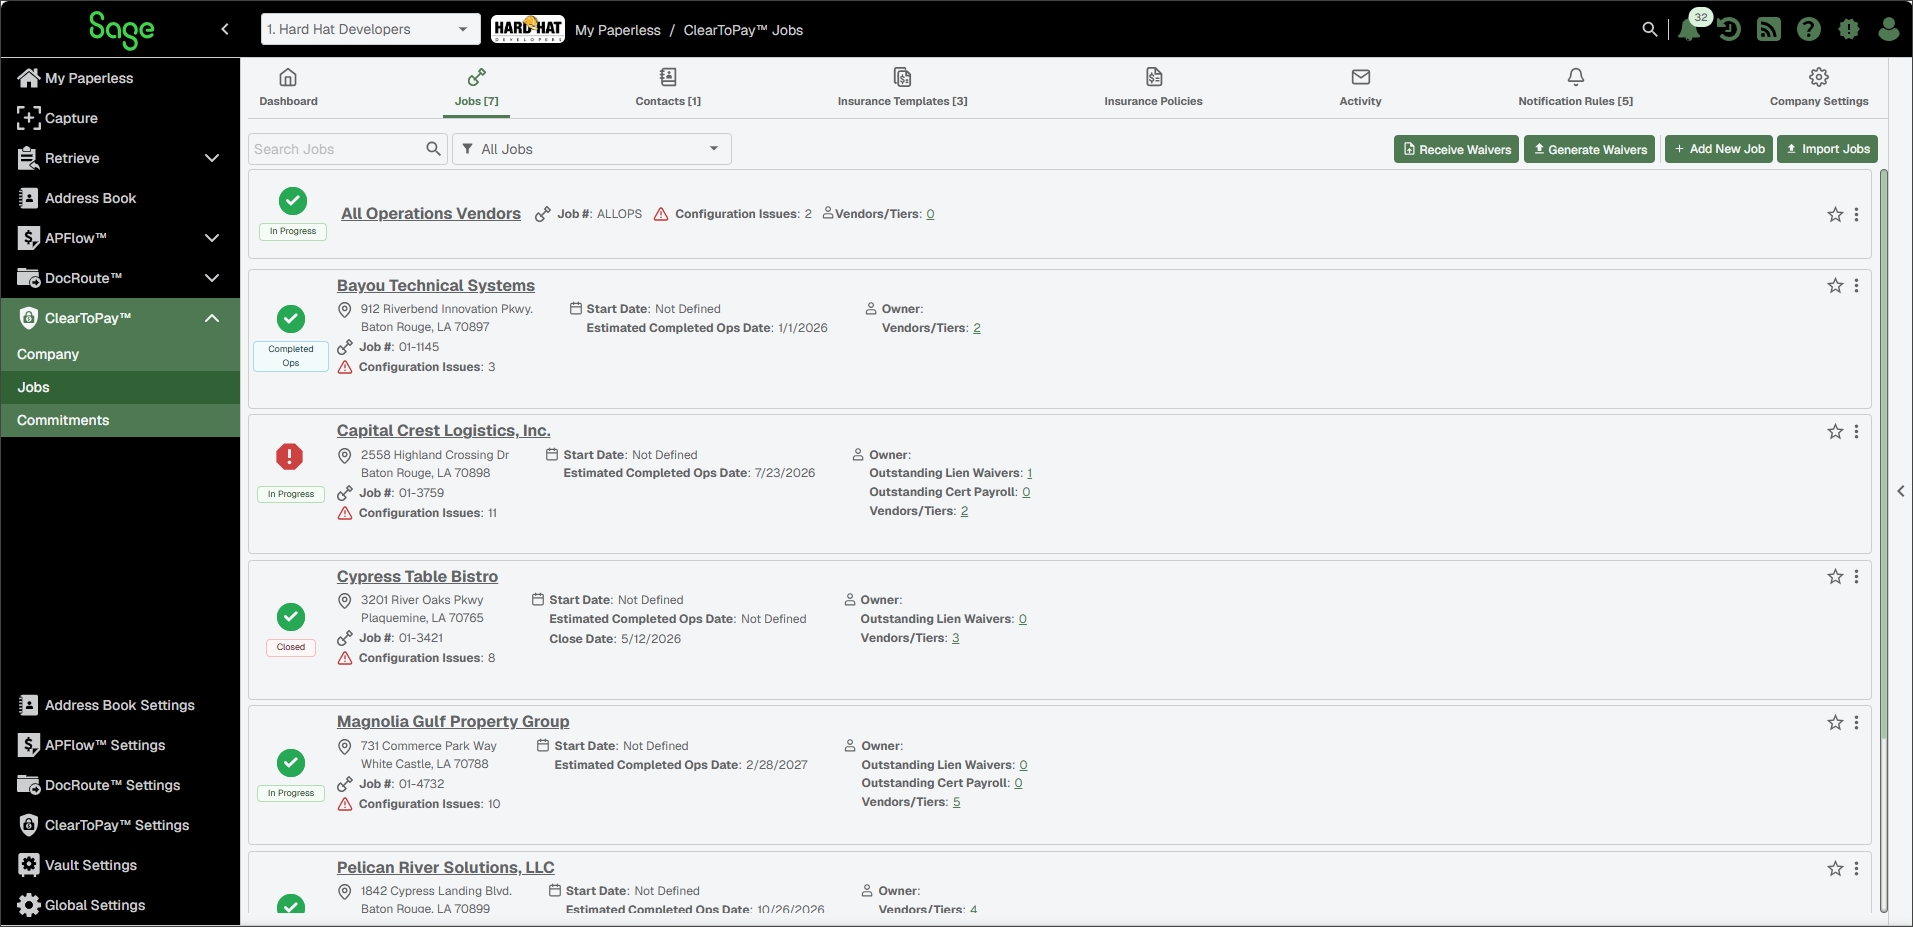
From this page, you can perform the following tasks:
To search for a specific job, enter the job name, job number or address in the Search Jobs field. Then, press
Enteror click the Search icon.
icon.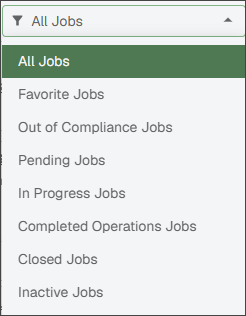
To narrow the list of jobs that display, click the dropdown to display filter options.

Click to select a job and mark waivers as received. In the Receive Waivers dialog, you can select one or more of the outstanding waivers from the list and set the appropriate received date. Then click . This applies the Date Received value to each record to quickly mark waiver records across vendors as received instead of navigating to each vendor's page individually.

Click to add one or more new lien waivers for this job. See Generate Lien Waivers for more information.

To add a new job to your company, click . For more information, see Add New Jobs.

To import jobs, click . For more information, see Add New Jobs.


Each job entry includes an icon that indicates the job's compliance.
The green check icon indicates the job (and all its sub jobs and vendors) is in compliance.
The red warning icon indicates the job (and all its sub jobs and vendors) is not in compliance.
Job Name
Click the job name link within the grid to access that job's detail page. For more information, see Job Dashboard and Navigation.
Status Indicators
Each job displays one of status icons shown to indicate the overall status of the job.
Active status means that the job is in-progress.
Closed status means that the job is complete.
Pending status means that the job has not yet started, but information is being assembled.
Completed Operations status means that the job is in the time frame when work has been completed but the job still needs to carry insurance to protect the customer from liability.


You can select the Star icon for a job to indicate this job is a favorite. Jobs marked as favorite can be found using the filter feature.
To remove the favorite status, click the Star icon again.
Job #
The job number is assigned when the job is created. All operations vendor jobs display ALLOPS as the job number.
Sub Job Number
The sub job number, if applicable, is set when the job is created.
Configuration Issues
Displays the number of configuration issues for that particular job. For more details, see the Job Configuration Issues widget on the job's dashboard.
Dates
Job cards may display the following date information:
Start Date: The date when a project is scheduled to begin or has begun. This date displays for all jobs, regardless of Pending, Active, Closed or Completed Operations status.
Note
All operations vendor entries do not include a start date because they span multiple projects rather than a single job timeline.
Estimated Completed Ops Date: Displays and is tracked for all standard project-based jobs (not All Operations Vendor jobs) and is used to forecast when a job's active work phase is expected to conclude.
Comp Ops Date: Displays once the project reaches the end of its active phase and its status is changed to Completed Operations. This initiates the timeline for the completed operations period (during which time, the vendor must still carry insurance).
Close Date: Displays when a job is set to Closed status. At this time, ClearToPay stops generating compliance warnings or automated emails for this project.
Owner
The project owner, if assigned during lien waiver configuration.
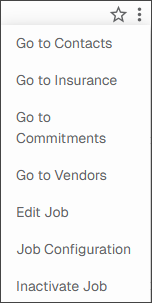
Click the vertical ellipsis
 to display a dropdown of navigable links pertinent to that job.
You can use the ClearToPay™ Job's Dashboard page to access important job features using the icons located at the top of the page, review and edit job information or check on job configuration issues.
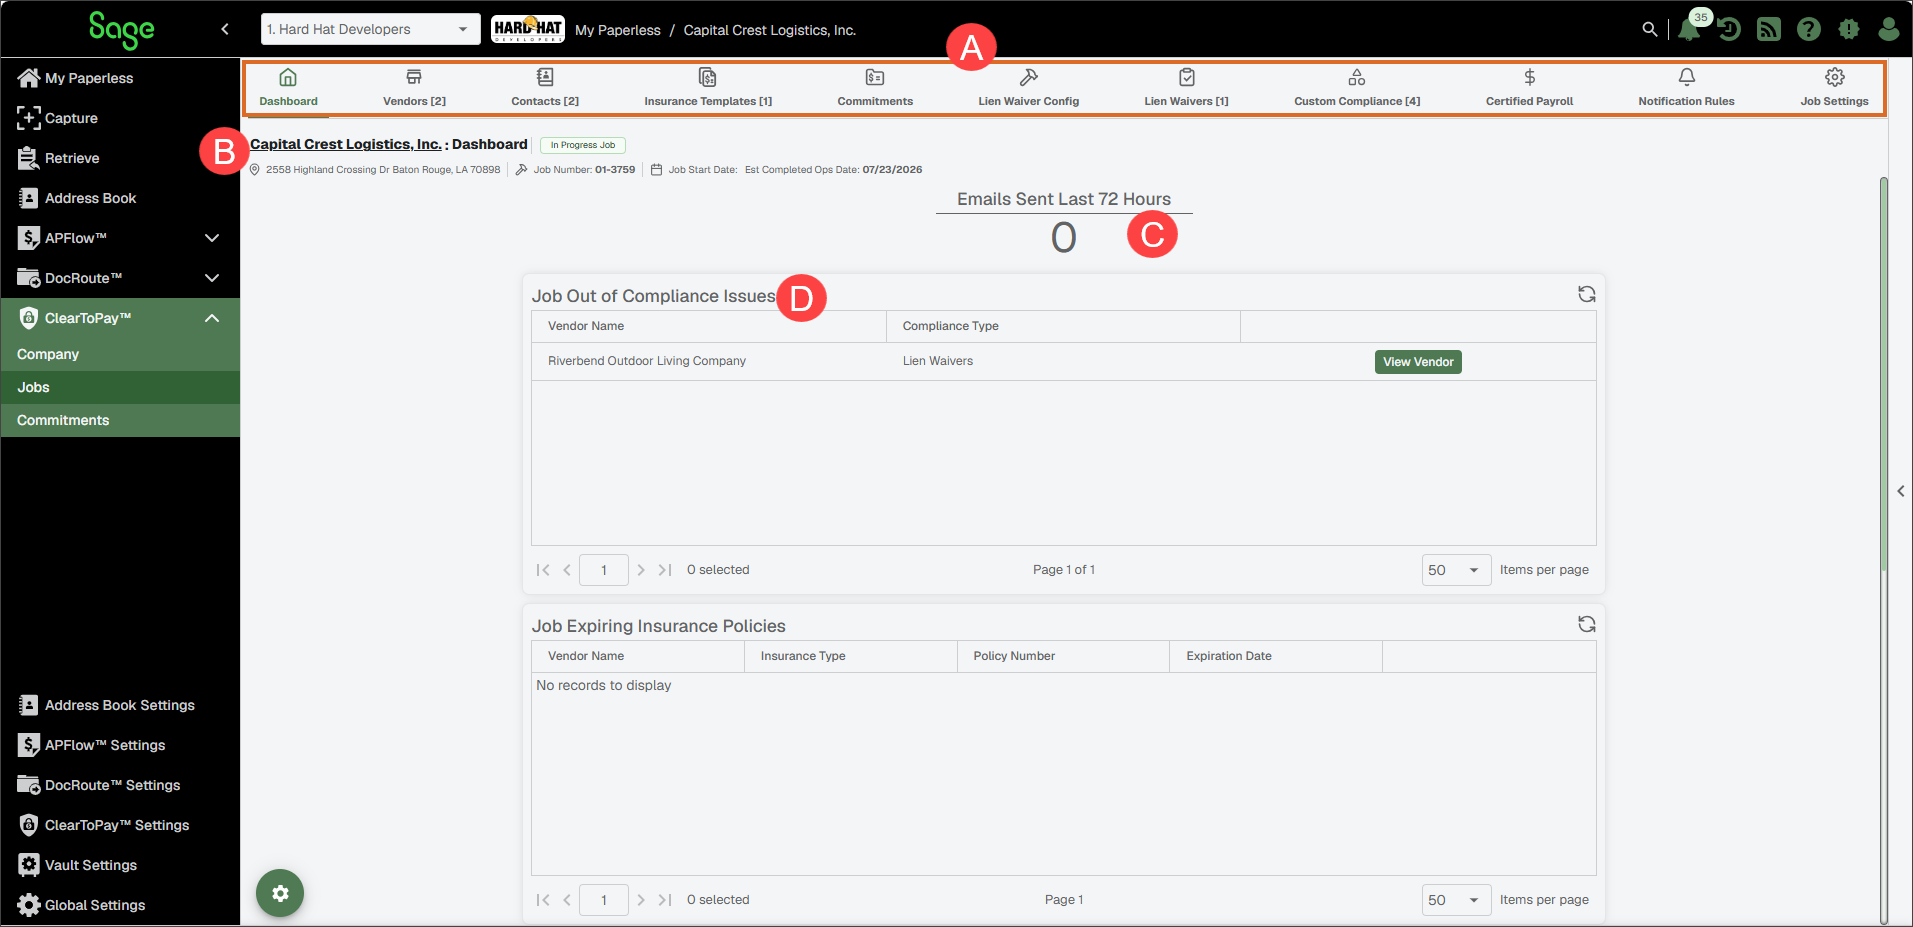
| A: Quick links to access job and vendor information and settings. |
| B: Job address and contact information. See Edit Existing Job for detail on updating this information. |
| C: Configurable mini widgets. See ClearToPay™ Widgets for more information. |
| D: Configurable grid widgets. See ClearToPay™ Widgets for more information. The buttons in the grid widgets take you to the area of concern (such as an out of compliance vendor's dashboard), display messages with an option to resend them, or open a dialog where you can view and address specific issues. |
ClearToPay™ Widgets
You can make modifications to the widgets that display on your various ClearToPay dashboards. ClearToPay provides various grid and mini widgets that help you quickly view and access relevant information like compliance issues, expiring policies, configuration issues and emails.
Just like other dashboards in Sage Paperless Construction, the system remembers your widget settings (by user, by widget, by vault).
To access the available widgets, click the Widget Configuration
 icon.
icon.The Select Widgets to Display dialog displays:
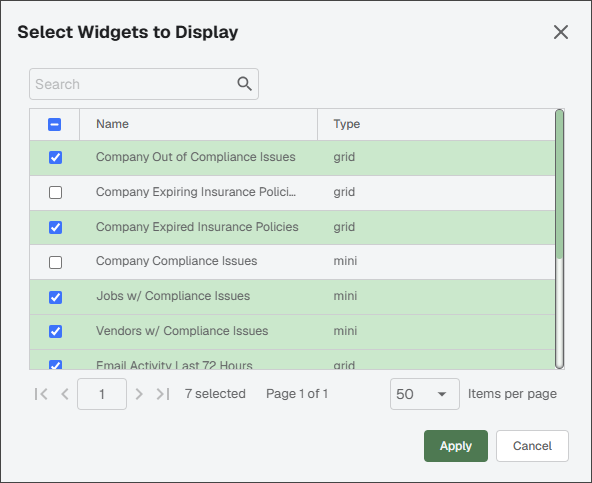
Select which widgets you want to display.
Note
The widgets that are available vary depending on if you are configuring widgets on the company, job or vendor dashboard.
Click .
Note
If you want to display all the listed widgets, click the check box in the header. This populates every check box with a checkmark.
To "unpin" a widget so that a particular widget does not display on your Dashboard page, remove the checkmark for that widget. Remember to click to save your changes.
For additional information on updating dashboard widgets in Sage Paperless Construction, see Use Widgets and Grids.
Click on any of the Refresh
 icons that display on each widget to refresh them individually.
The Add Job dialog provides a single location where you can enter all the pertinent information about a new job from name and address to start date and estimated completed operations date. You can also import jobs to your company from a bridged accounting system.
Important
You must be configured as a Compliance Manager for the current vault to be able to complete this process.
Complete the following steps to add a new job in ClearToPay™:
From the Jobs page, click .
Enter the job's information in each of the following fields:
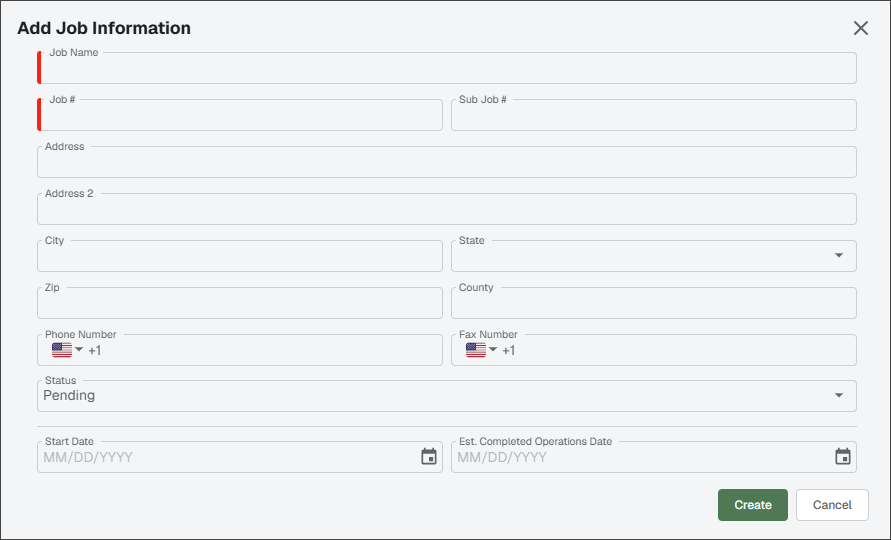
Enter the job name in the Job Name field.
The accounting system may populate the Job Number field. If not, enter the corresponding Job Number in this field.
If appropriate, enter the number in the Sub Job Number field.
Enter the job address in the Address field and Address 2 field if necessary.
Enter the zip code for the vendor's location in the Zip field. The City, State and County fields populate.
Note
If the zip code is valid for more than one city, select the appropriate city.
In the Phone Number and Fax Number fields, enter the appropriate information.
In the Start Date field, use the calendar to select the correct date. To select the current date, enter the day in the DD portion of the date. The month and year systematically populate.
In the Estimated Completed Operations Date, use the calendar to select the correct date.
In the Status dropdown, select one of the following:
Pending: When a job is imported or manually added, the job status is set to Pending. Jobs in this status do not report or generate compliance issues, emails or warnings.
Active: This status is used for jobs currently in progress. Compliance warning and automated emails are active.
Completed Operations: This status is used when a company is required to continue tracking insurance policies for a period of time after the project is complete. Insurance warnings and emails are still active. If selected, a Completed Operations Date field displays where you can enter the actual completed ops date.
Closed: When a job is finished and no compliance tracking is needed, the job should be set to Closed. A job with a Closed status does not generate any compliance warnings or automated emails. If selected, Completed Operations Date and Close Date fields display where you can enter the applicable dates.
Click .
Click .
In the Import Jobs dialog, select the connection source from the dropdown (Bridge Connection is the default).
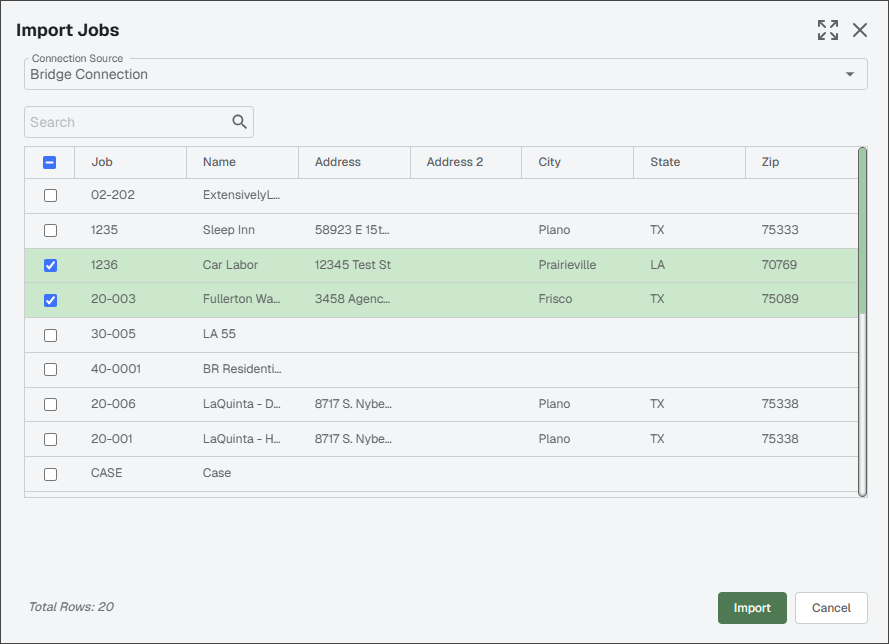
Select the jobs that you want to import from the list.
Click .
Use the Edit Job Information dialog to modify the high level job information that is visible on each job's dashboard page.
To access the Edit Job Information dialog, do one of the following
Click the Edit
 icon that displays when you hover over the job's name:
In the jobs list grid, select the Vertical Ellipsis
> Edit Job for the job you want to edit.
Review all fields and make the necessary modifications.
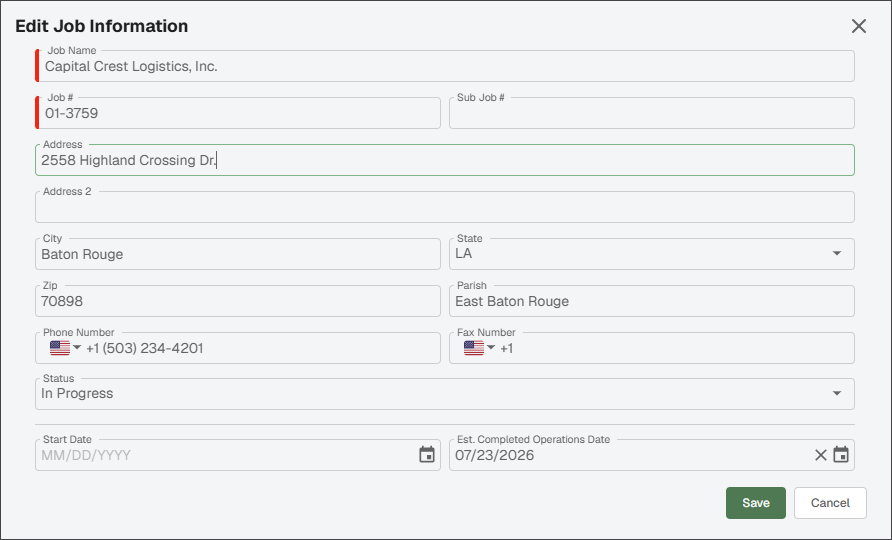
Click .
Use the Inactivate Job dialog to mark a job as inactive. Insurance policies are not tracked for inactive jobs.
Navigate to the job you want to inactivate.
In the job entry grid for the job you want to deactivate, select the Vertical Ellipsis
> Inactivate Job.
If you need to reactivate an inactive job, use the filter to find it in the Inactive Jobs list, then select the Vertical Ellipsis > Reactivate.