Configure OCR Settings
Paperless Optical Character Recognition (OCR) offers a way to systematically scan your documents, extract data from the document images and input index values. Drag and drop your documents into Sage Paperless Construction, and OCR automatically extracts key information from the document, eliminating manual entry of those values.
One of the most common uses for OCR is using it during AP Invoice Entry to collect AP Vendor, Invoice Date, Invoice Number, Invoice Total and Purchase Order information from invoices. You can also use Line Level OCR to collect line level data.
Important
A license is required to access OCR. You can check for available OCR licenses within Info. See License Information for more information.
The following file extensions are accepted by Paperless OCR:
Images | Documents |
|---|---|
.gif | .doc |
.heic | .docx |
.jpg | .ods |
.jpe | .odt |
.jpeg | |
.pipg | .xls |
.png | .xlsx |
.tif | |
.tiff |
After purchasing Paperless OCR, our implementation team works with you to configure OCR workflows based on your processes and company requirements. Your OCR Workflow defines what fields are going to be captured from each document. You must map each captured OCR field to a specific index on a document type or to a specific Invoice Entry field. You can set up multiple mappings per workflow.
For administrator information on setting up or editing data lists, see Configure Data Lists.
For administrator information on setting up or editing workflows, see Configure OCR Workflows.
For administrator information on setting up an OCR Queue, see Configure OCR Queues.
Administrators can also create importer jobs to capture invoices sent to a specific email inbox and systematically upload them to an OCR queue. See Importer Jobs.
For processor information to understand and use OCR, see Train and Use Paperless OCR.
For information on using OCR with APFlow™, see APFlow™ with OCR.
For information on using OCR with eCapture™, see Use OCR to Submit a Credit Card Receipt in eCapture™.
Configure Data Lists
Each Data List is a predefined database set up in the OCR system to accurately capture the data in your documents. A common database set up with your installation is the Vendor List.
Complete the following steps to find your pre-configured data lists:
From My Paperless, click .
In the Global Settings navigation bar, click .
From the OCR dropdown, click .
A page similar to the following displays:
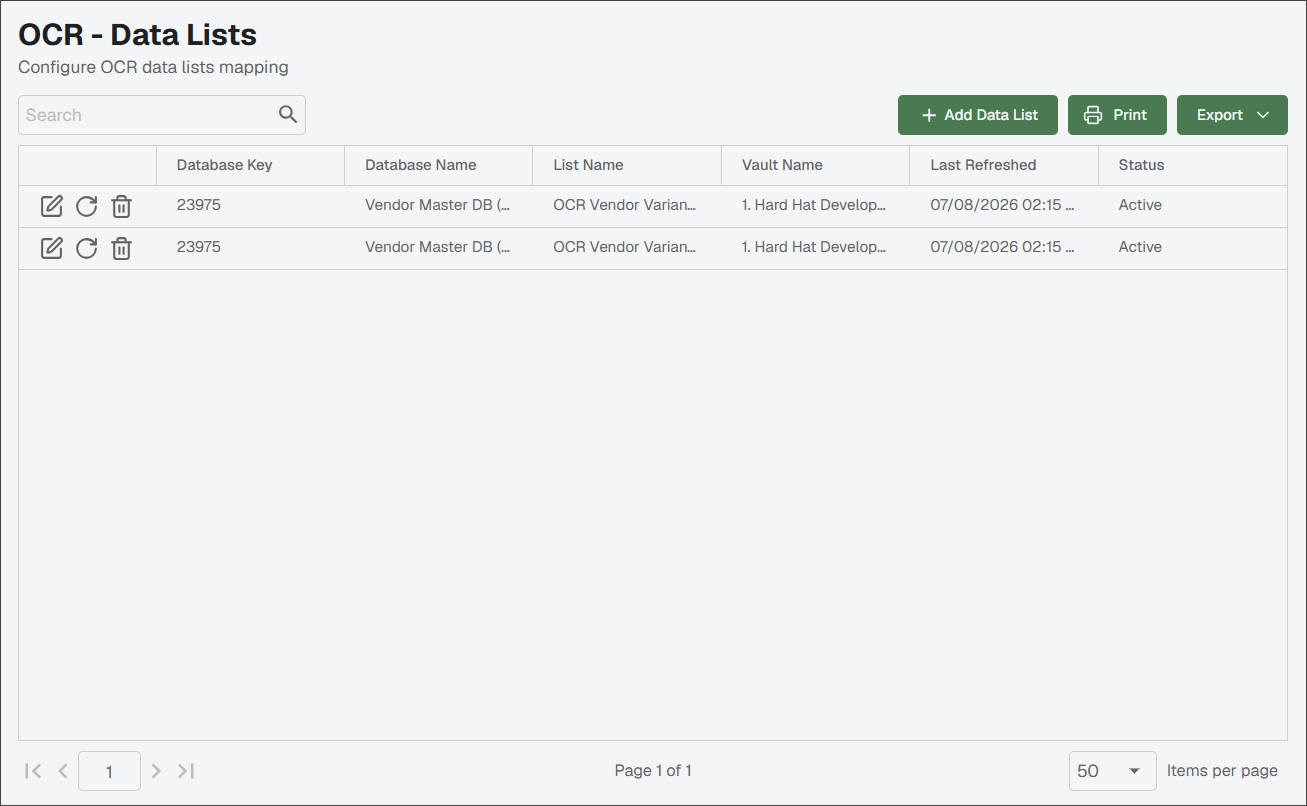
From this page you can add new mappings or edit the existing data mappings.
When you create a new data list, you need to map it to one of your accounting databases and refresh it based on the interval defined in the mapping. After it is configured, the databases in the OCR system are populated with accounting data and refreshed based on the defined interval.
On the OCR - Data Lists page, click .
A blank Data List Mapping Properties page displays on the General tab.
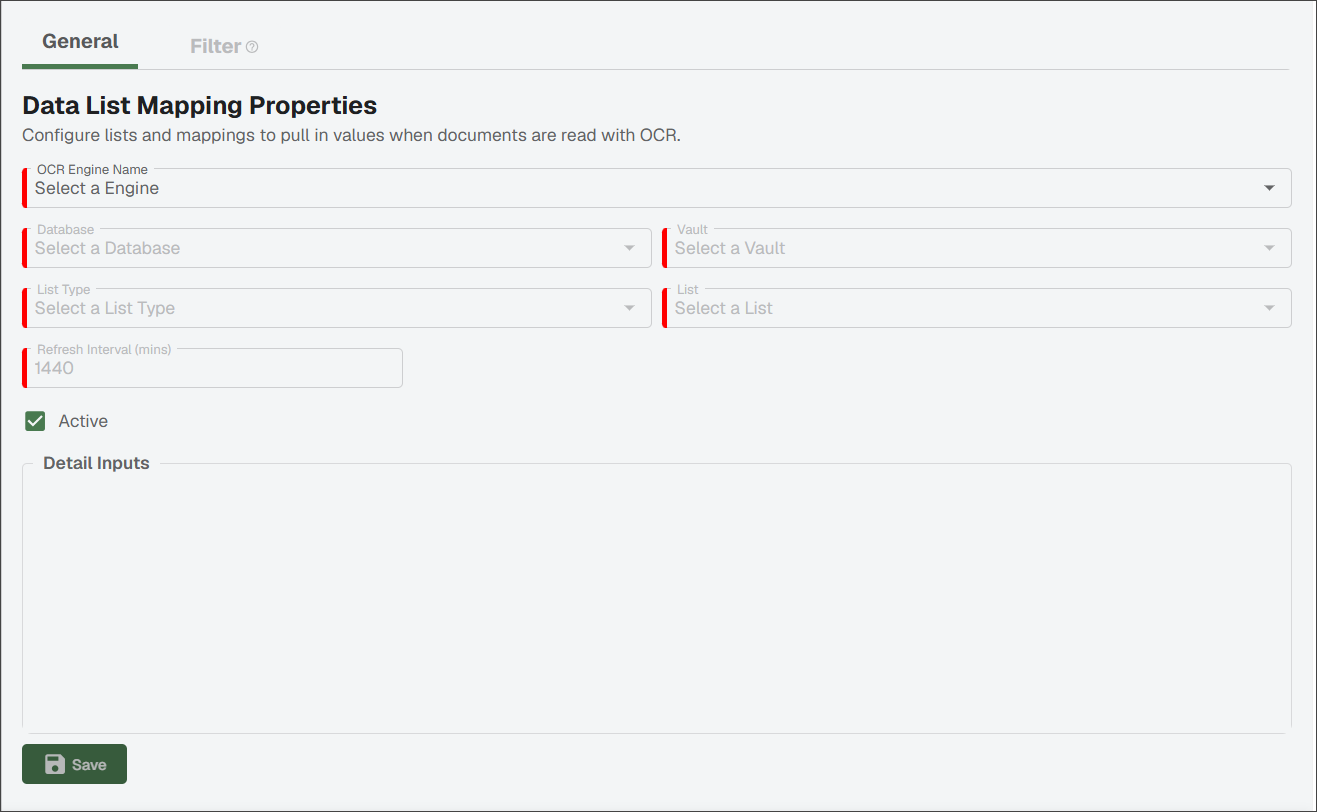
Enter the necessary information into each of the fields as described in the table below:
OCR Engine Name
Select the engine used to drive the OCR functionality.
Database
Based on the selected OCR Engine, choose the appropriate database from the dropdown.
Vault
From the dropdown, select the vault.
This is a required field.
List Type
From the dropdown, select the appropriate list type.
This is a required field.
List
The lists that display in the dropdown are based on your selected List Type.
Select the appropriate list.
This is a required field.
Refresh Interval (mins)
This field displays the date and time based on when the database in the OCR system was last updated. The Refresh Interval (mins) field defines how often the database is updated.
The field default is 1440 minutes. You can modify the time.
This is a required field.
Active
The Active check box is selected by default. If this mapping should not be active, click to remove the checkmark.
Detail Inputs
Based on the list you selected from the List dropdown, corresponding fields display. Click on an associated dropdown and click the entry to populate the field.
Review the partially completed Data List Mapping Properties page, which should resemble the following:
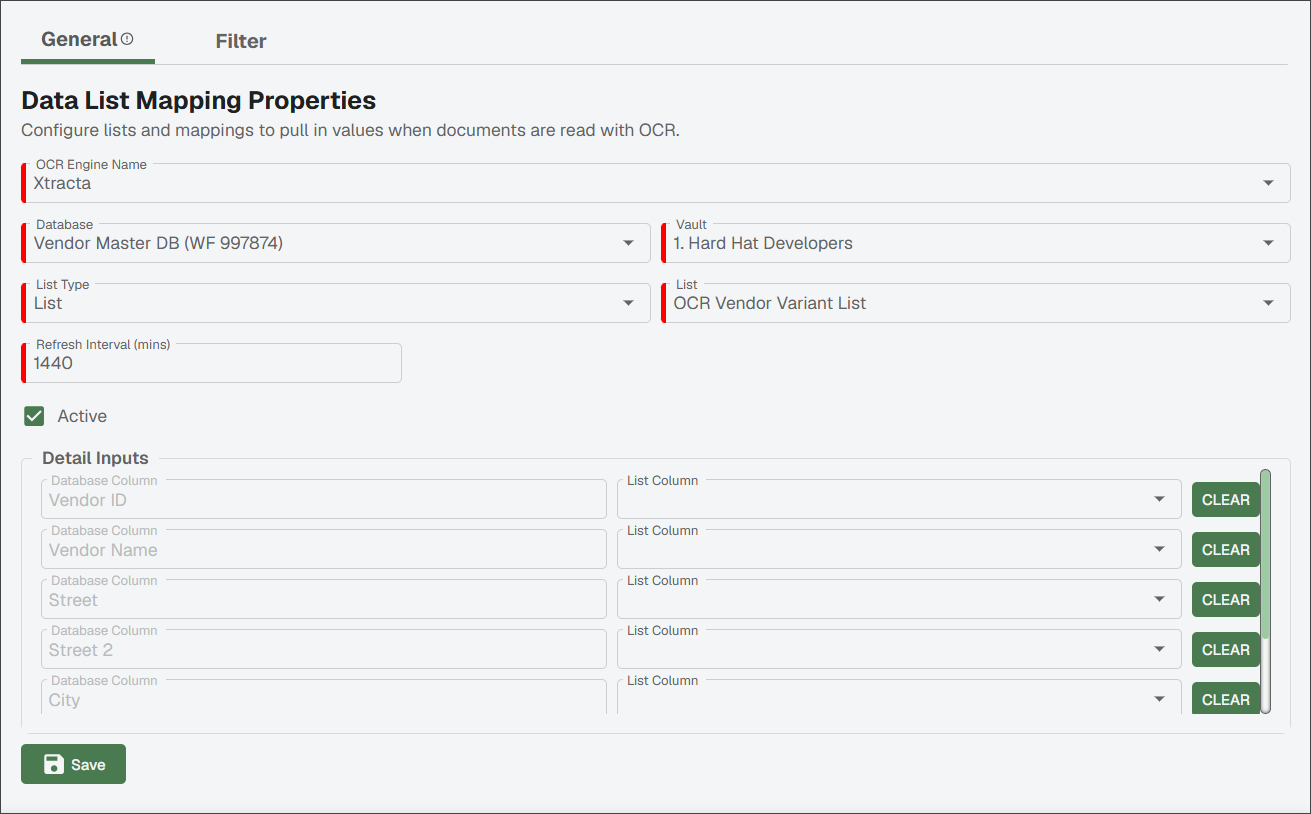
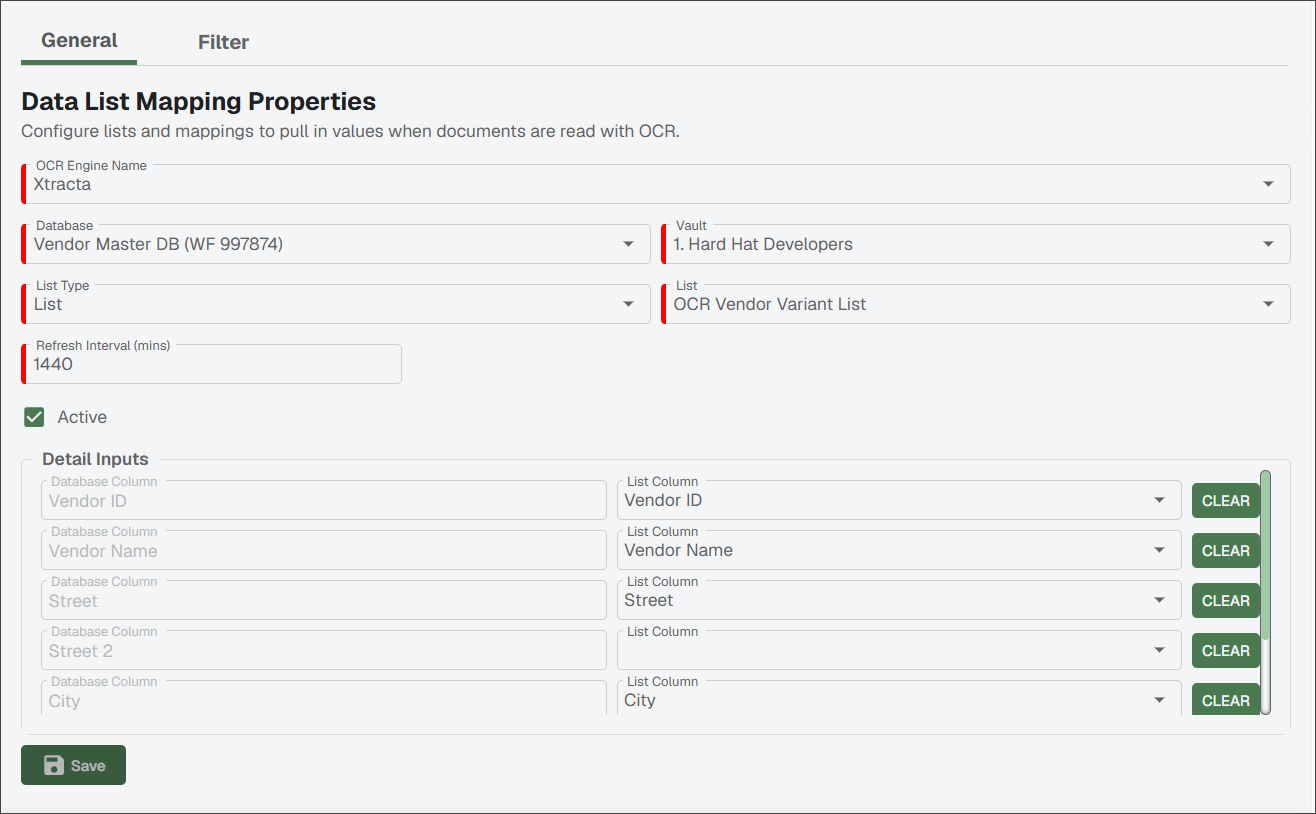
In the Detail Inputs section, select the appropriate values to populate each List Column dropdown with the information that corresponds to the Database Column.
A completed Data List Mappings Properties page resembles the following:
Click .
Once you have saved the General page, the Filter tab becomes active.
Click the tab.
Note
Use this functionality to identify criteria, such as obsolete vendors, that should not be included in your OCR data lists. With specific data removed, the volume of applicable criteria needing to be systematically searched is reduced.
From the Column dropdown, make a selection.
Note
The column headings that display depend on the data list you are syncing.
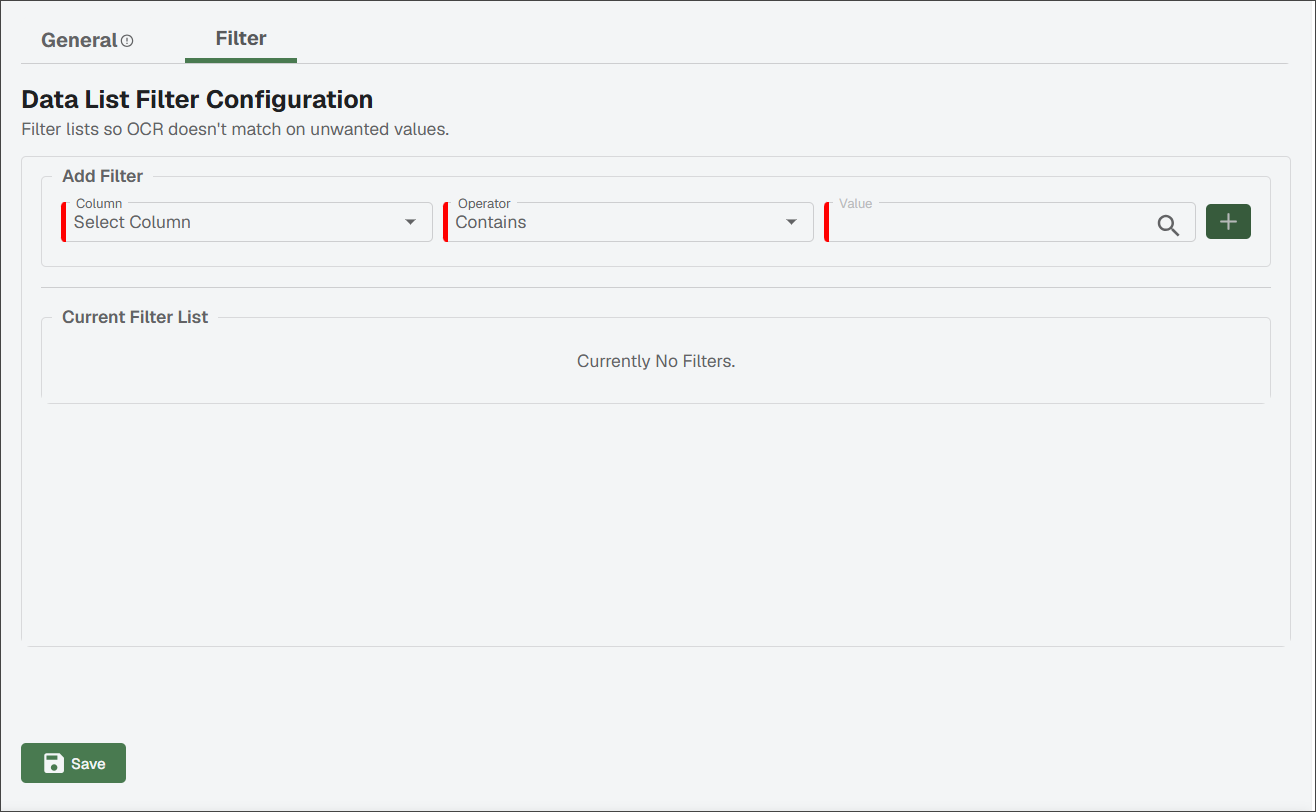
From the Operator dropdown, selection one of the following:
(default)
In the Value field, manually enter a selection.
Note
If you are unsure of which value to enter, click the Lookup
 icon or press to display the Lookup dialog from which to select the value.
To add to the filter criteria, click the
 .
.Click .
Complete the following steps to make revisions to an existing mapping.
On the OCR - Data Lists page, click the Edit
 icon on an existing data list mapping.
The GENERAL tab displays with its fields populated.
Make the necessary updates, then click .
Configure OCR Workflows
Complete the following steps to find your pre-configured workflows:
From My Paperless, click .
In the Global Settings navigation bar, click .
From the OCR dropdown, click .
A page similar to the following displays:
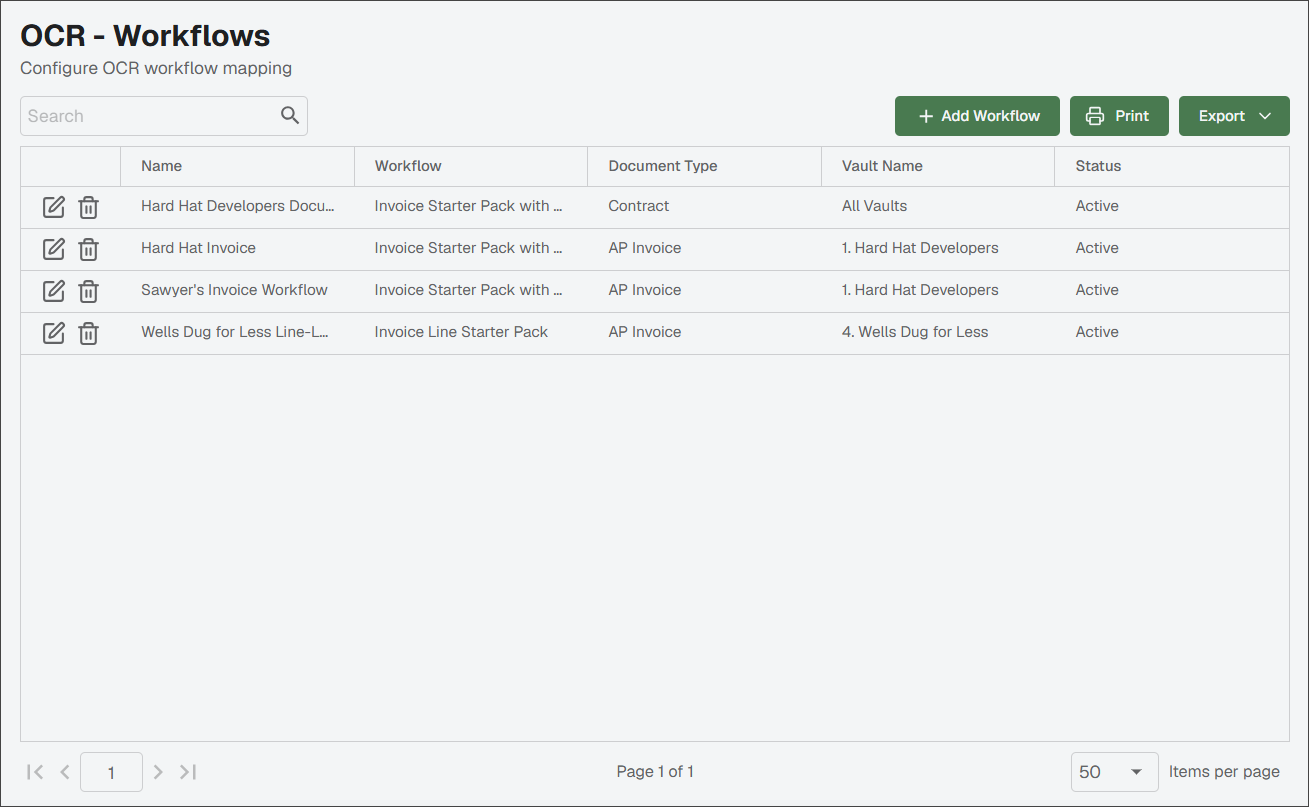
From this page you can add new mappings or edit the existing workflows.
Select a workflow to map header only fields or both header and line level fields, as appropriate.
On the OCR - Workflows page, click .
A blank Workflow Mapping Properties page displays on the General tab.
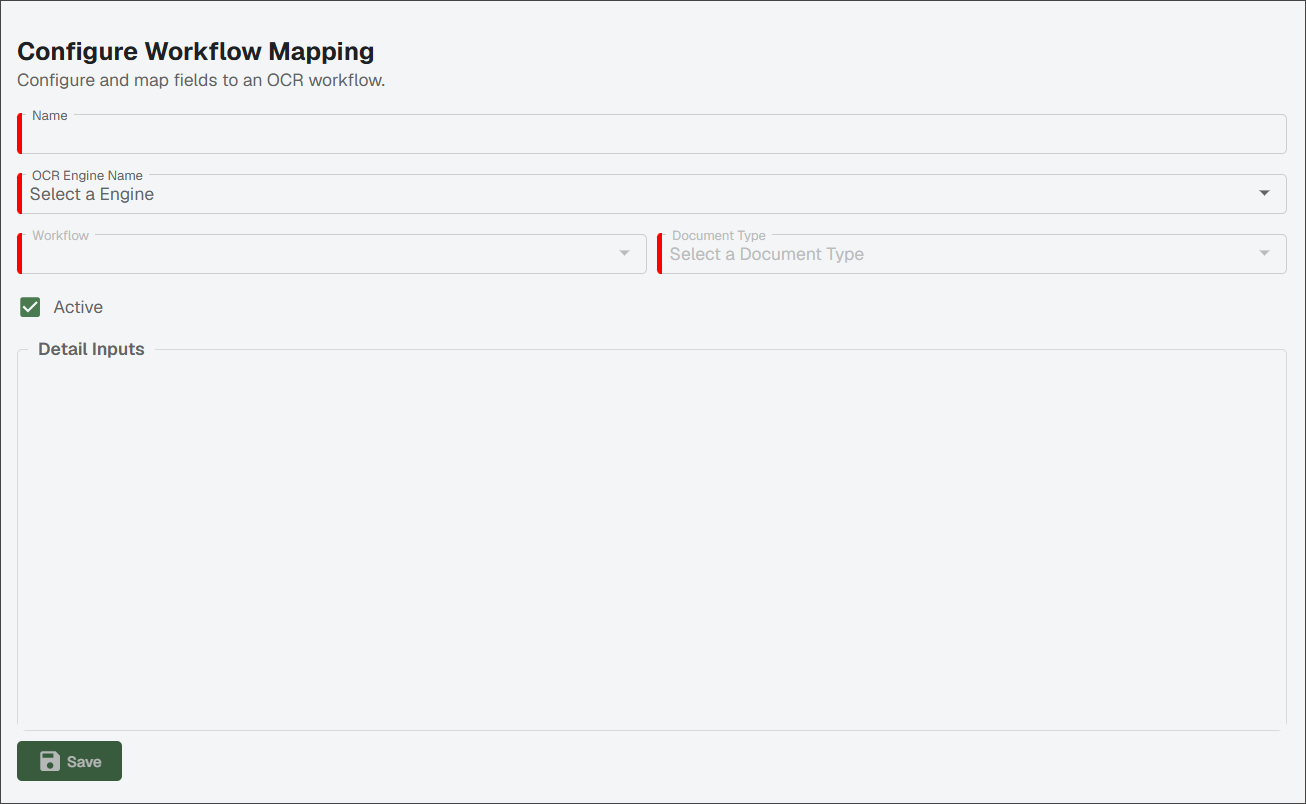
Enter the necessary information into each of the fields as described in the table below:
Mapping Information
Name
In the Name field, enter a unique name for this workflow mapping. This is a required field.
OCR Engine Name
Use the OCR Engine Name dropdown to select the engine. This identifies which engine is being used to drive the OCR functionality. This is a required field.
Workflow
In the Workflow dropdown, select any of the available workflow templates.
This is a required field.
Document Type
In the Document Type dropdown, select the appropriate document type. Selecting populates the Invoice Processing section with a list of entry fields that display on the Invoice Entry page.
Active
The Active check box is selected by default. If this mapping is not active, click to remove the checkmark.
There is no way to delete a mapping.
Invoice Processing
Process
Use the Process dropdown to identify the process.
Select the dropdown to OCR invoice documents through Invoice Entry.
Select the dropdown to OCR invoice documents and index them into the system instead of having them move through Invoice Entry.
Note
The Vault field does not display with this process option is selected.
Vault
Use the Vault dropdown to select the appropriate vault.
Note
This field does not display when Index Only is selected from the Process dropdown.
Detail Inputs
The fields that display in this grid are based on the list you selected from the Document Type dropdown.
Review the partially completed Workflow Mapping Properties page, which should resemble the following:
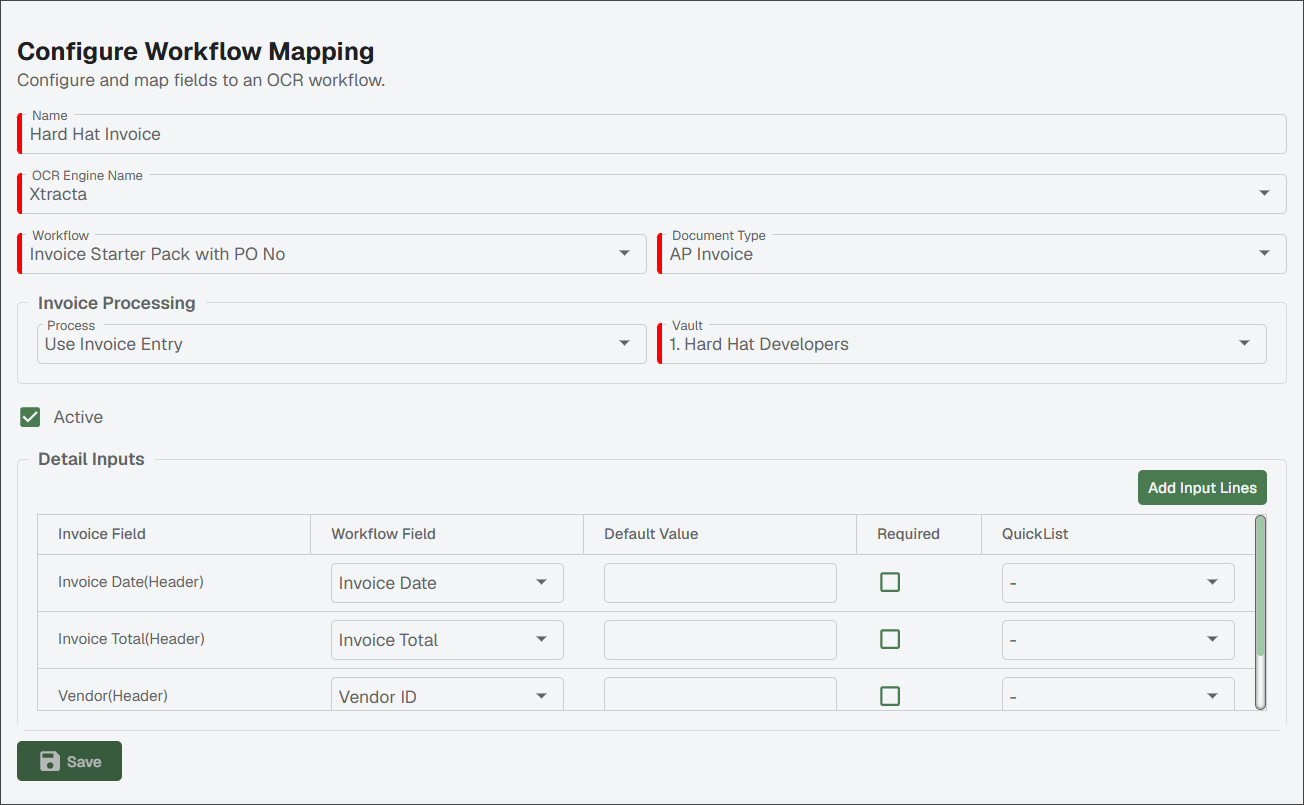
In the Detail Inputs section, click .
The Optional Input List dialog displays:
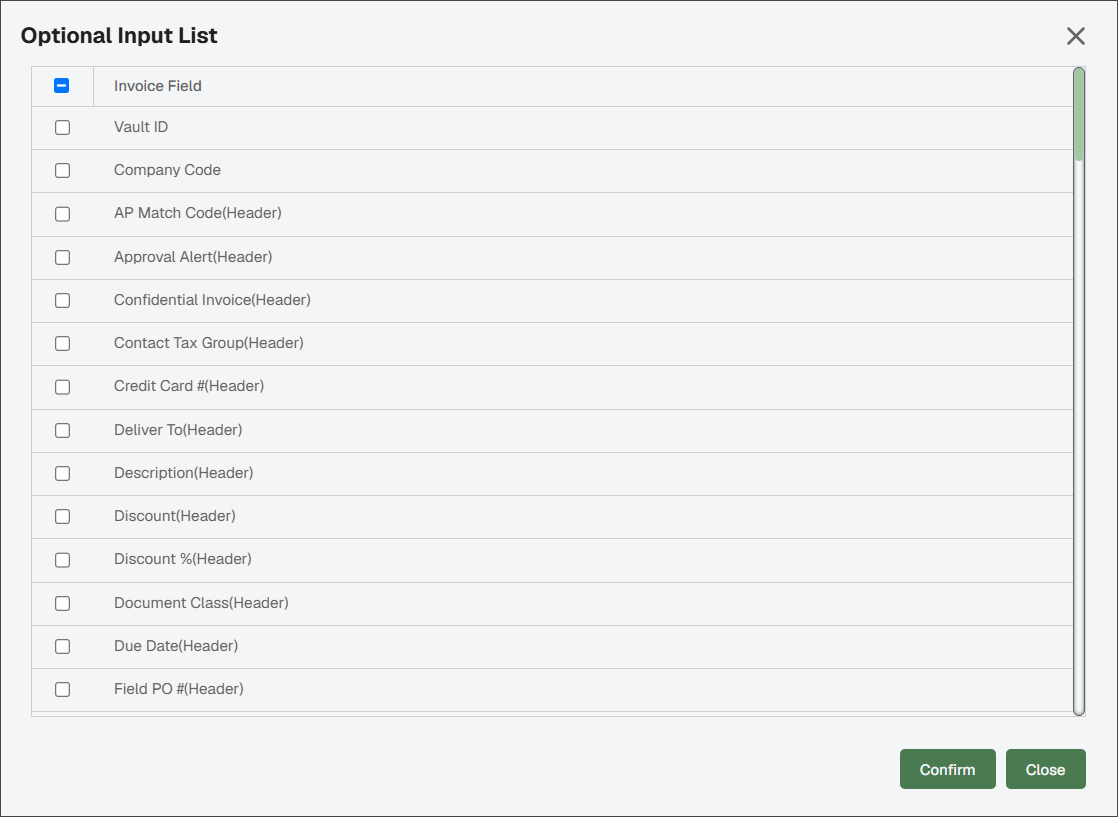
For each check box selected on the Optional Input List, a corresponding row systematically displays in the Detail Inputs pane. If indexing a document, you can select from the list of index fields assigned to the selected document type. If processing through Invoice Entry, you can select from just header fields or from both header and line level detail fields based on the workflow you selected.
Click .
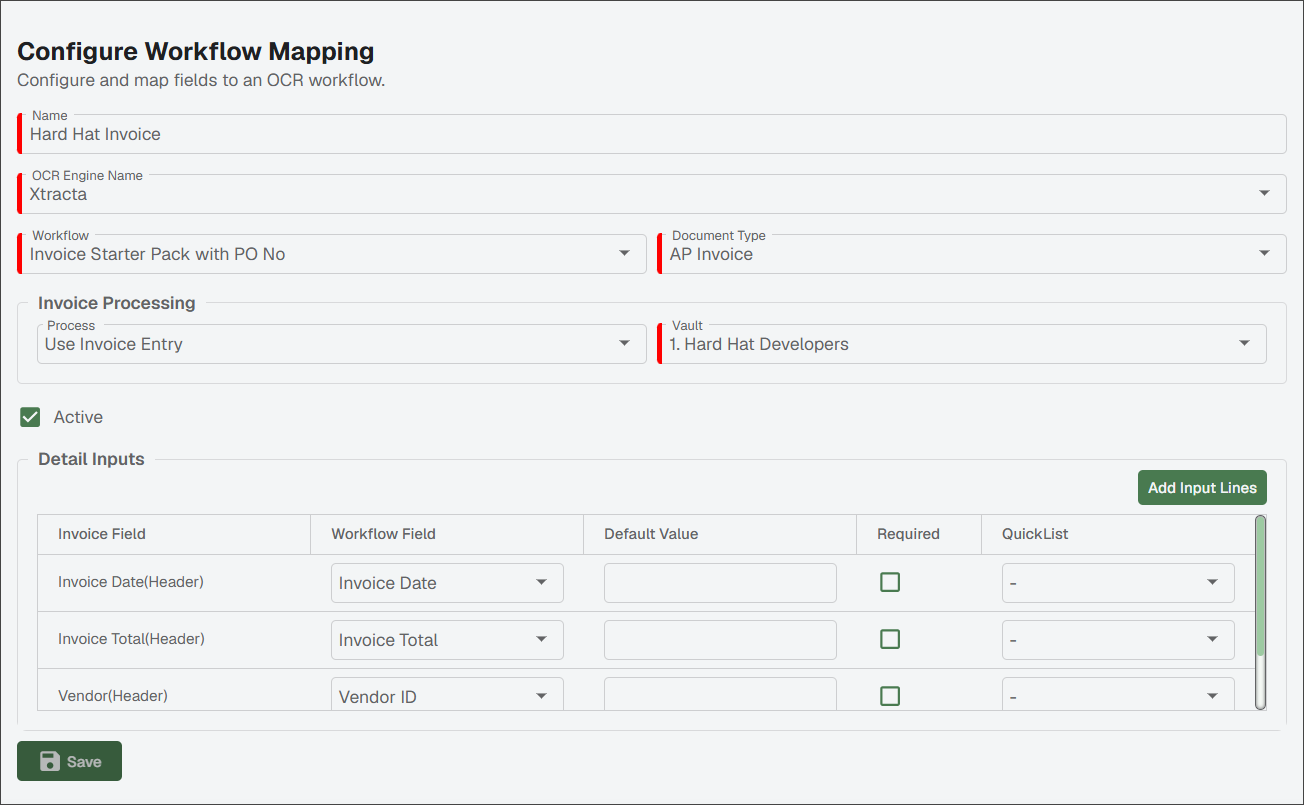
In the Detail Inputs section, select the appropriate values to populate each Workflow Field to identify which fields are going to be captured from each document.
Invoice/Index Field
This column is populated based on the fields you select from the Optional Input List. The fields displaying in the Optional Input List reflect the document type you selected from the Document Type dropdown.
Workflow Field
A dropdown list of all OCR fields for the selected workflow displays in this column. Use the dropdown to assign the Capture field to the index or invoice field in Sage Paperless Construction.
Default Value
You can enter any free form value here to provide a static default value for the Index or Invoice field. No Workflow OCR should be selected as it is going to be overwritten by this default. Entries displaying here are hard coded.
Required
If a check box is selected in this column, on return from OCR, a value must be populated in this column through OCR or Sage Paperless Construction backfills for the document to save. If any field is missing, the document remains in the queue to be processed manually. As non-invoice documents return from OCR, backfills are automatically run so this functionality can be used to prevent saving a document into the system that did not backfill successfully.
QuickList
You can select a quicklist to automatically open when the invoice is first accessed. In the dropdown, you can select from either the PO Lookup or the Subcontract Lookup. If a value has been captured by OCR, the quicklist displays the appropriate commitment lines and pre-selects all to facilitate quickly adding the commitment to your invoice. For any commitment (subcontract or purchase order), if the invoice total captured by OCR equals the commitment total, then the commitment lines are systematically added and invoice auto-routed.
Note
If PO lines are added but missing the PO line number, OCR logic determines the PO line number based on an exact unique match on the Material/Inventory Item field.
If a check box is selected in the Required column, on return from OCR, a value must be populated in this column through OCR or Sage Paperless Construction backfills for the document to save. If any field is missing, the document remains in the queue to be processed manually. As non-invoice documents return from OCR, backfills are automatically run so this functionality can be used to prevent saving a document into the system that did not backfill successfully.
Note
If you entered information in either the Workflow Field or the corresponding Default Value column, or both, click on that row to remove any text from the columns.
A completed Workflow Mappings Properties page resembles the following:
Click .
Complete the following steps if revisions are needed to an existing workflow mapping:
On the OCR - Workflows page, click the Edit
icon on an existing workflows mapping.The General tab displays with its fields populated.
Make the necessary updates, then click .
Configure OCR Queues
The final step in the OCR configuration process is to assign the workflow mappings to the applicable OCR queue(s).
In Global Settings, make sure that the queue you want to use for Paperless OCR has the Active and OCR check boxes enabled. You can do this by editing the queue or selecting it when you Add a User Queue.
Note
You must have System Administrator permissions to access Global Settings.
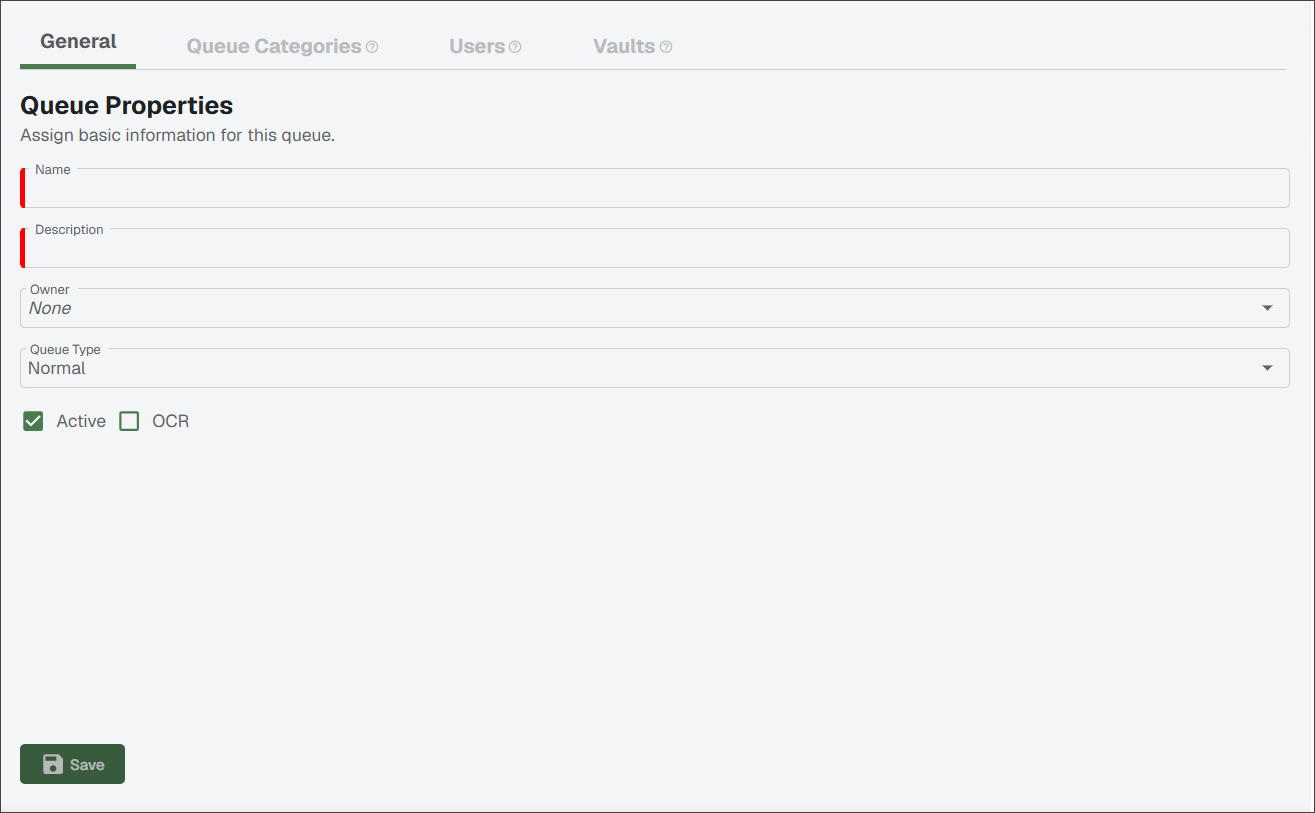
Proceed through the Queue Categories, Users and Vaults tabs, making sure the queue displays in the proper places and is visible to the right people.
Click .
In Vault Settings, make sure that the queue you want to use for Paperless OCR is assigned to your vault as shown in Vault Queue Configuration.
Select your OCR queue from the list.
The following page displays. Because the queue was assigned to OCR, an OCR Workflow Settings pane displays at the bottom of the page:
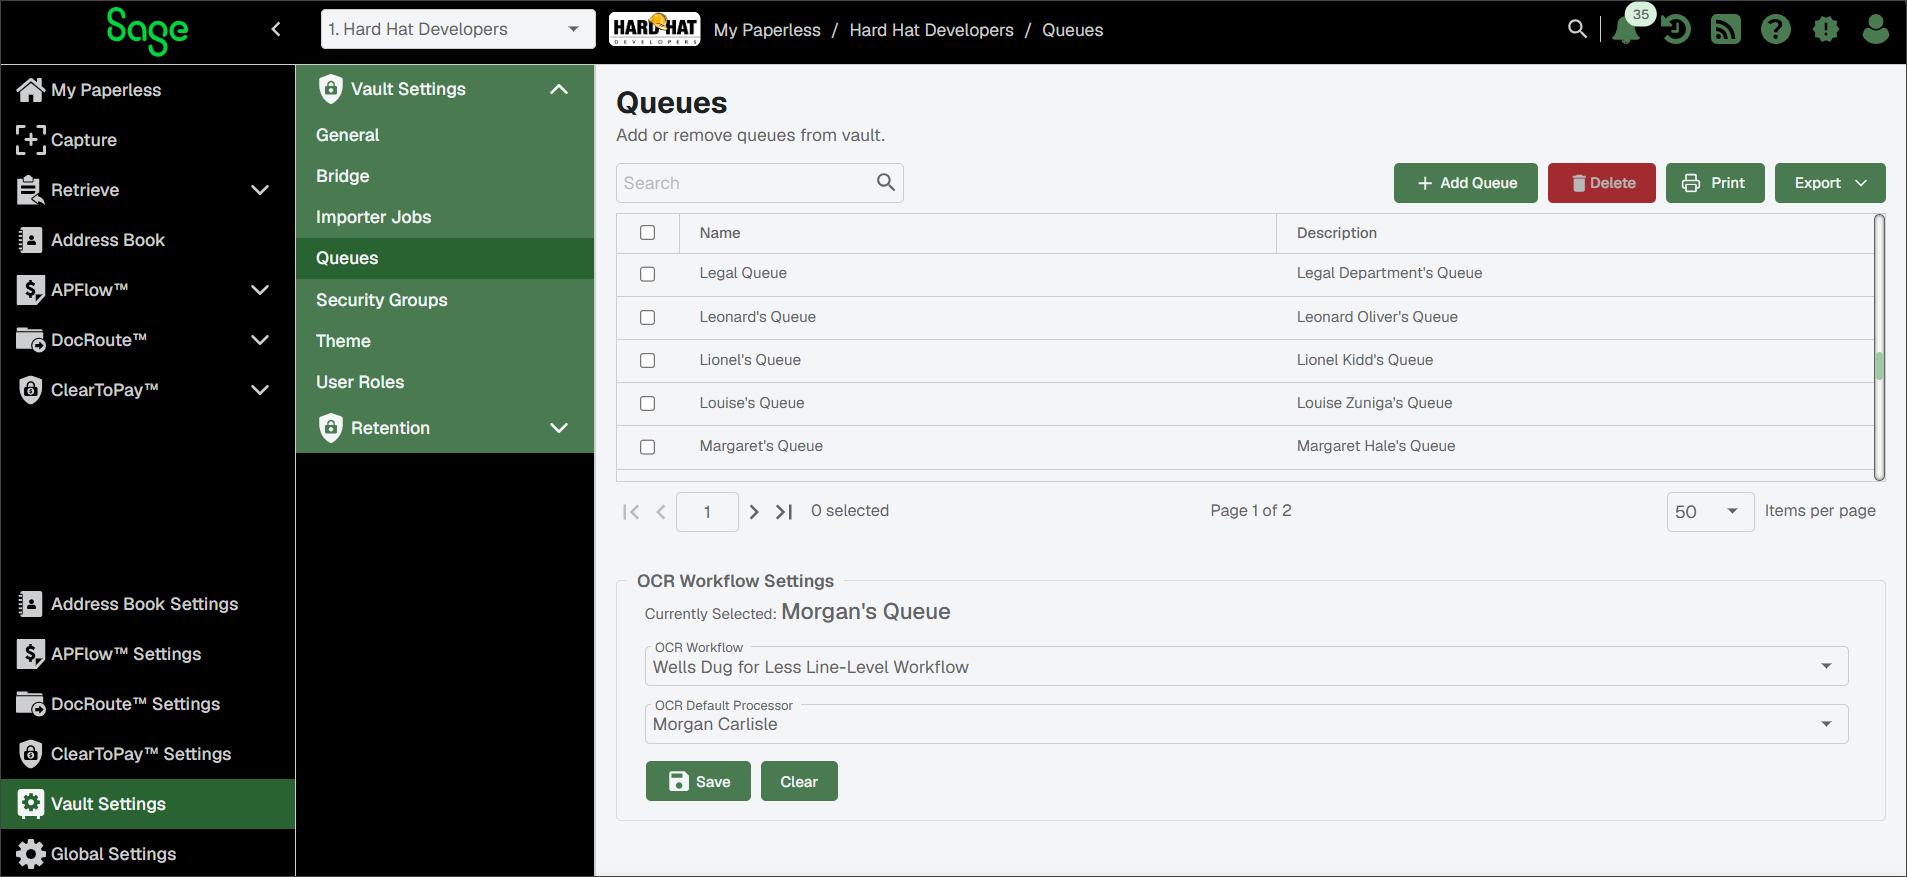
From the OCR Workflow dropdown, select the workflow you want to apply to this queue from the list.
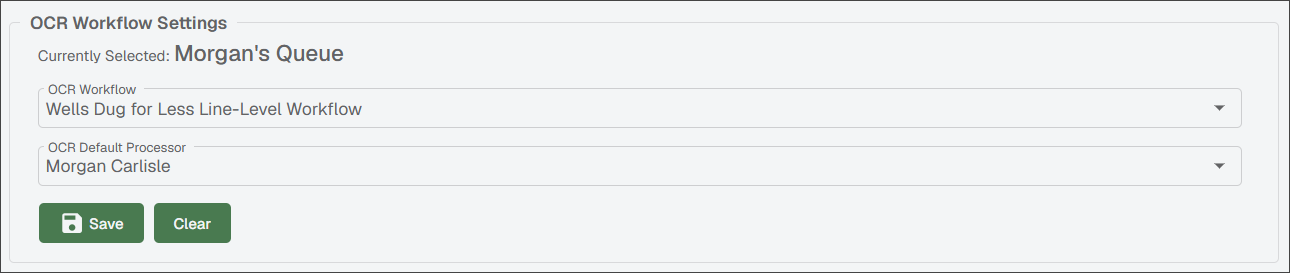
From the OCR Default Processor dropdown, select the user you want to process the invoices or documents that are delivered to this queue.
Clear an OCR Workflow Mapping
If a queue no longer needs to be used for OCR, complete the following steps to clear the workflow mapping and remove the association.
From My Paperless, click .
In the Vault Settings navigation bar, click .
Select the queue you want to remove OCR from.
Click .
The OCR workflow settings are updated and the dropdowns display default information: