Use Credit Card Importer and its Features
The Credit Card Importer page serves as a central workspace for managing imported transactions—from reviewing unassigned items to organizing them into invoices, matching receipts and handling related vendor details—through to finalized imported invoices.
Complete the following steps to access this page:
From My Paperless, click .
From the APFlow™ navigation bar dropdown, click .
The Credit Card Importer main page displays:
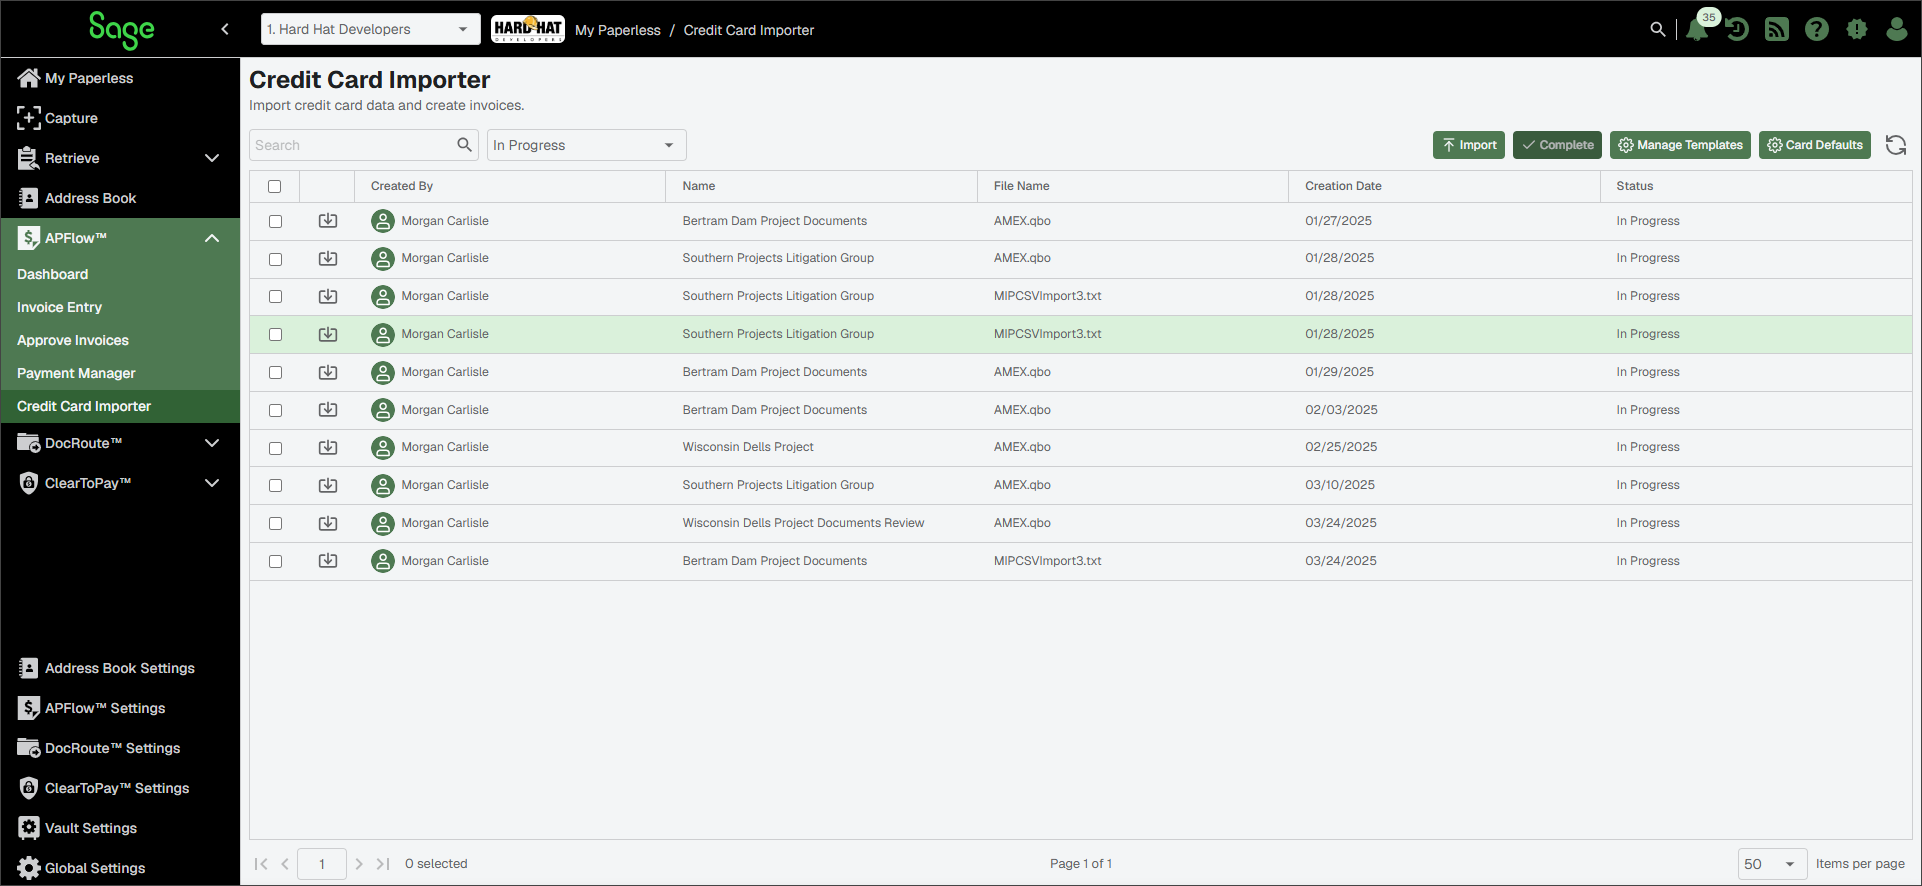
Highlight an existing import.
Note
For details on creating a new import, click Create a New Import.
Click the Open
 icon.
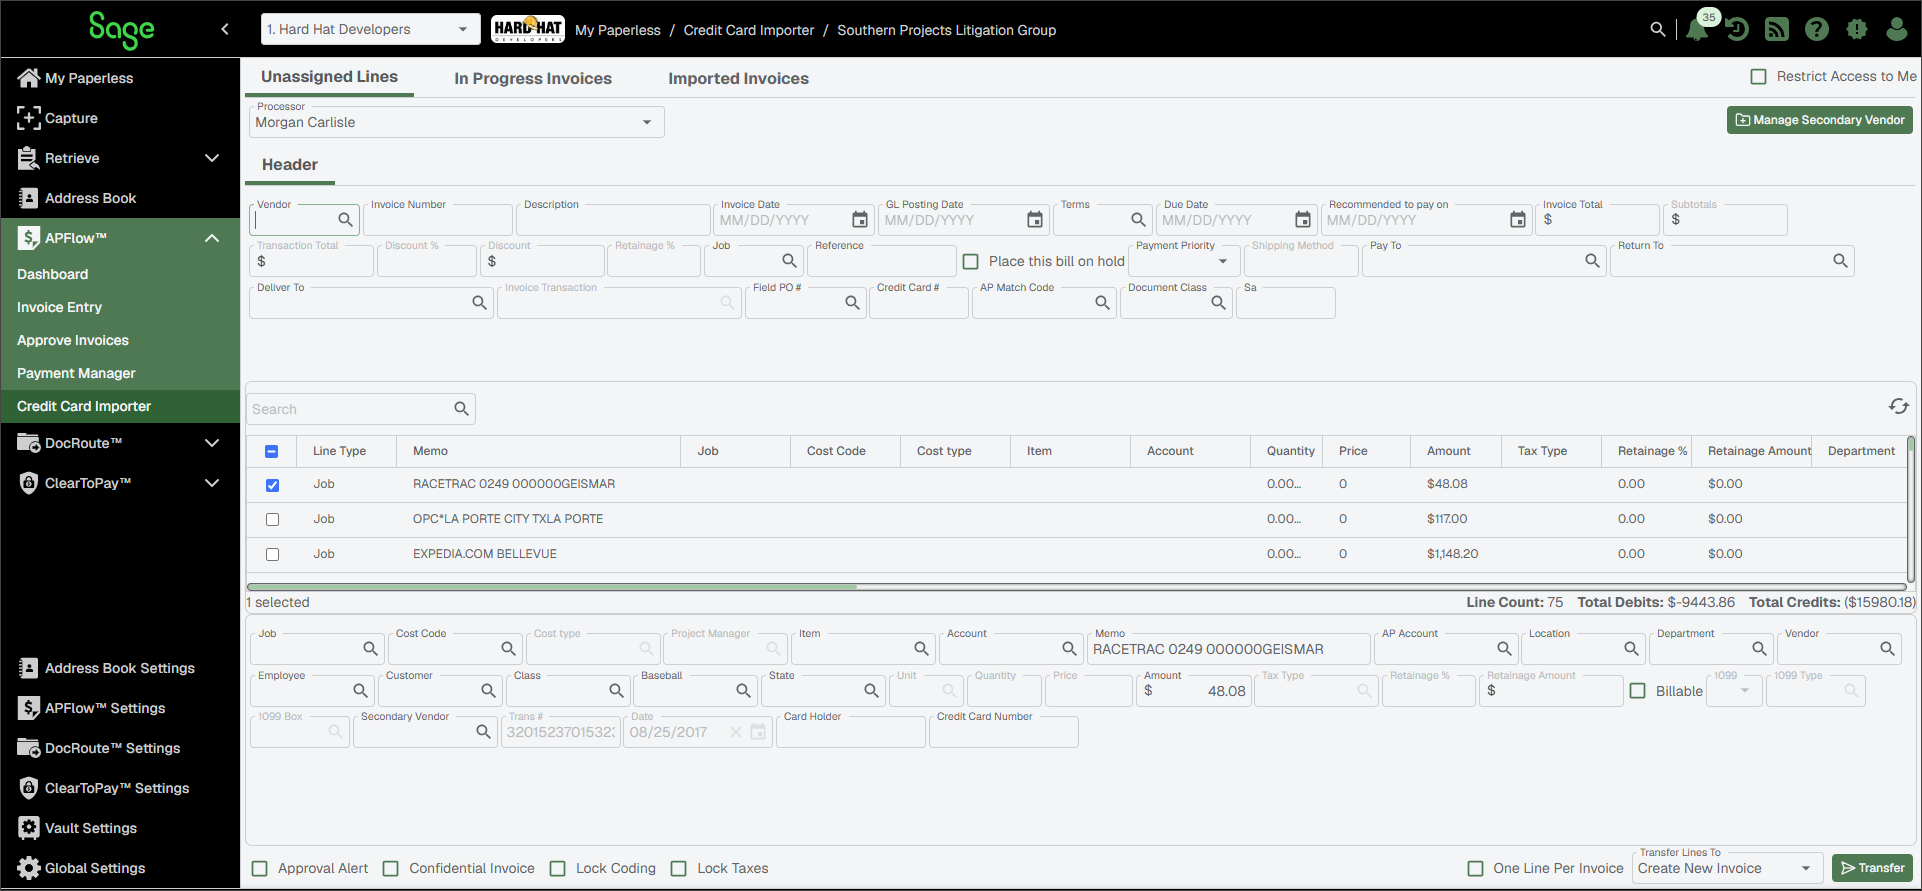
icon.The Credit Card Importer page similar to the following displays with the Unassigned Lines tab active:
Note
This page has three main views, reflected in the tabs at the top of the page:
Unassigned Lines: Displays when starting an import, and includes all unassigned transactions. Beneath the Line Details section, the following transaction information displays:
The Line Count figure represents the number of lines left to be distributed.
The Total Debits figure represents the sum of all positive transaction amount values.
The Total Credits figure represents the sum of all negative transaction amount values.
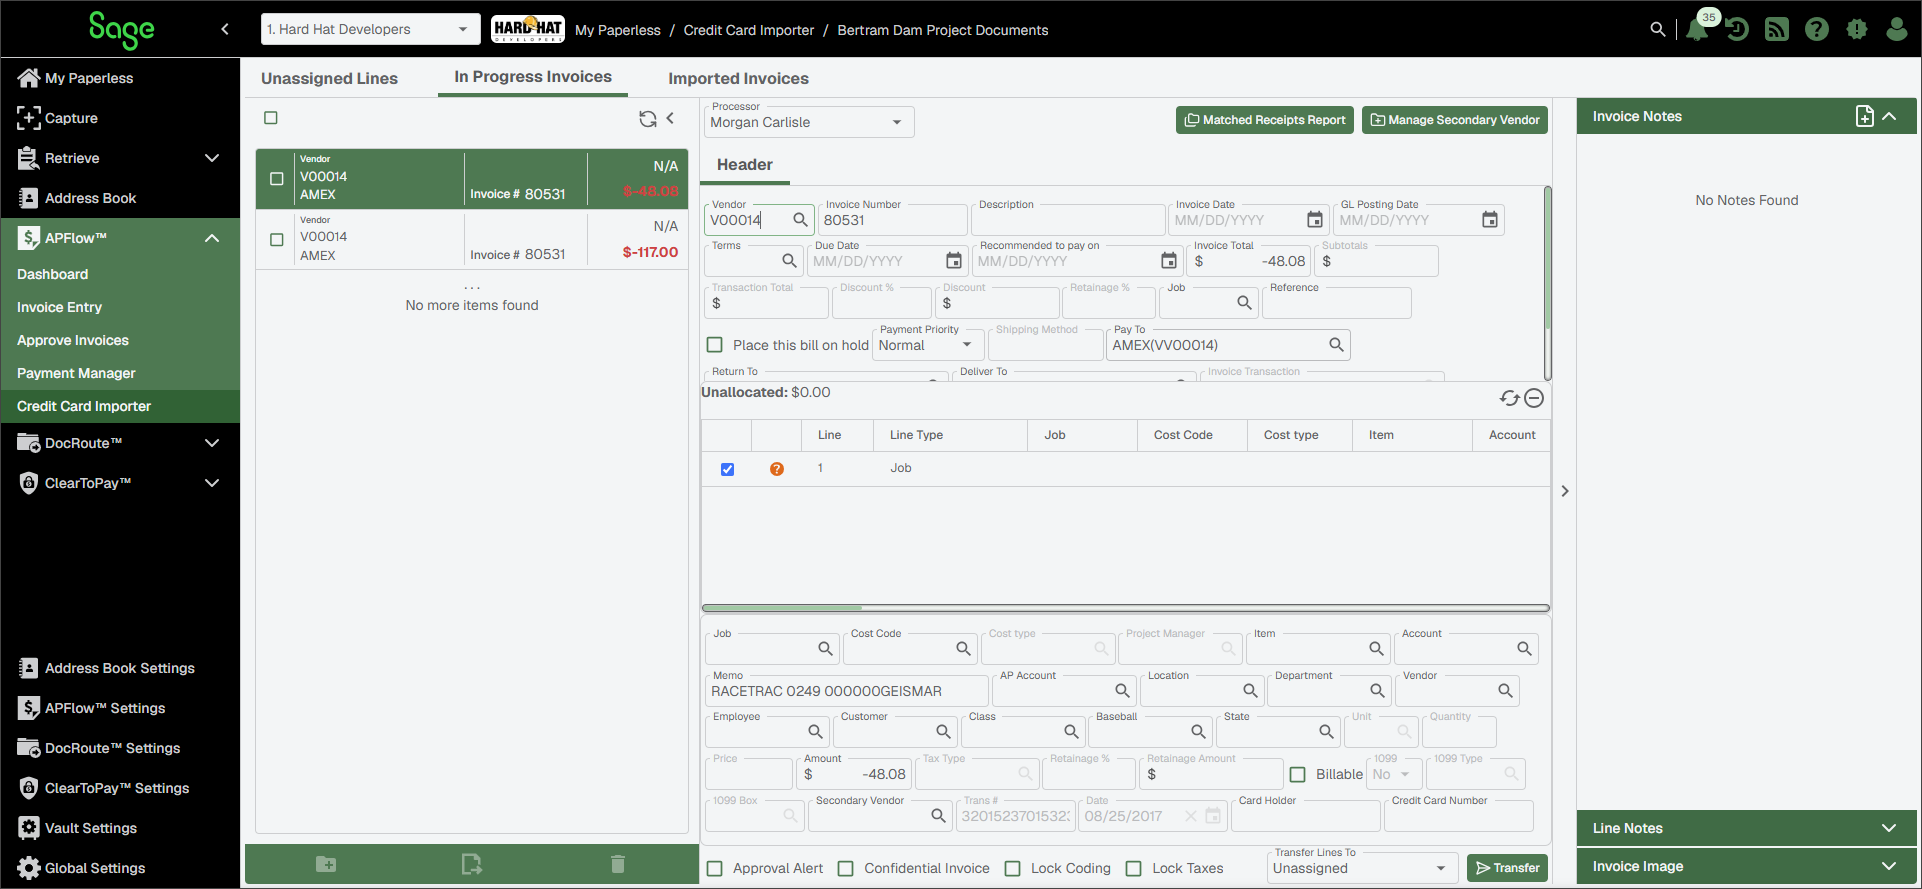
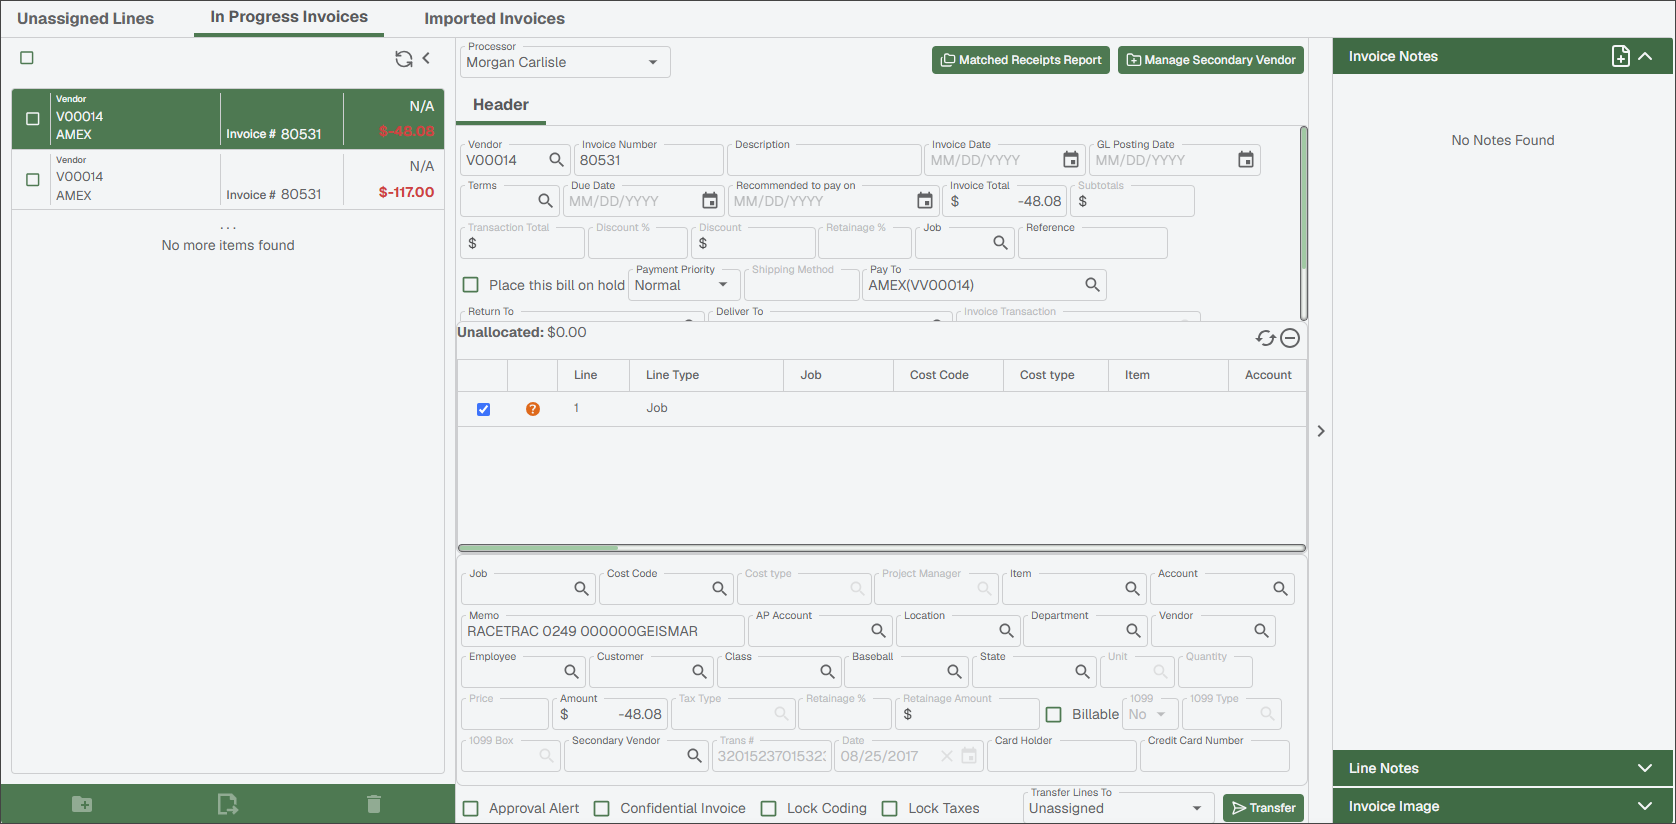
In Progress Invoices: Displays a list of invoices that are in progress in the left pane and detail specifics for a selected invoice in the right pane. This page also includes a sidebar to the right of the invoice area.
For more information, see How to Use the Sidebar in Sage Paperless Construction.
Imported Invoices: Displays a list of invoices that are in progress in the left pane and line detail specifics for a selected invoice in the right pane.
Process Unassigned Credit Card Transactions
When the Credit Card Importer main page displays, all the unassigned transactions in the imported file that have not yet been transferred to invoices are listed.
Complete the steps below to access the Unassigned Lines tab and process the transactions:
Click the Open
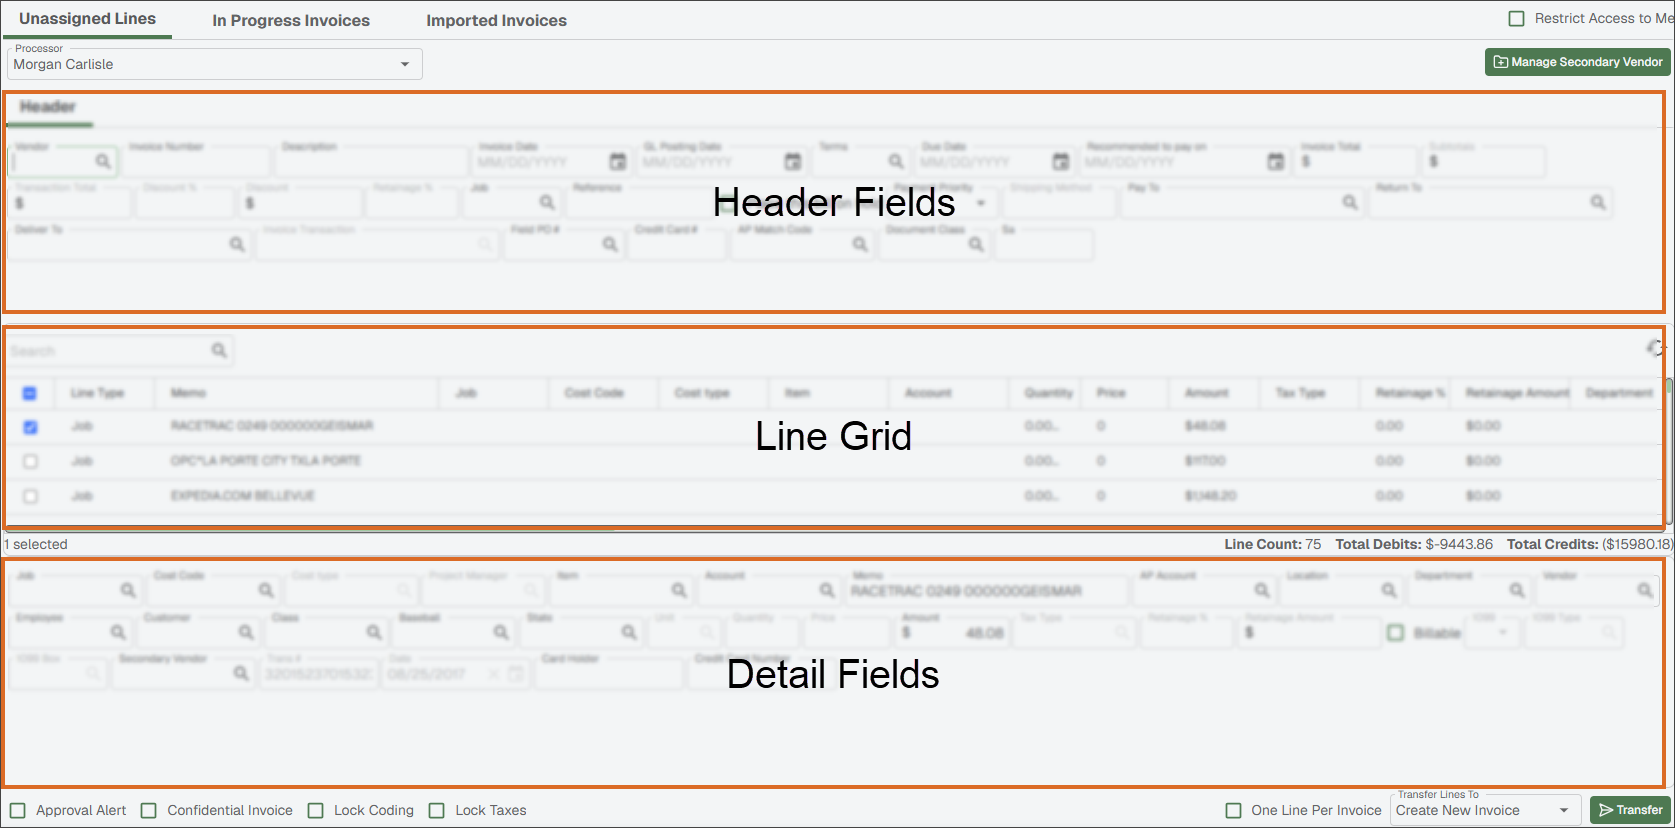
icon to open the imported transaction.The page that displays is broken out into the following panes:
(Optional) In the Processor dropdown, select an individual from the list to change/assign a processor.
If access to this credit card import should be limited, and you did not click the Restrict Access to Me check box when creating the New Credit Card Import , you can click the check box displaying in the tab header.
Note
Individuals in a Supervisor role can view import files with restricted access.
In the Header Fields pane, enter all default values associated with the pending new invoice.
In the Line Grid pane, where the unassigned transactions display, select the check box(es) for any or all of the listed unassigned transactions.
Note
The grid dynamically displays columns based on what is mapped in the template.
Important
If each of the selected transactions should be on separate invoices, click to select One Line Per Invoice. This check box is enabled when Create New Invoice is selected in the Transfer Lines To Invoice dropdown.

You can set the secondary vendors now by clicking .
See Secondary Vendors for more information on mapping vendors.
In the Details Fields pane, enter any default values that are valid for the invoice lines.
Important
Not all defaulting occurs in this page. Some defaulting field values generate after the line(s) transfer to an in-progress invoice.
Select from the Transfer Lines To dropdown.
Note
This moves the selected lines from unassigned transaction(s) into a single New Invoice or a series of New Invoices (if One Line Per Invoice is selected).
Proceed to Transfer Lines.
Transfer Lines
Important
Before transferring lines into invoices, you must complete the steps shown in Process Unassigned Credit Card Transactions.
Click .
The invoice(s) now display in the In Progress Invoices tab.
Note
When the Transfer Lines To dropdown entry is selected and the selected transactions are moved to an In Progress Invoice, the field setting defaults move too.
Click the In Progress Invoices tab.
Note
Invoice-specific information displays here. This page is set up to mirror the Invoice Entry page functionality in APFlow. This includes the ability to change the line type by clicking
 for a highlighted line as well as removing a highlighted line
  .
.
If appropriate, use the Transfer Lines to dropdown to return the selected transaction(s) back to the Unassigned Lines tab. Or, you may delete selected invoices by clicking
 .
.
Use this functionality to move transaction lines from one invoice to an existing invoice.
Click to highlight an invoice in the In Progress Invoices tab.
In the Line Grid pane, highlight to select the line(s) to transfer.
From the invoice dropdown, select the In Progress Invoice where the transaction line should move.
Note
If Unassigned is selected, the transaction line(s) move back to the Unassigned Lines tab.
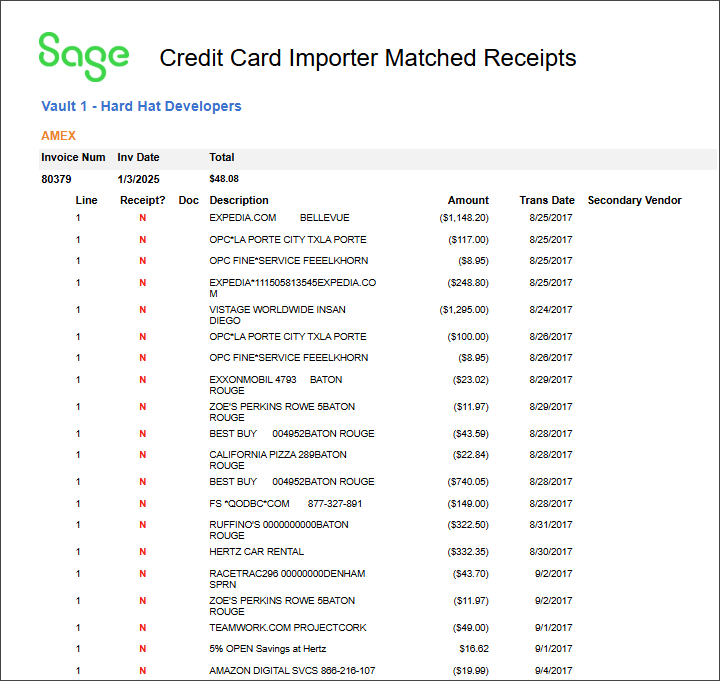
Use the Matched Receipts Report to determine which lines/invoices have matched receipts. Using this report, you can quickly determine if any lines do not have matches so you can easily find and match them.
From the In Progress tab, click the to launch the report in a new browser window.
The report provides a listing of all in-progress invoices and accurately shows which lines on those invoices have matched receipts. If there is no match, a red N displays in the Receipt? column.
 |
Match Receipts in Credit Card Importer
Match criteria for invoices and receipts are:
Transaction Date
Vendor
Transaction Amount
On the Credit Card Importer - In progress Invoices tab, select the invoice you want to match from the grid.
Click the Match Receipts
 icon.
icon.The Match Receipts dialog displays:
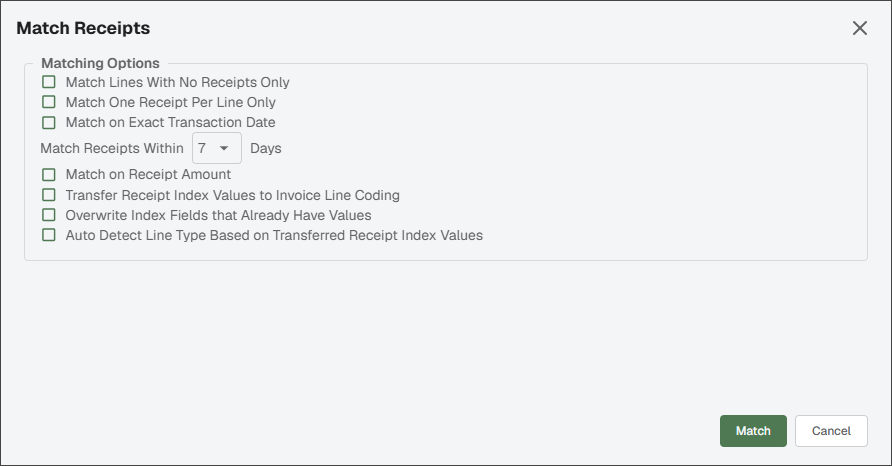
In the Matching Options pane:
Select to match on receipts to transactions without existing matched receipts.
Select to allow one receipt match per line, even if all receipts and lines share same vendor, amount and transaction date. If checked, the receipt match should match the first receipt to the first line, the second receipt to the second line, and so on until there are not more receipts to match.
Select to limit the match to the current date.
Use the dropdown in the Match Receipts Within x Days to select a number (1-7) that represents a window of time from the current transaction date. The range can be set from up to seven days in the past to up to seven days in the future.
Select to narrow the match search by a specific receipt amount.
Note
If multiple matches are identified, the first match in the list is systematically selected.
Select so that if multiple matches are identified, the first identified match index values are applied to the invoice line coding.
Select to ensure that any information manually entered in invoice fields is overwritten when a receipt is matched.
Select (Transfer Receipt Index Values to Invoice Line Coding must also be selected), so that receipt index values are systematically applied to the invoice line coding.
Click .
Invoice lines include matched receipt indicators to show if a single receipt was matched, if multiple receipts were matched, or if no receipts were matched. If no receipts have been matched, clicking the icon generates a Find Receipts dialog.
In Credit Card Importer, you can review multiple lines at once, by running the Run the Matched Receipts Report.
Note
Line Level Matching is available in Invoice Entry, Approve Invoices and Credit Card Importer.
Note
If the Receipt  icon displays, a single receipt was matched and no further receipt matching is necessary for that invoice line.
Choose a method to systematically get receipts, either through a request to a user or by searching the system.
Requests
Click the Match Receipts
 icon.
icon.The Find Matching Receipts dialog displays:
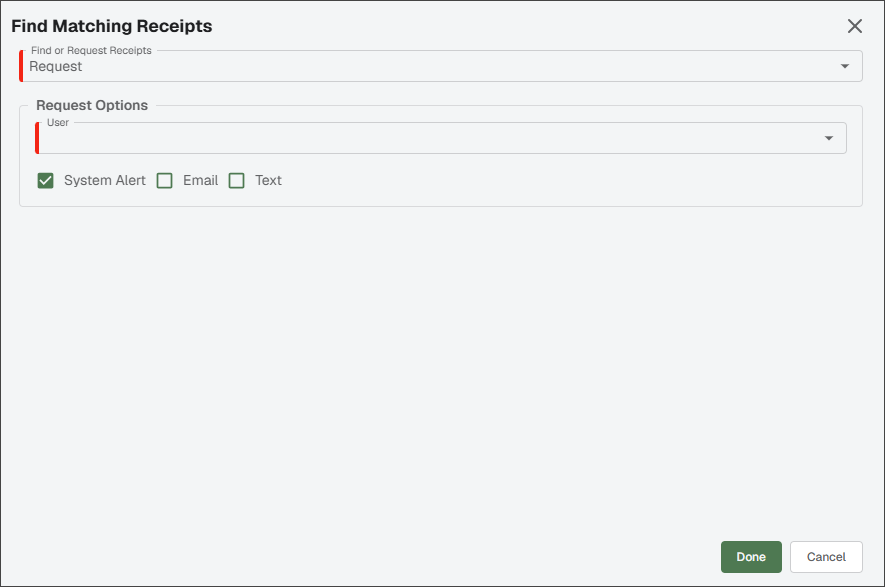
From the Find or Request Receipts dropdown, select Request.
In the User dropdown to select the user to whom the receipt request should be sent.
From the three check boxes (, , ), select the best method of sending the receipt request.
Click .
Search
Click the Match Receipts
icon on the line.The Find Matching Receipts dialog displays:
From the Find or Request Receipts dropdown, select .
The Criteria tab displays where you can enter keywords and/or advanced search conditions:
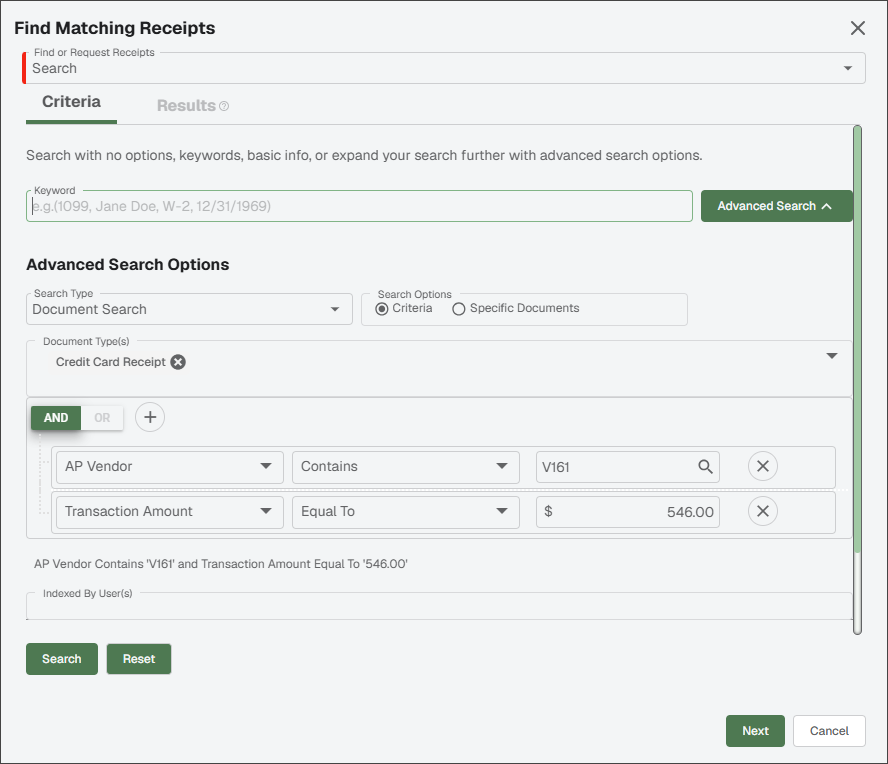
Click Search.
The Results tab lists potential matches.
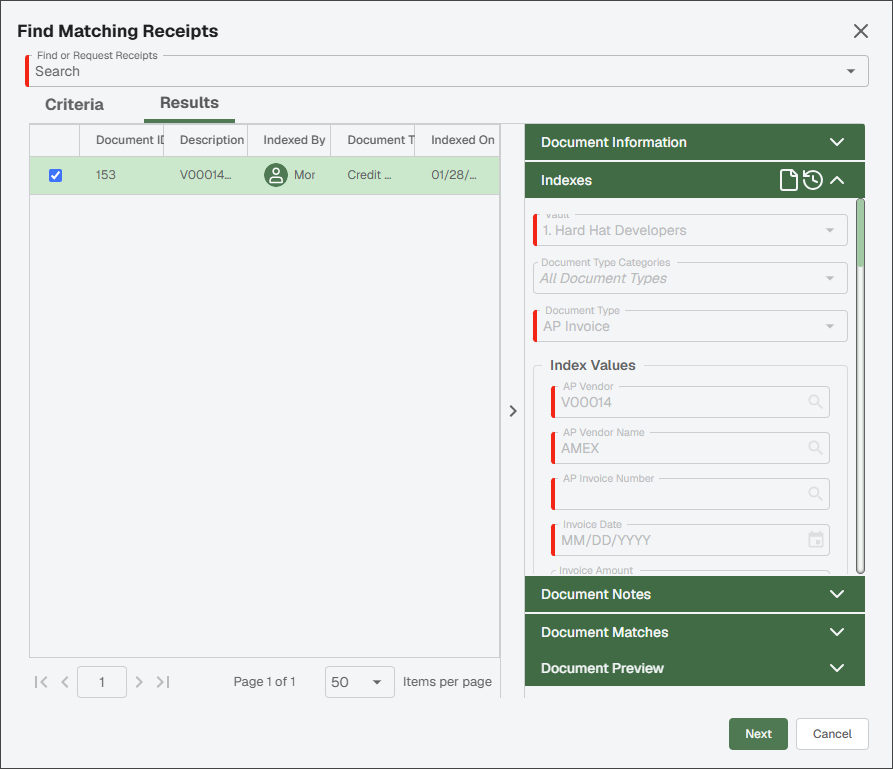
Click to select the entry.
Click .
Select the appropriate Match Receipt Option(s).
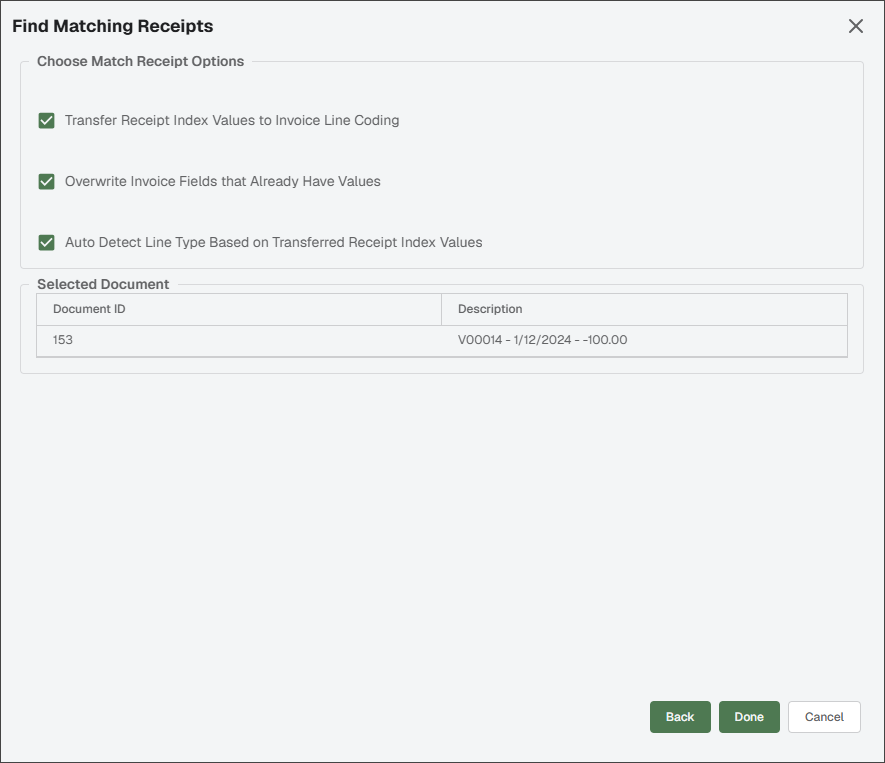
Click .
The In Progress Invoices tab redisplays and includes the
icon for the line with the matched receipt.
Secondary Vendors
Secondary Vendors on a credit card statement refer to those businesses/individuals from whom goods and services were purchased and were paid by credit card. The entries on the credit card statement are a record of those purchases.
Click .
The Manage Secondary Vendors dialog similar to the following displays:
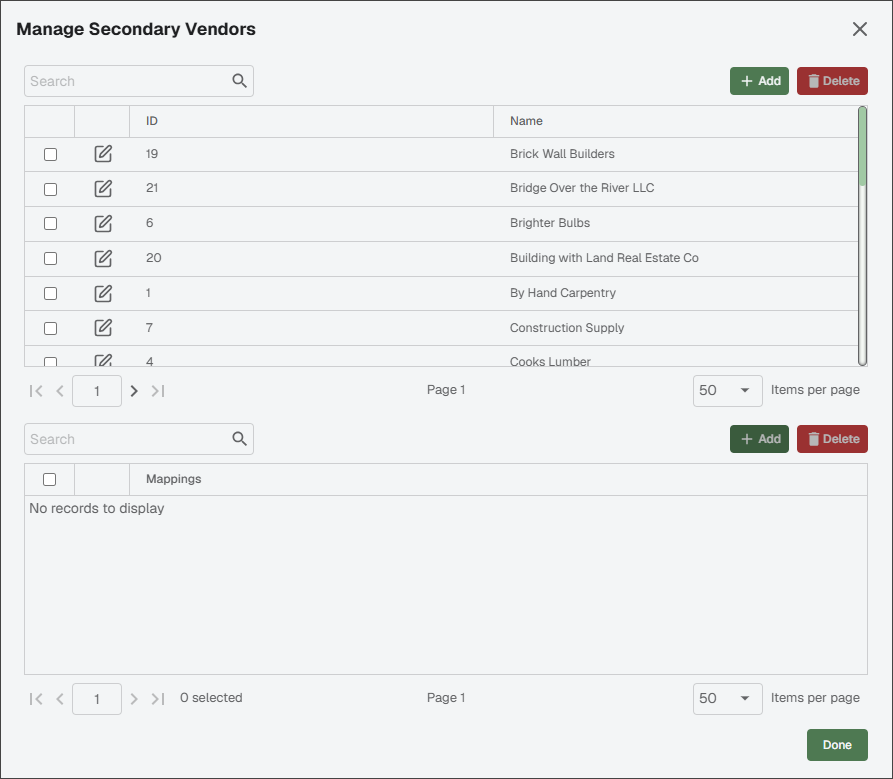
You can click at the top of the dialog to add a new secondary vendor to the list. If the vendor already exists, begin typing their name in the Search field to narrow the search list.
Select the vendor from the list.
Click .
The New Secondary Vendor Mapping dialog displays:
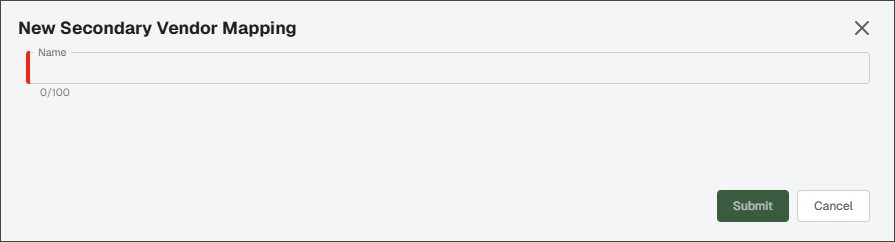
In the Name field, type the name for the mapping.
Click .
Click .
Secondary vendors visible in the Vendor Mappings pane display as the actual vendor names listed on the credit card transactions.
Vendor names listed in the upper Secondary Vendor Name pane, display the corresponding unique secondary vendor names. Transaction Names in the transaction lines may be changed to unique secondary vendor names through the Manage Secondary Vendors button.
Note
To revert previously changed vendor mappings from the unique secondary vendor names to actual vendor names, click .
On the Unassigned Lines tab, set the vendor mappings:
Right click on a Transaction Name entry to reveal a dropdown list similar to the following
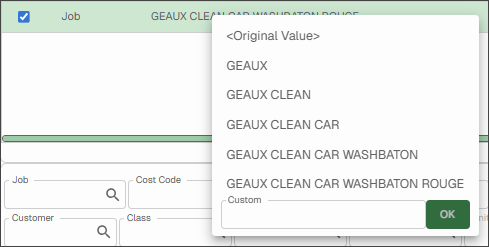
Select an entry from the dropdown list.
All exact match entries are replaced with the entry selected from the dropdown list.
In the Line Grid:
Unassigned transaction entries displaying in bold font already have a located secondary vendor.
Unassigned transaction entries displaying in normal font do not have a located secondary vendor.
Unassigned transaction entries displaying in italics, right click and select a secondary vendor manually from the list.
Secondary vendors are optional. A secondary vendor list only exists in Sage Paperless Construction. It does not exist in the bridged accounting system and has no impact on any vendor lists resident in the bridged accounting systems.
Use the Secondary Vendor Options on the New Credit Card Import page to search and filter on specific secondary vendors.
For example, American Express is the vendor. Secondary vendors would be Exxon, McDonald's, Home Depot, etc., wherever purchases were made and are reflected on the American Express credit card statement.
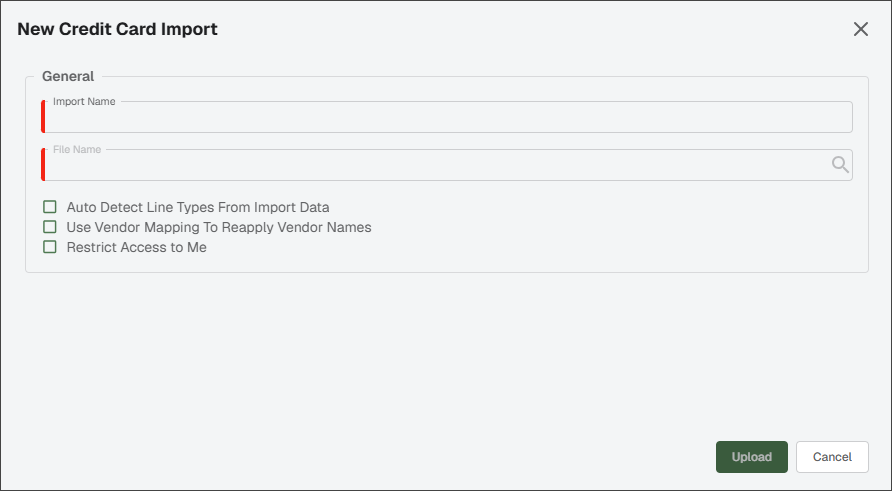 |
Under Secondary Vendor Options:
If selecting Create Secondary Vendors for Renamed Transactions, only those secondary vendors that were manually edited are included in the database. This is the default.
If selecting Create Secondary Vendors for Unique Transactions, APFlow™ captures every unique secondary vendor imported and saved in the database.
If neither option is selected, no secondary vendors are created or populated on the invoice line.
Important
These two options are also listed—and can be selected or deselected—on the collapsible box on the Credit Card Import main page.
Most APFlow™ reports are based on the vendor to which the invoice is assigned.
A special report, AP Secondary Vendor Drilldown, is available and provides historical information on the secondary vendors captured during the credit card import process.
For more information on viewing reports, see Reports List.
Imported Invoices
Important
Before importing invoices, you must complete the steps shown in Transfer Lines.
Review this page to identify what invoices were created from which credit card imports.
From the In Progress Invoices tab, click Import Invoices into APFlow
 icon.
icon.The Import Invoices dialog similar to the following displays:
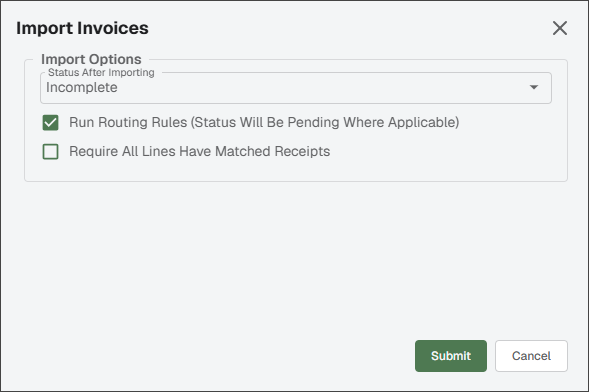
See Status After Importing for more information of each dropdown option and check box.
Once the Import Invoices dialog fields are populated, click .
An Import Results dialog displays.
The Import Invoices dialog includes a option. The available choices below the Status After Importing vary, based on selected status.
Incomplete
If this option is selected, Routing Rules occurs systematically and the status changes to Pending.
If this option is selected, every line must have a matched receipt.
Approved
This option is not available with this status.
If this option is selected, every line must have a matched receipt.
If this option is selected, then the following option () can also be selected.
Exported
This option is not available with this status.
.
If this option is selected, every line must have a matched receipt.
If this option is selected, then the following option () can also be selected.
During the importing process, if transactions were previously imported and duplicate transactions identified, a Duplicate Transaction Found dialog displays:
From here you can remove the duplicate(s), skip the invoice if multiple entries display, or decide to import the duplicate(s).
Note
If you click , the import does not move forward.