Users
Sage Paperless Construction users have access to all system functions assigned to them through security rights. Users can be employees, customers, subcontractors, etc., with access to Sage Paperless Construction data and documents through web browsers and web applications.
From My Paperless, click .
In the Global Settings navigation bar, click .
The following page displays:
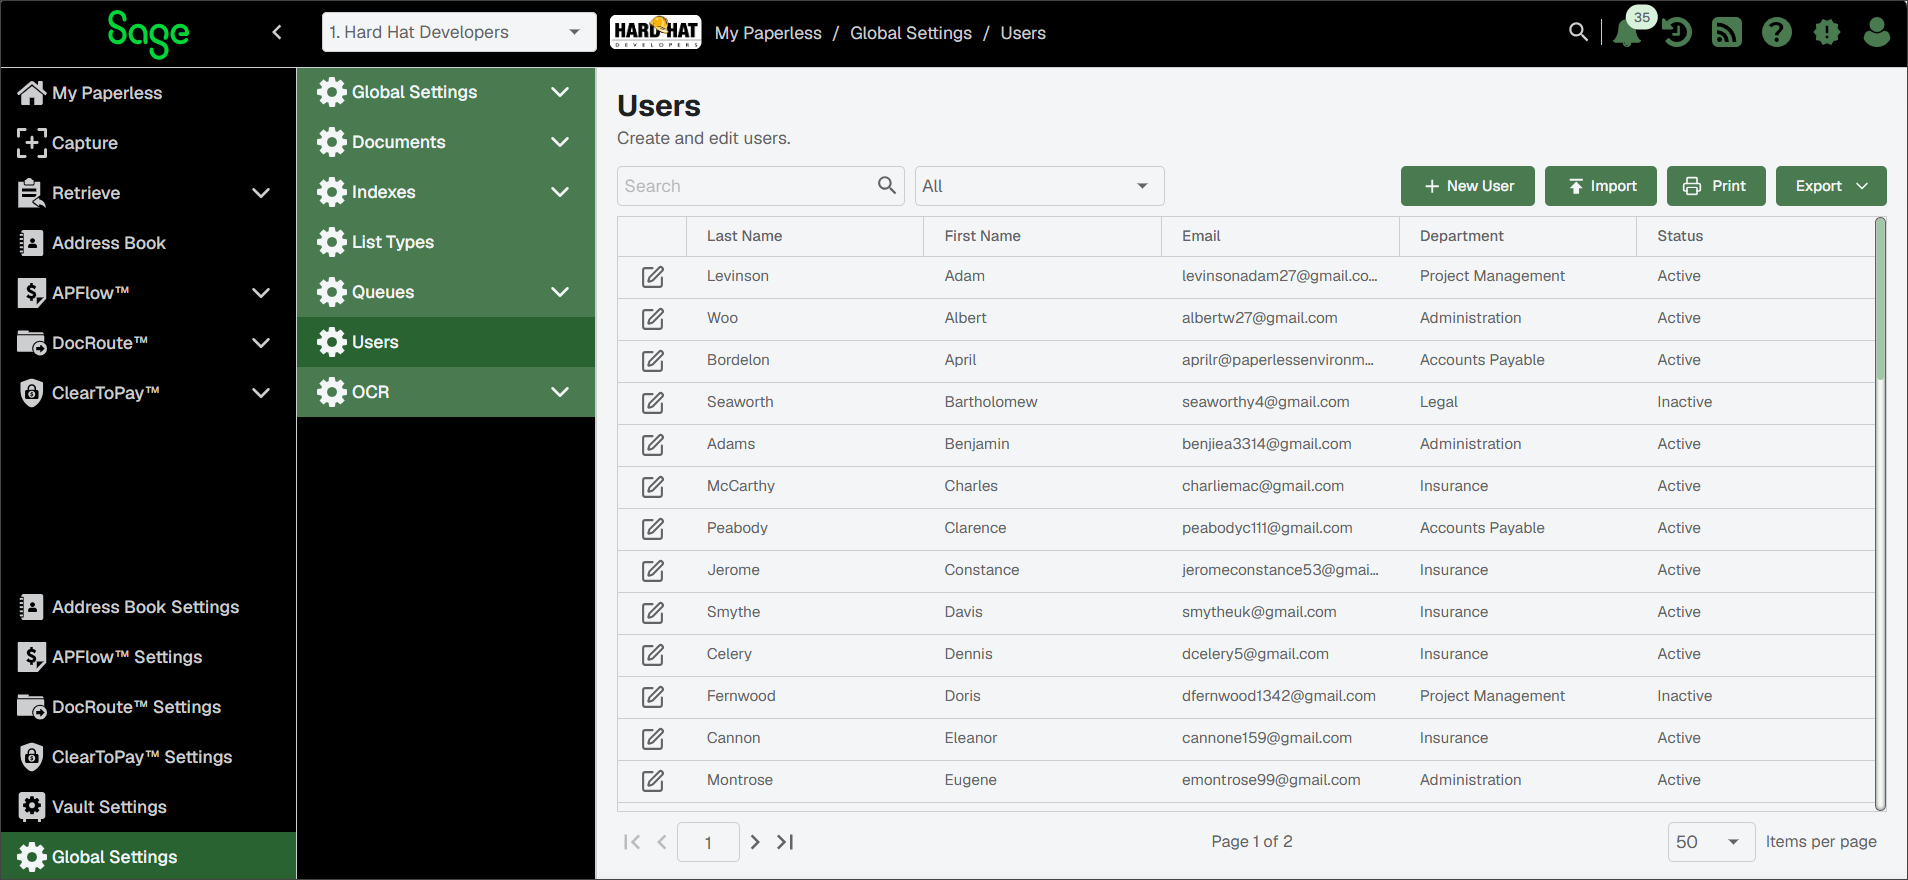
Complete the steps below to manually add individual users and assign them specific permissions in new or existing vaults:
Note
You can also update existing users by clicking the Edit  icon and proceeding through the tabs as described in the sections below.
From the Users page, click .
The Create User page displays with the General tab active.
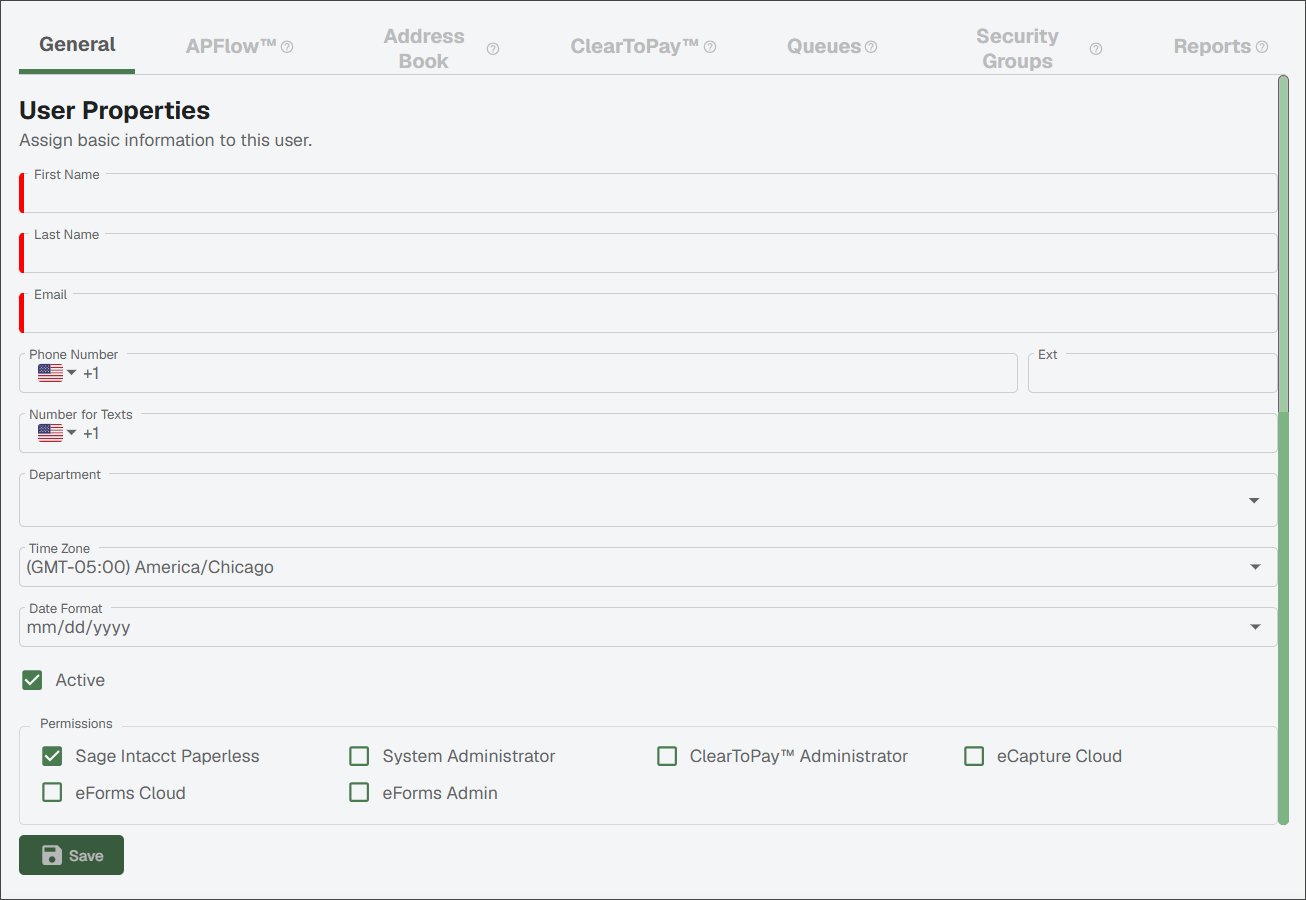
Proceed through the General, APFlow™, ClearToPay™, Queues, Security Groups and Reports tabs as described in the sections below.
General Tab
In the User Properties section, enter the information in the following fields:
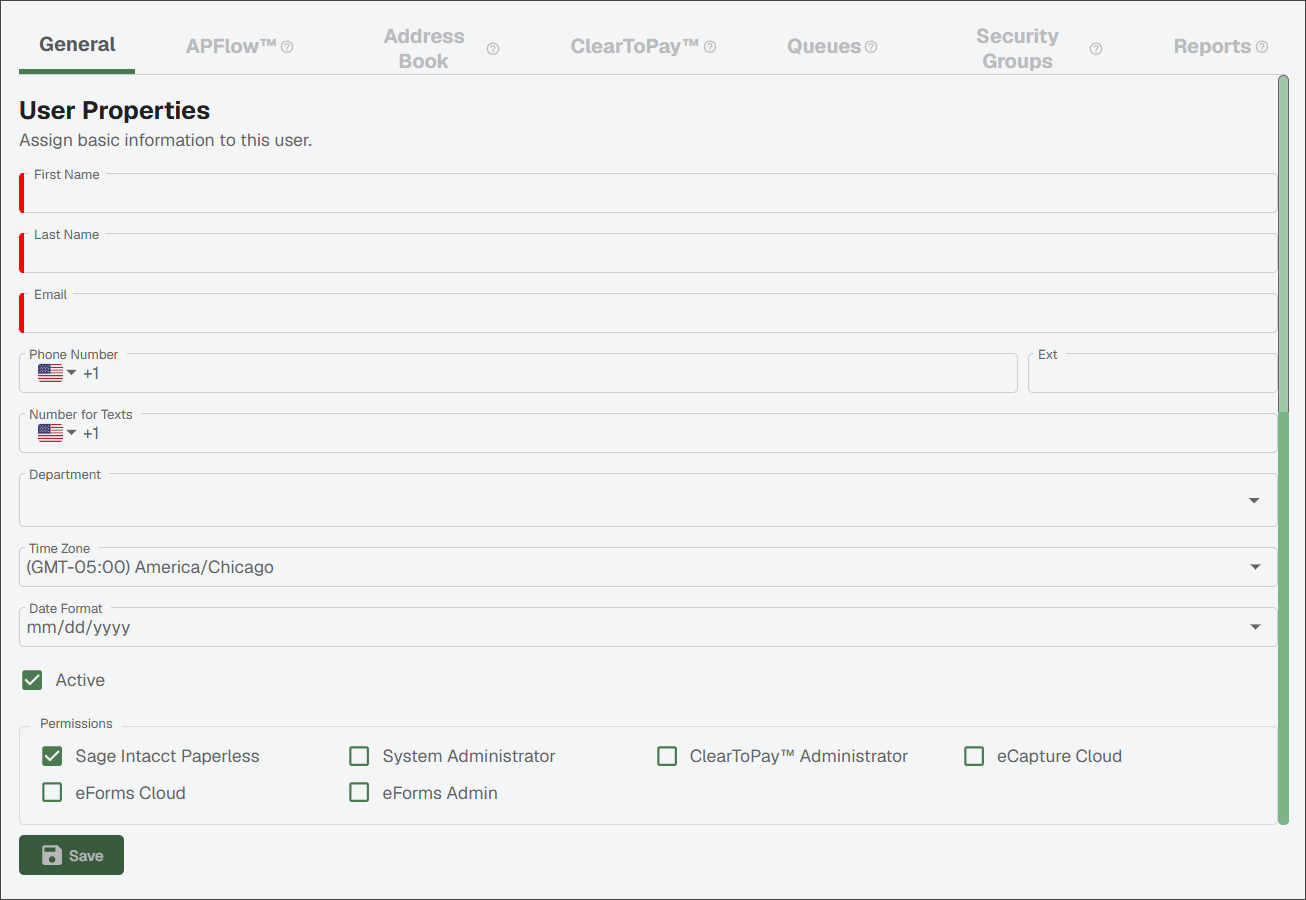
First Name
Last Name
Email
Note
The email address entered serves as the user's login ID. It is also used for system alerts, document alerts and/or invoice alerts. If the email you enter already exists in the system, a warning message displays. The email address must be unique. If the email you enter is invalid, a different error message displays. In either case, make the necessary updates before you proceed.
Phone Number
Note
It is not necessary to include any punctuation.
To change the country code, click the dropdown arrow next to the flag. Begin typing the country name to narrow your search. The country code is identified by the flag and the +# that displays in the Phone Number field.
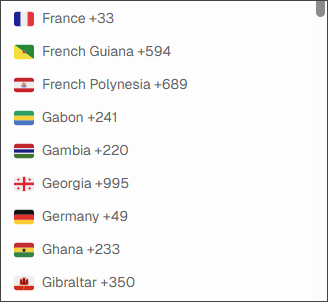
When you press , the updated country code displays. In this example, the revised country code is Australia, +61. The phone number format is revised to meet the identified country's requirements.
Number for Texts
Note
Enter the cellphone number where text messages should be sent. This is the number that is used for system alerts, document alerts and/or invoice alerts. The number in this field must include the entire cell phone number. It is not necessary to include any punctuation. If the country code is not correct, click the dropdown arrow to locate the appropriate country.
In the Department field, enter the department name to which the new user is assigned.
Note
This is not a required field.
In the Time Zone field, click the dropdown to select the time zone associated with this user.
In the Date Format field, click the dropdown to select the date format that displays throughout Sage Paperless Construction.
If the new user is active, select the check box. If the new users is not yet active, leave the check box blank.
In the Permissions section, select the products the user should have access to:
Check box
Description
Sage Paperless Construction
Select this check box if the user should have access to the main Sage Paperless Construction application.
Important
For users that only require access to external portals or mobile applications, leave this check box blank.
System Administrator
Select this check box if the user should have System Administrator permissions. System administrators have permissions to manage Sage Paperless Construction across all vaults.
Important
For most users, this check box remains blank.
ClearToPay™ Administrator
Select this check box if the user should have ClearToPay Administrator permissions.
eCapture Cloud
Select this check box if the user should have access to eCapture™ Cloud.
eForms Cloud
Select this check box if the user should have access to eForms™ Cloud.
eForms Admin
Select this check box if the user should have access to the eForms™ Administrator Portal.
Click .
An invitation email is sent to this user.
Note
If you have System Administrator permissions and the invitation email has already been sent for this user, Resend Invite displays. If an invitation email was sent but not acted upon, the email expires. Should a follow up invitation email need to be sent, click this button.
APFlow™ Tab
Click the tab.
A page similar to the following displays. Each row shows the user's vault access and associated APFlow roles and permissions.
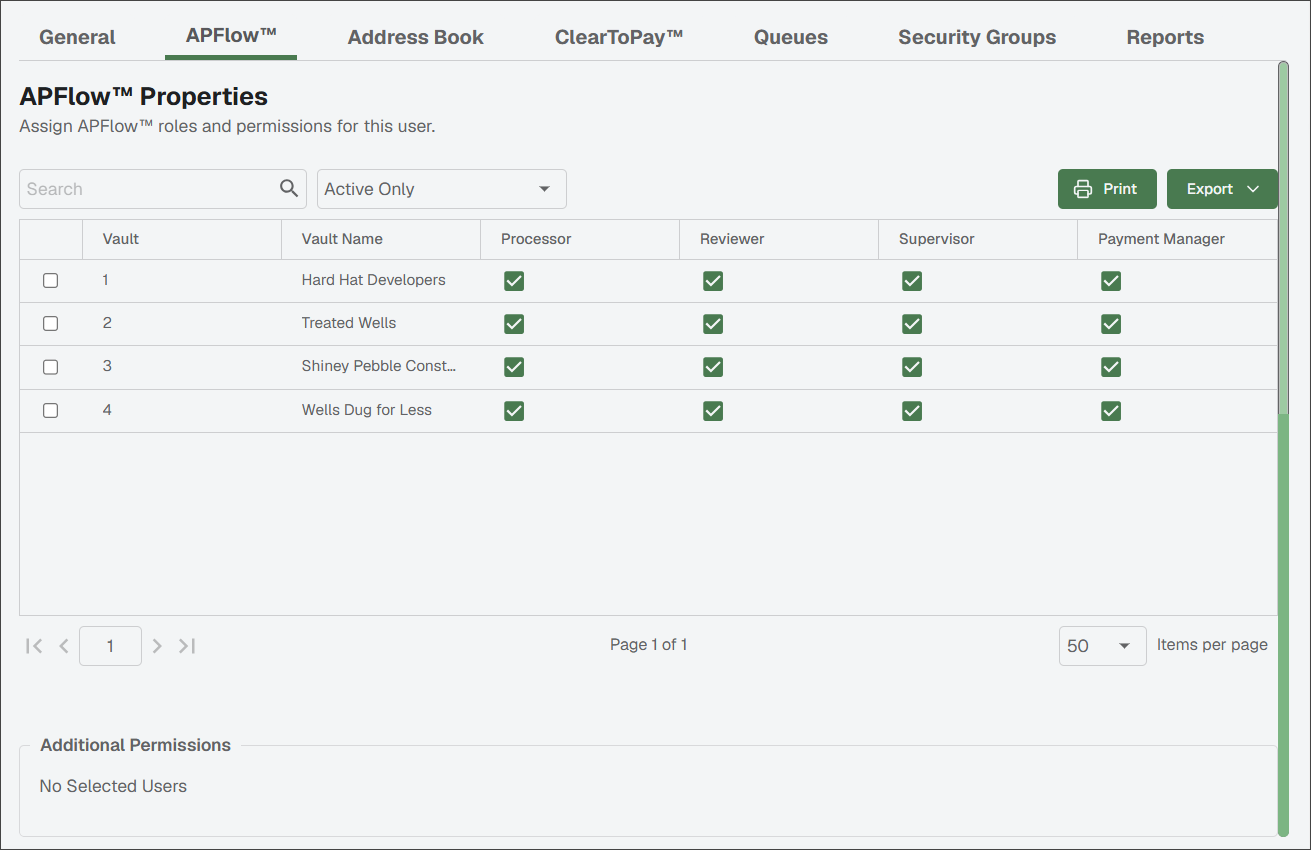
(Optional) If the Payment Manager module should be visible to this user for any or all vault(s) that display in this grid, click the checkmark associated with each appropriate vault. This user must be given access to at least one bank account. See APFlow™ Bank Account Permissions for more information.
Note
If the Payment Manager option does not display in the left navigation bar within the APFlow™ dropdown menu for the user after populating the check box(es), they must refresh the page.
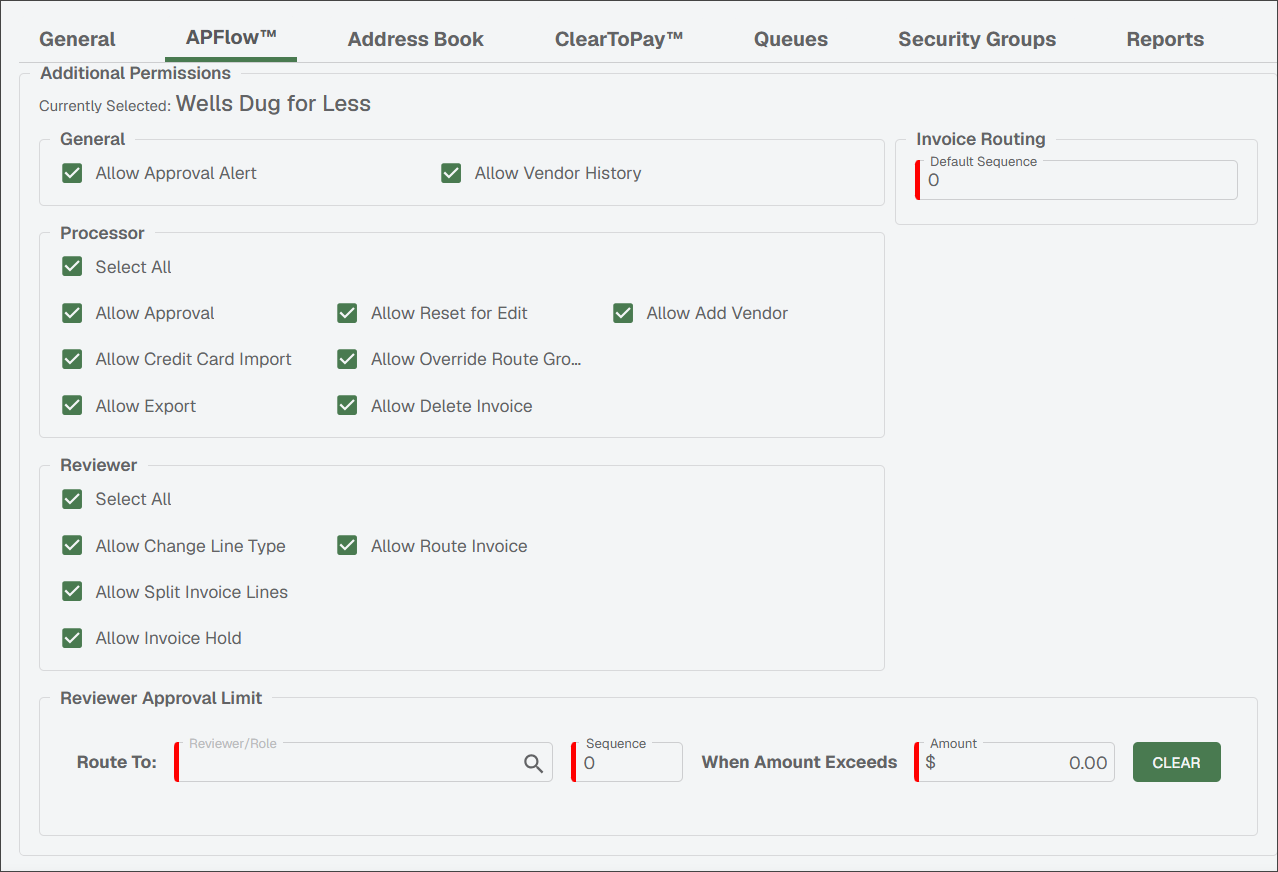
Click to select a specific vault and the user's role(s) within that vault. and the permissions associated with those role(s) displays in the Additional Permissions grid.
The permissions associated with the selected role(s) displays in the Additional Permissions section. Definitions for each option are described in the Sage Paperless Construction Glossary.
ClearToPay™ Tab
Note
You must have System Administrator or ClearToPay Administrator permissions to access the ClearToPay™ tab when configuring global user settings.
Note
User permissions can only be set for vaults that have been configured for ClearToPay.
Click the tab.
Each row shows the user's vault access and associated ClearToPay roles and permissions.
Note
This page is divided into two sections. The top section, User Permissions, lists each vault and the role (Compliance Manager, Job Level Access, Auditor) assigned to the selected user.
The bottom section, Job Level Access Permissions, only displays if you selected for the user and lists each job and compliance tracking area.
Use the check boxes to assign the user's role within each of the applicable vaults. See the table below for descriptions of vault and permission access levels.
Note
Each user can only have one role per vault. If a user does not have a selected role in a vault, that user does not have access to ClearToPay in that particular vault.
Vault Access
This column indicates whether or not the identified user belongs to any security groups in the selected vault(s). If the user does not belong to a security group in a particular vault, they are not able to access ClearToPay in that vault.
Compliance Manager
This role grants full access to all Company, Job and Vendor tracking within ClearToPay. However, this role does not provide rights to ClearToPay Settings. With this permission, module-level permissions such as editing or reviewing of a job or vendor is not tracked. This allows the user to set up contacts as the company level, set up company insurance templates and track the internal company's insurance policies. The user assigned to this role also has full rights to send out communications, run reports, etc.
Note
If this role is selected, no other configuration is required and the remainder of the page is blank.
Job Level Access
See Job Level Access for more information.
Auditor
This role provides read-only access to all pages within a company. The user is able to view dashboards and run reports, but is unable to change any data or send out communications.
Note
If this role is selected, no other configuration is required and the remainder of the page is blank.
Job Level Access
When you configure a user with Job Level Access for a particular vault, the Job Level Access Permissions pane displays:
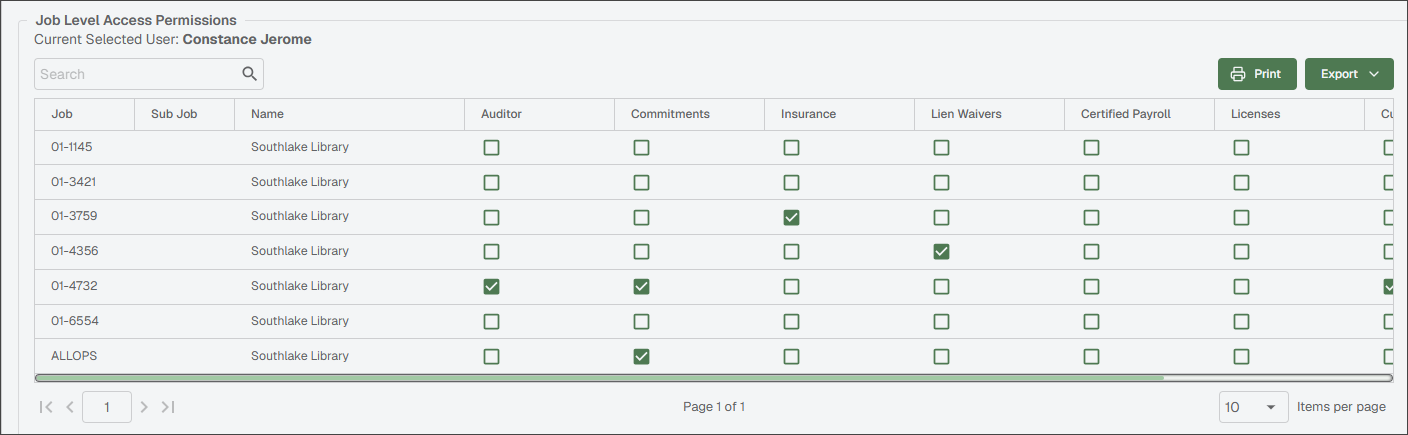 |
This user's role is configured on a job-by-job basis, with each permission area clearly identified. These permissions at the job level correspond with the following compliance tracking modules:
Auditor (read-only access to the selected job)
Commitments
Insurance
Lien Waivers
Certified Payroll
Custom Compliance
When you grant a user access to a specific compliance tracking module by selecting that check box, their access extends to all functionality (add, edit, delete information captured on those page(s) within the module(s) for the chosen job as well as to any vendors and tier vendors assigned to that job.
Queues Tab
Click the tab.
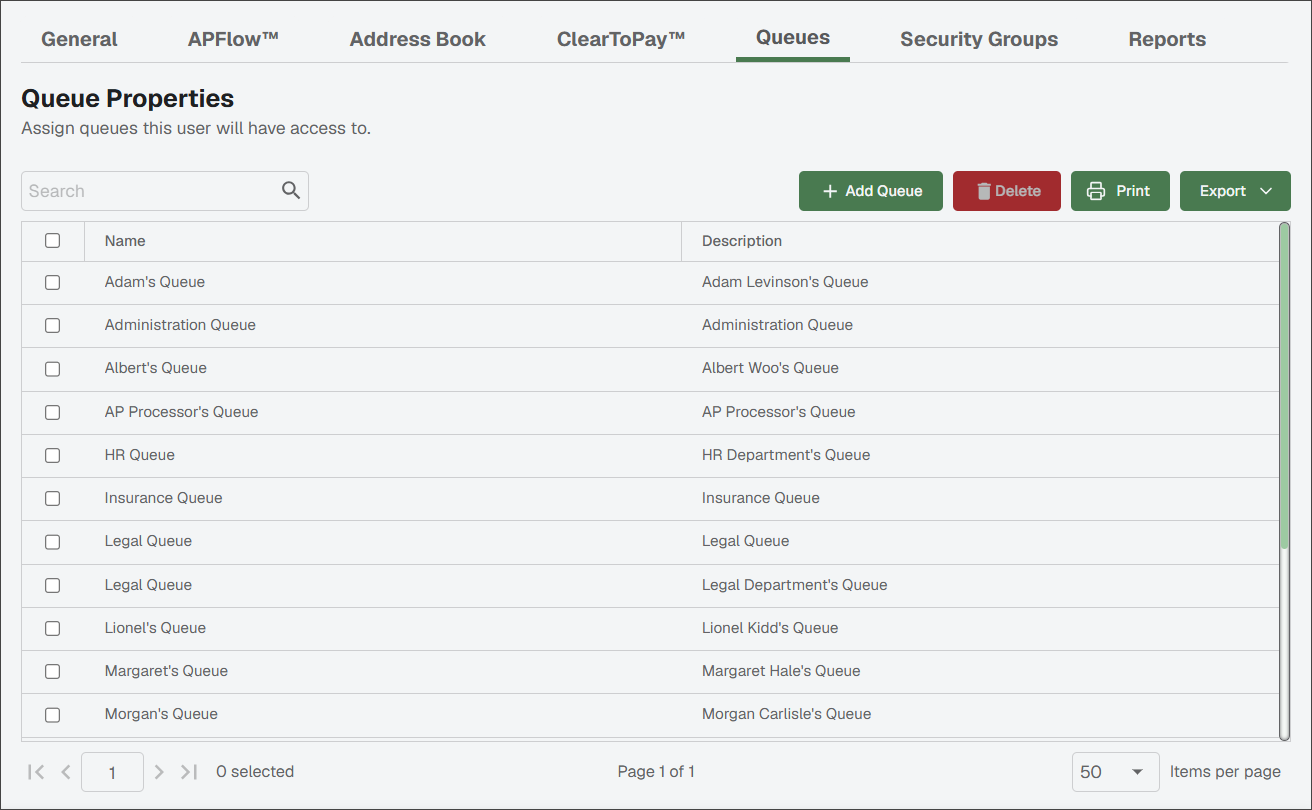
A page similar to the following displays where you can review the queues that have already been assigned (if any) and assign additional queues to the user.
Click .
An Add Queues dialog similar to the following displays:
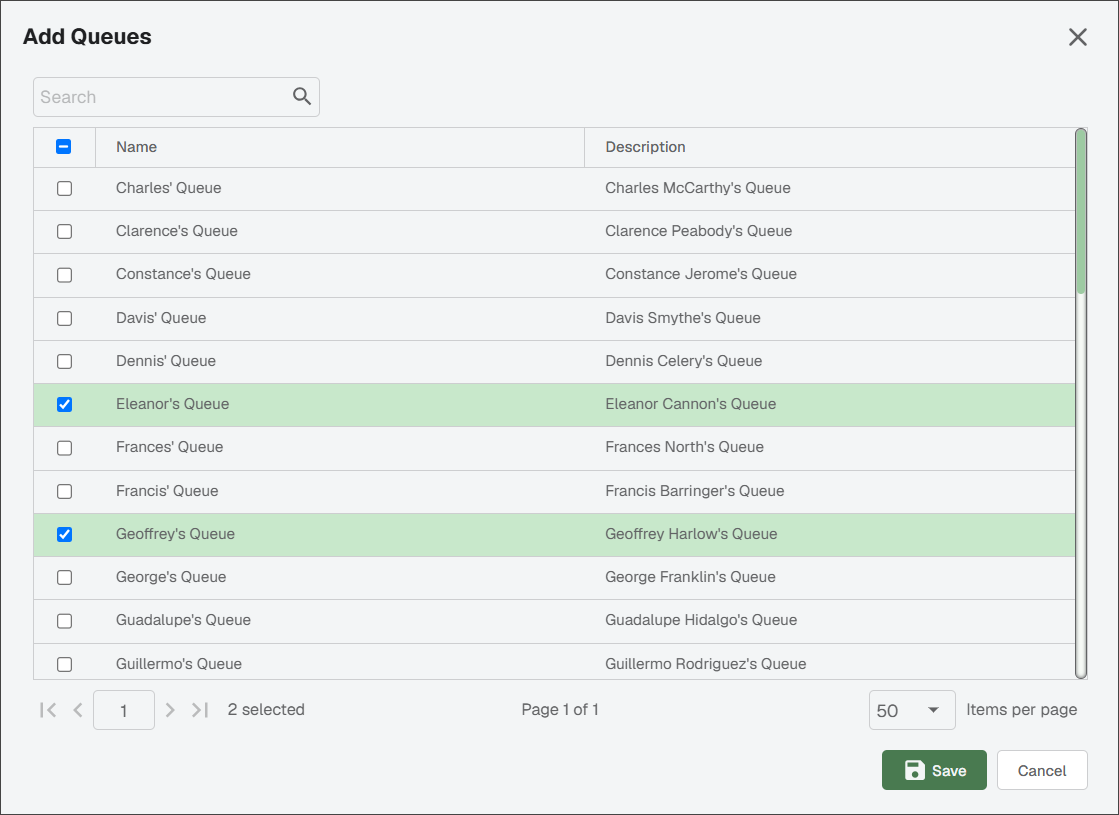
Scroll through the list to locate the correct queue(s) to give the user access to.
Note
You can also click in the Search field and enter the first few letters of the queue's name to locate it more quickly.
Select the queue's check box(es).
Click .
The Queues tab main page updates to include the newly added queue(s).
Security Groups Tab
Click the tab.
The following page displays:
Note
The security groups that display on this page were configured on the page. See Security Groups for more information. The user to whom you are associating security groups is identified in the breadcrumbs located in the page header.
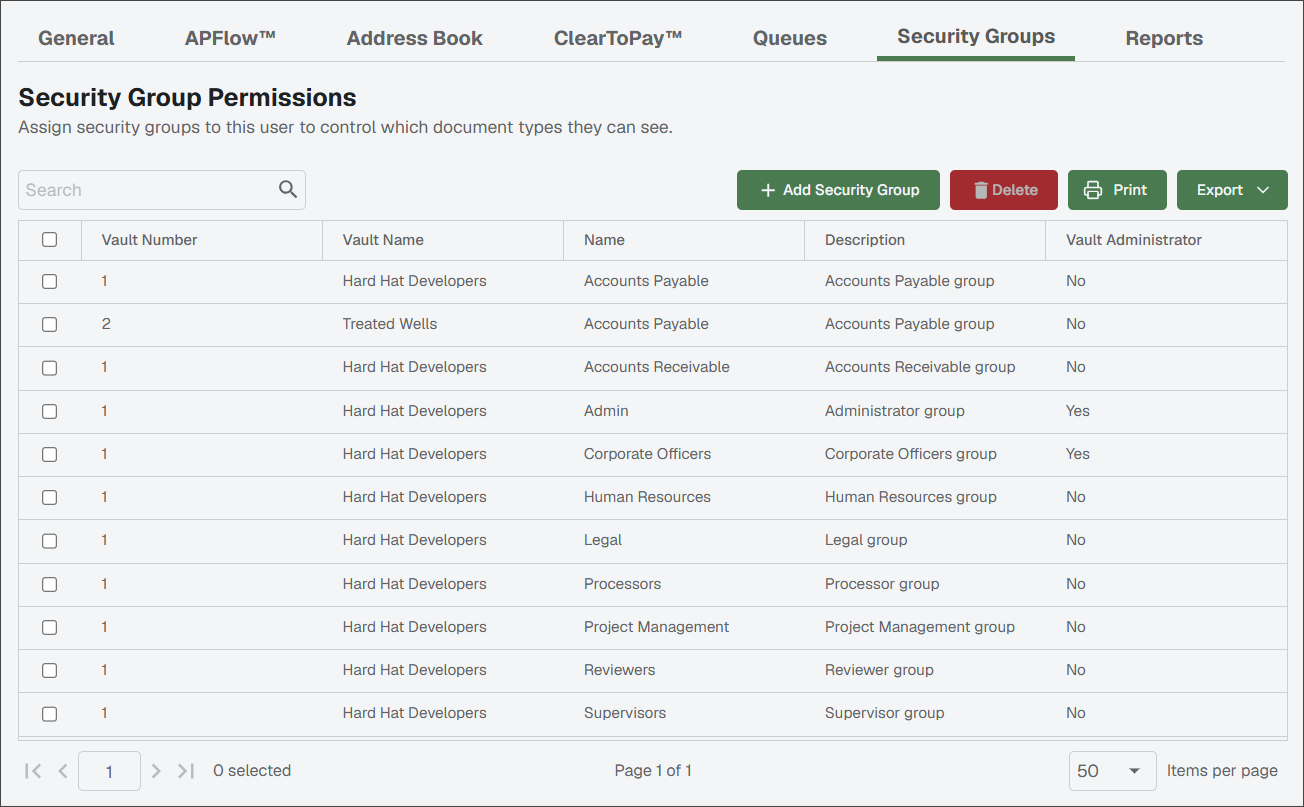
Click .
The following Add Security Groups dialog displays with all the active vault's existing security groups to which the user can be assigned:
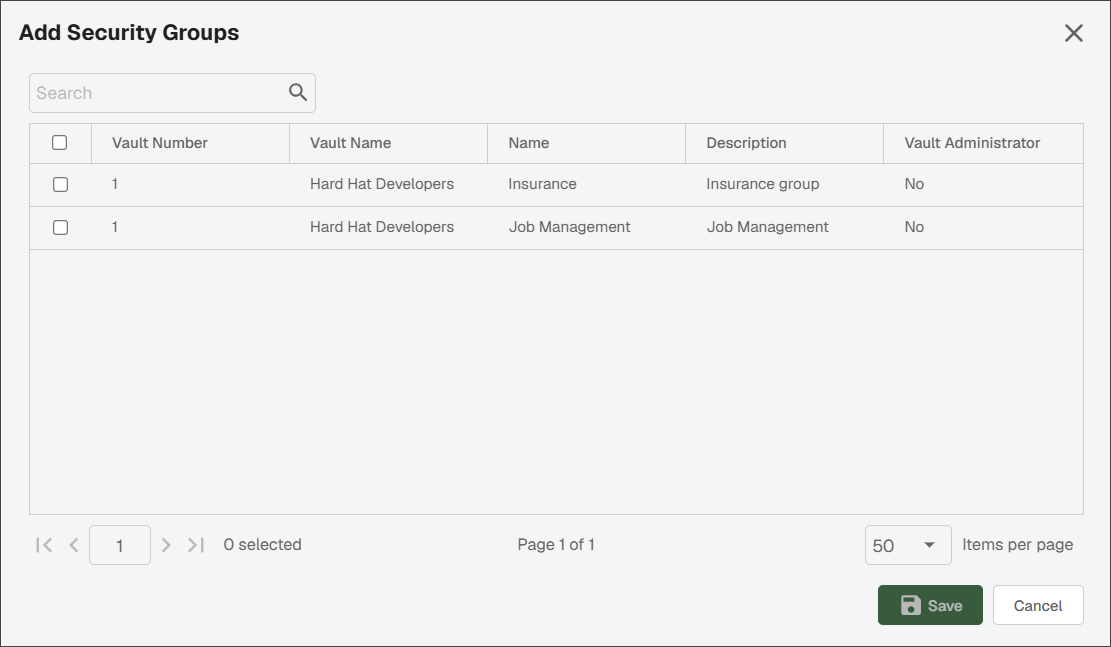
Scroll through the list and select as many security groups as is appropriate for the identified user.
Click .
Remove Assigned Security Groups
Select the check box for the security group from which you want to remove the user.
Click .
A confirmation dialog similar to the following displays:
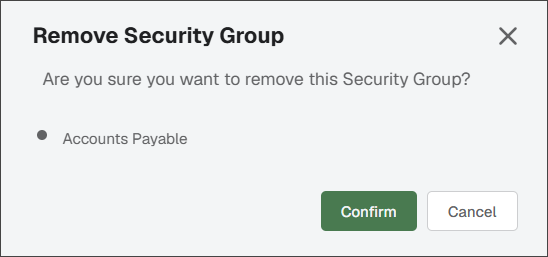
Click .
The user is removed from the security group(s).
Reports Tab
Administrators can add, edit and remove scheduled reports for the identified user. The reports listed on this tab match those listed in the individual's Report Scheduler in User Settings. See Schedule User Reports for more information.
Click the tab.
A page similar to the following displays:
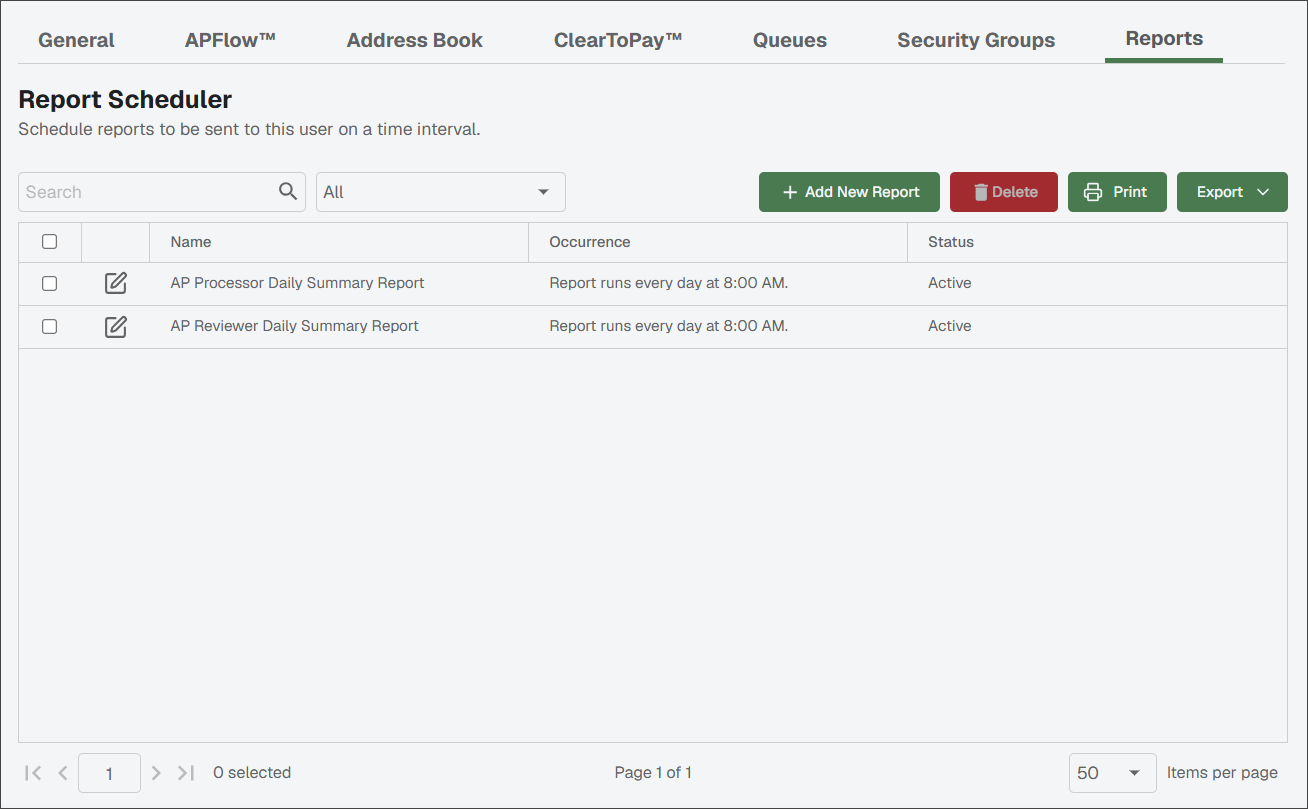
Click .
A page similar to the following displays:
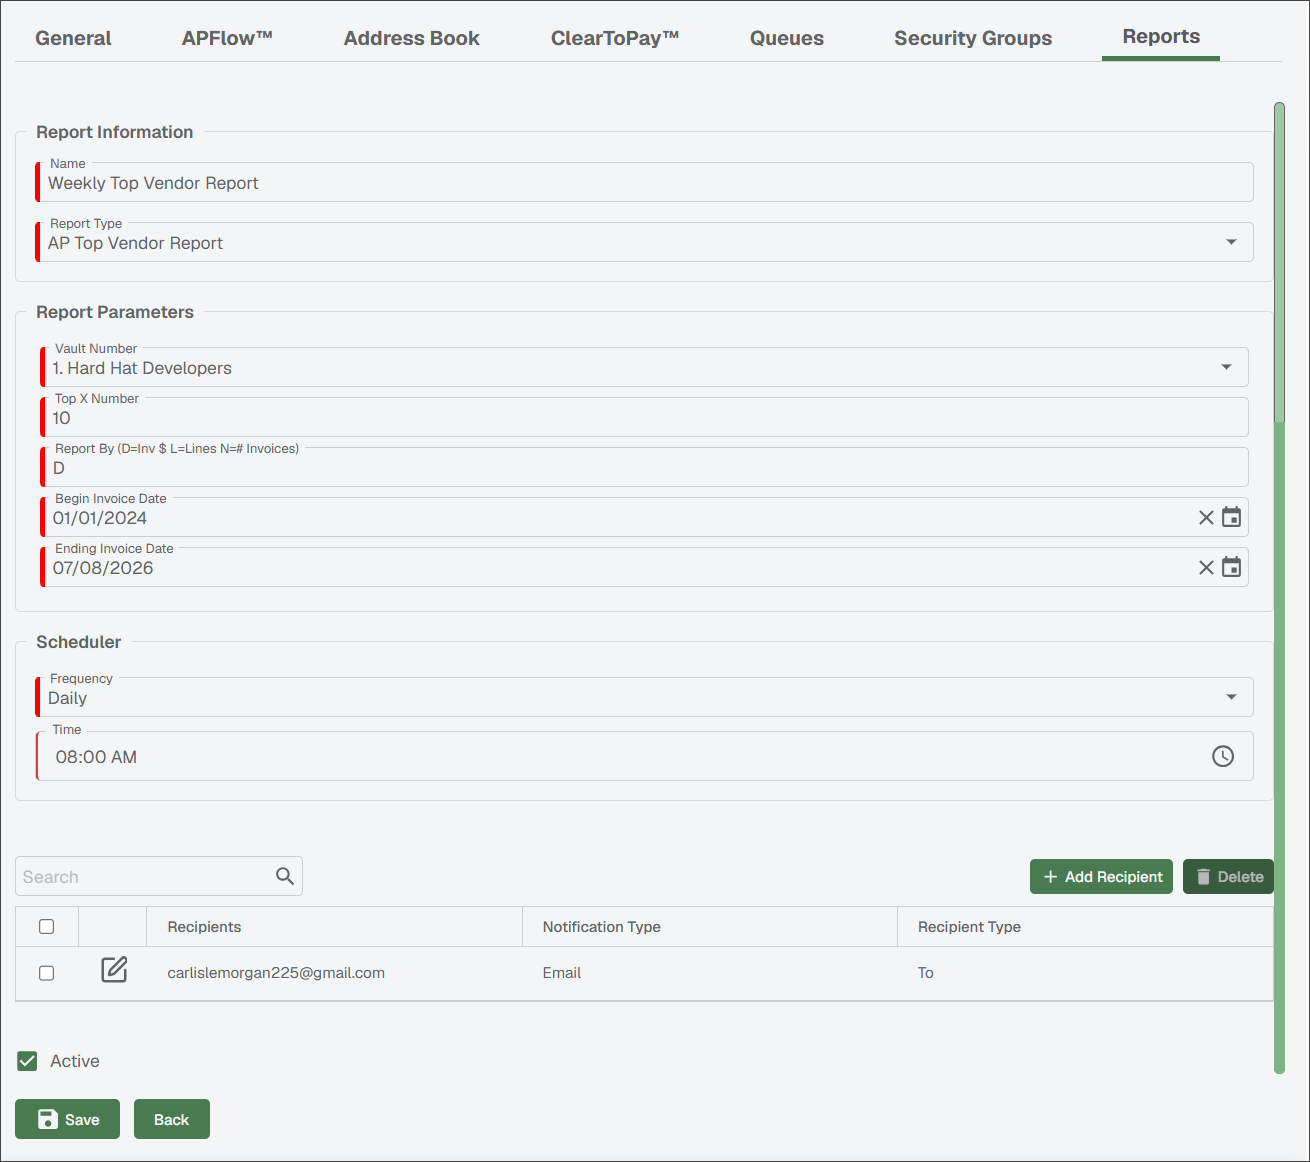
In the Name field, enter the company-appropriate name.
Use the Report Type dropdown to select the report type from the list of options.
Choose which report you want to run from the Report Type dropdown:
Modify the report parameter details to suit your requirements:
The Report Type you select impacts the fields that display within Report Parameters. For more information about different report types and their respective parameters, see Reports List.
For parameters that include dates, you can use the default dates or click the Calendar
 icon to select a specific date. When scheduling reports to run over an extended period of time, it is recommended that you use the Month Begin, Current Date or Month End buttons so that the criteria updates dynamically each time the scheduled report runs.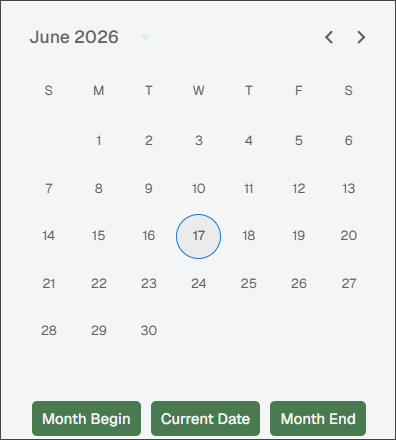
Set the Frequency of the report email. You can choose , , or .
Based on your selection in the previous step, choose the time, date, day of the week and any other required values for when you would like the report to be emailed.
(Optional) Add, edit or delete report recipients.
Leave the Active check box selected if this report is ready to be scheduled and sent. Deselecting the Active check box maintains your settings but its status is inactive.
Click .
Remove Assigned Reports
Click the associated check box of the scheduled report you do not want the user to receive.
Click .
A confirmation dialog similar to the following displays:
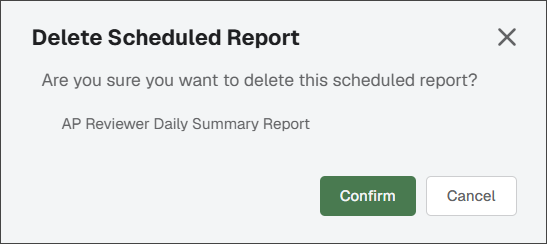
Click .
The import utility enables companies with large numbers of employees to import them into Sage Paperless Construction as a group instead of manually adding them individually.
A predefined User Import Template form is available for you to complete with your employee information. The data you enter in this template systematically populates the User Information grids in .
From the Users page, click .
The Import Users dialog displays:
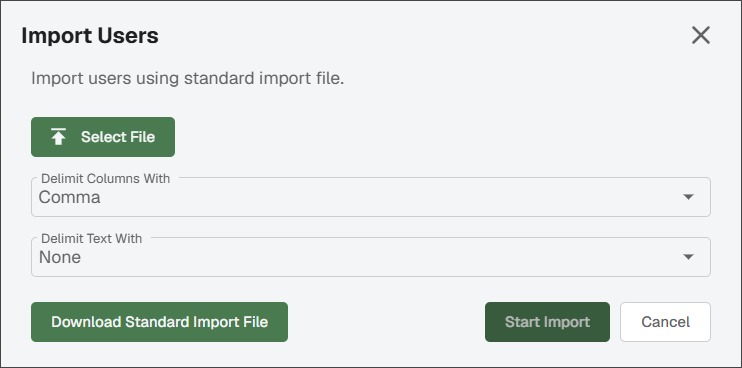
Click to download the User Import Template form.
Note
If you click because you do not want to use the User Import Template form, use the Delimit Columns With and the Delimit Text With dropdowns to appropriately identify the column delimiter for the file you are uploading.
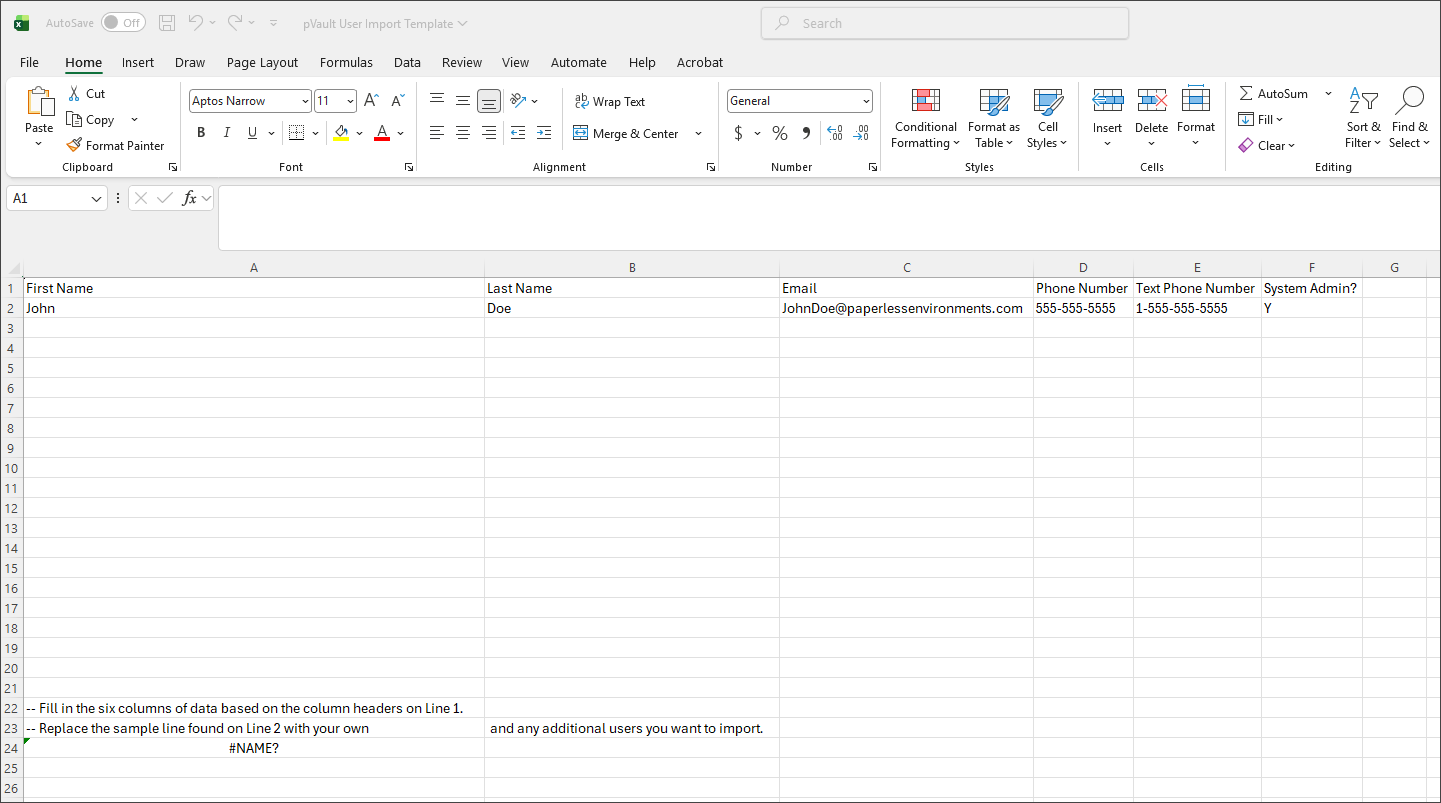
Populate the User Import Template form with the users you want to upload to the system. Use the table below for reference when entering information.
First Name
Enter the employee's first name. This is a required field.
Last Name
Enter the employee's last name. This is a required field.
Email
Enter the employee's email address. This is a required field.
Phone Number
Enter the employee's telephone number.
Text Phone Number
Enter the employee's cell phone number where they can receive alert text messages.
System Admin?
If this employee should have system administration rights, enter . If this employee should not have system administration rights, enter .
Click and select the completed template from your computer.
Keep the Delimit Columns With default () and the Delimit Text With default () settings.
Click .
Note
After the users are imported into Sage Paperless Construction, you need to edit each user to assign their specific access levels and permissions. Follow the descriptions on each of the user tabs in Add New System Users.