New Invoice
The Invoice Entry page is the main page for processing invoices.
For information on accessing Invoice Entry and page layout details, see Invoice Entry Page Layout.
Important
Fields on this page vary depending on the accounting system to which Sage Paperless Construction is bridged.
If you are not properly bridged to your accounting system, even though an invoice displays in your APFlow™ Queue, the Create New Invoice icon
 is inactive. See, Vault Bridge Settings (Sage 300 CRE) for more information.
From My Paperless, click .
From the APFlow™ navigation bar, click .
In the APFlow™ Queues field, use the dropdown to select the queue from which the Processor is entering invoices.
Note
For more information on OCR icons and validation details, seeOCR Icons and Validation.
The dropdown lists any user queue to which the Processor has security rights.
In the Document Status field use the dropdown to select .
Click on a row in the grid.
The document's image displays in the Viewer to the right of the APFlow™ Queues pane.
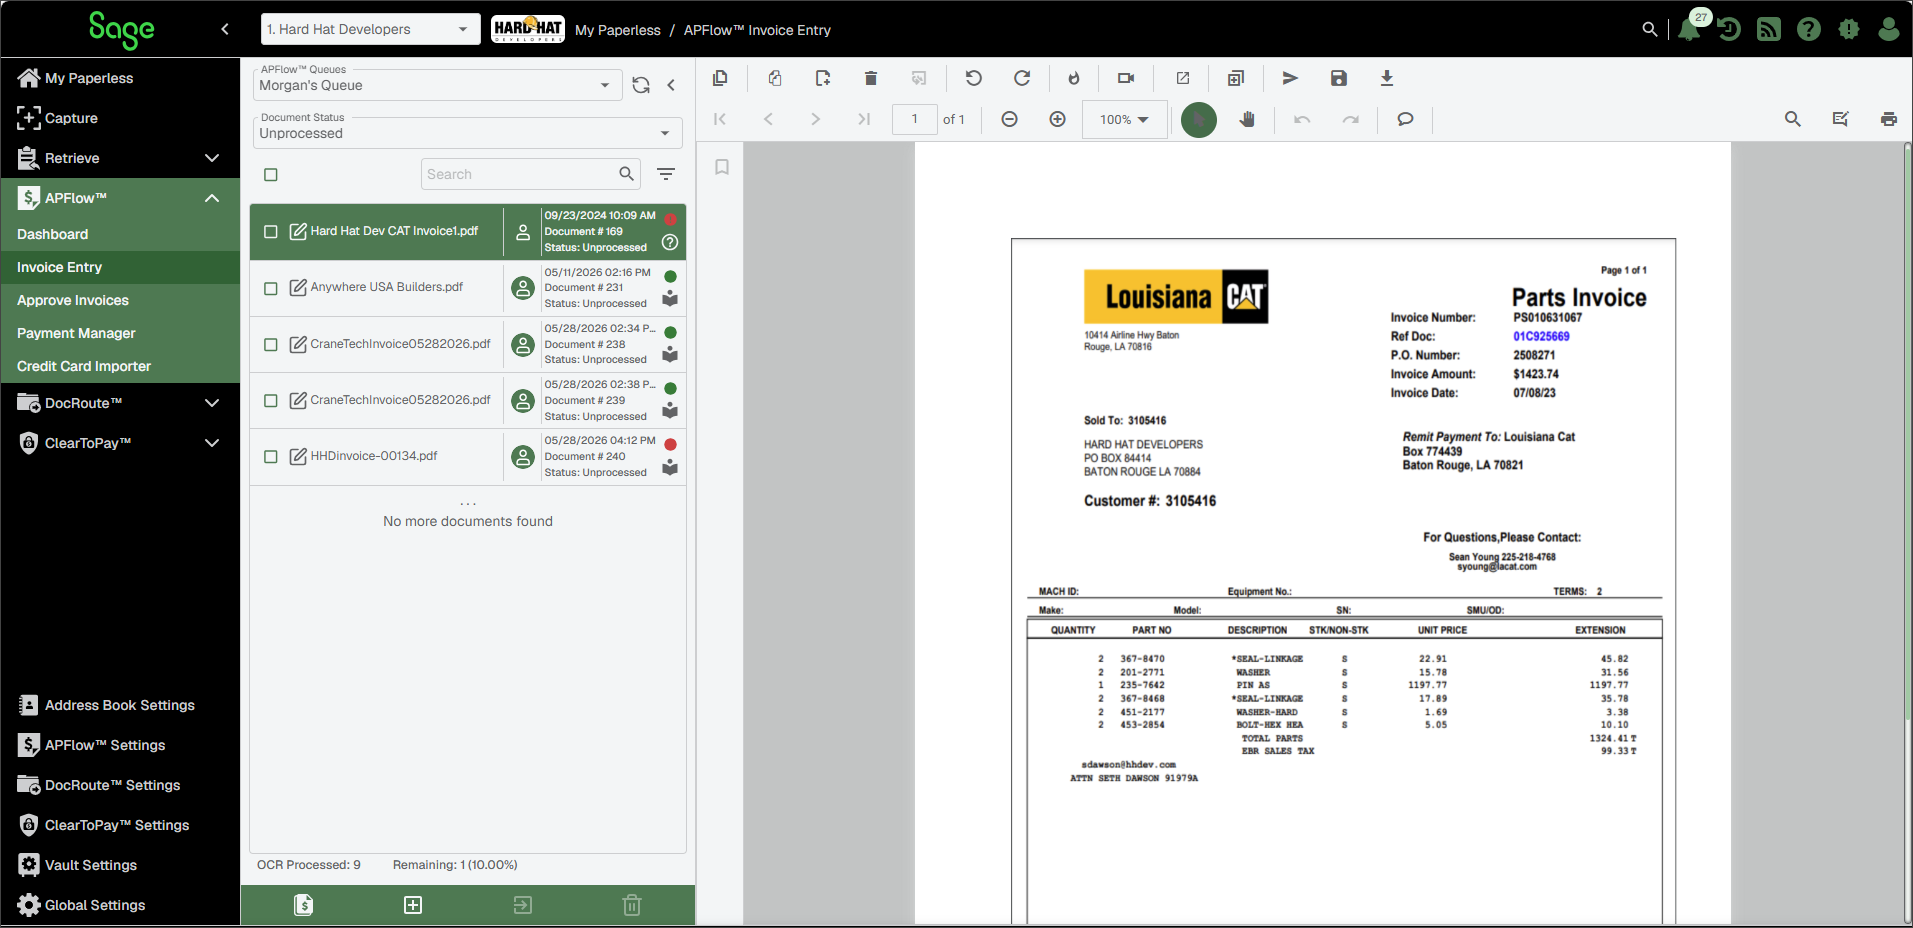
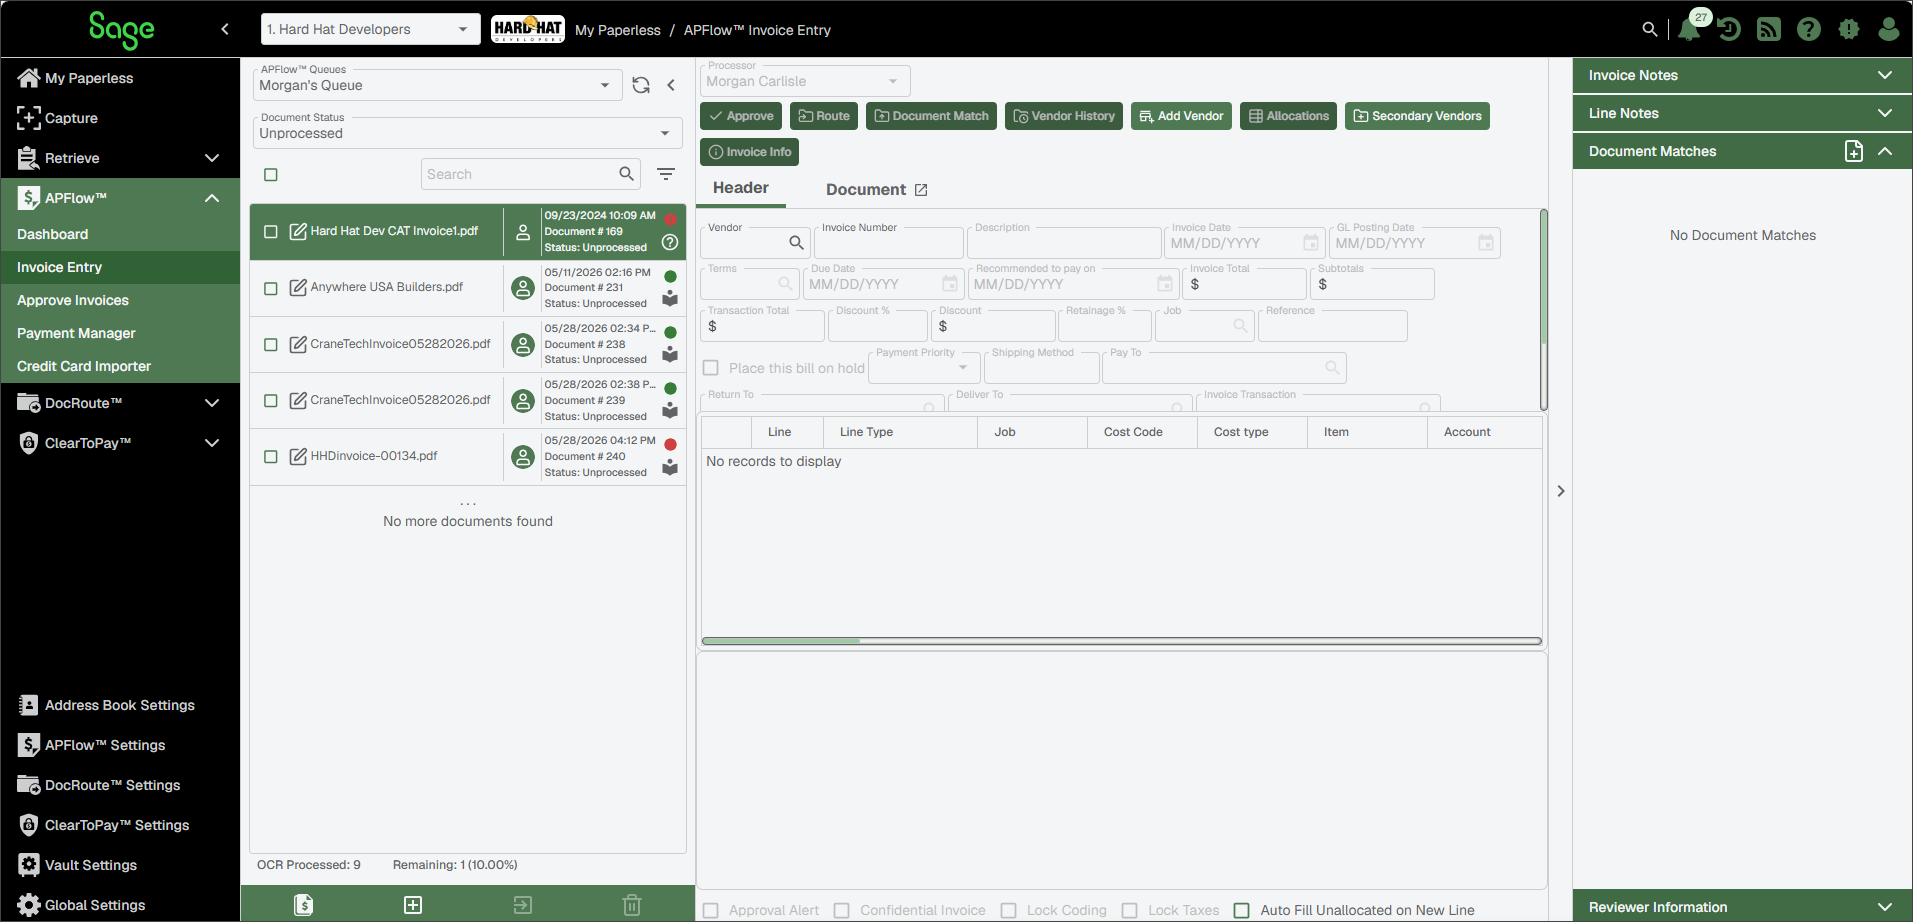
Click the Create New Invoice
icon at the bottom of the APFlow™ Queues pane.This generates a blank invoice template. As fields are populated, italicized text descriptions may display below fields.
APFlow™ with OCR
Important
A license is required to access OCR. You can check for available OCR licenses within Info. See License Information for more information.
When an invoice is added to an OCR queue in Invoice Entry, the invoice is "read" by OCR. Based on the workflow you selected, header fields such as Vendor, Invoice Number, Invoice Date and Invoice Total and line level detail fields (if licensed for line-level OCR) such as Job and Amount are systematically populated with information identified on the invoice.
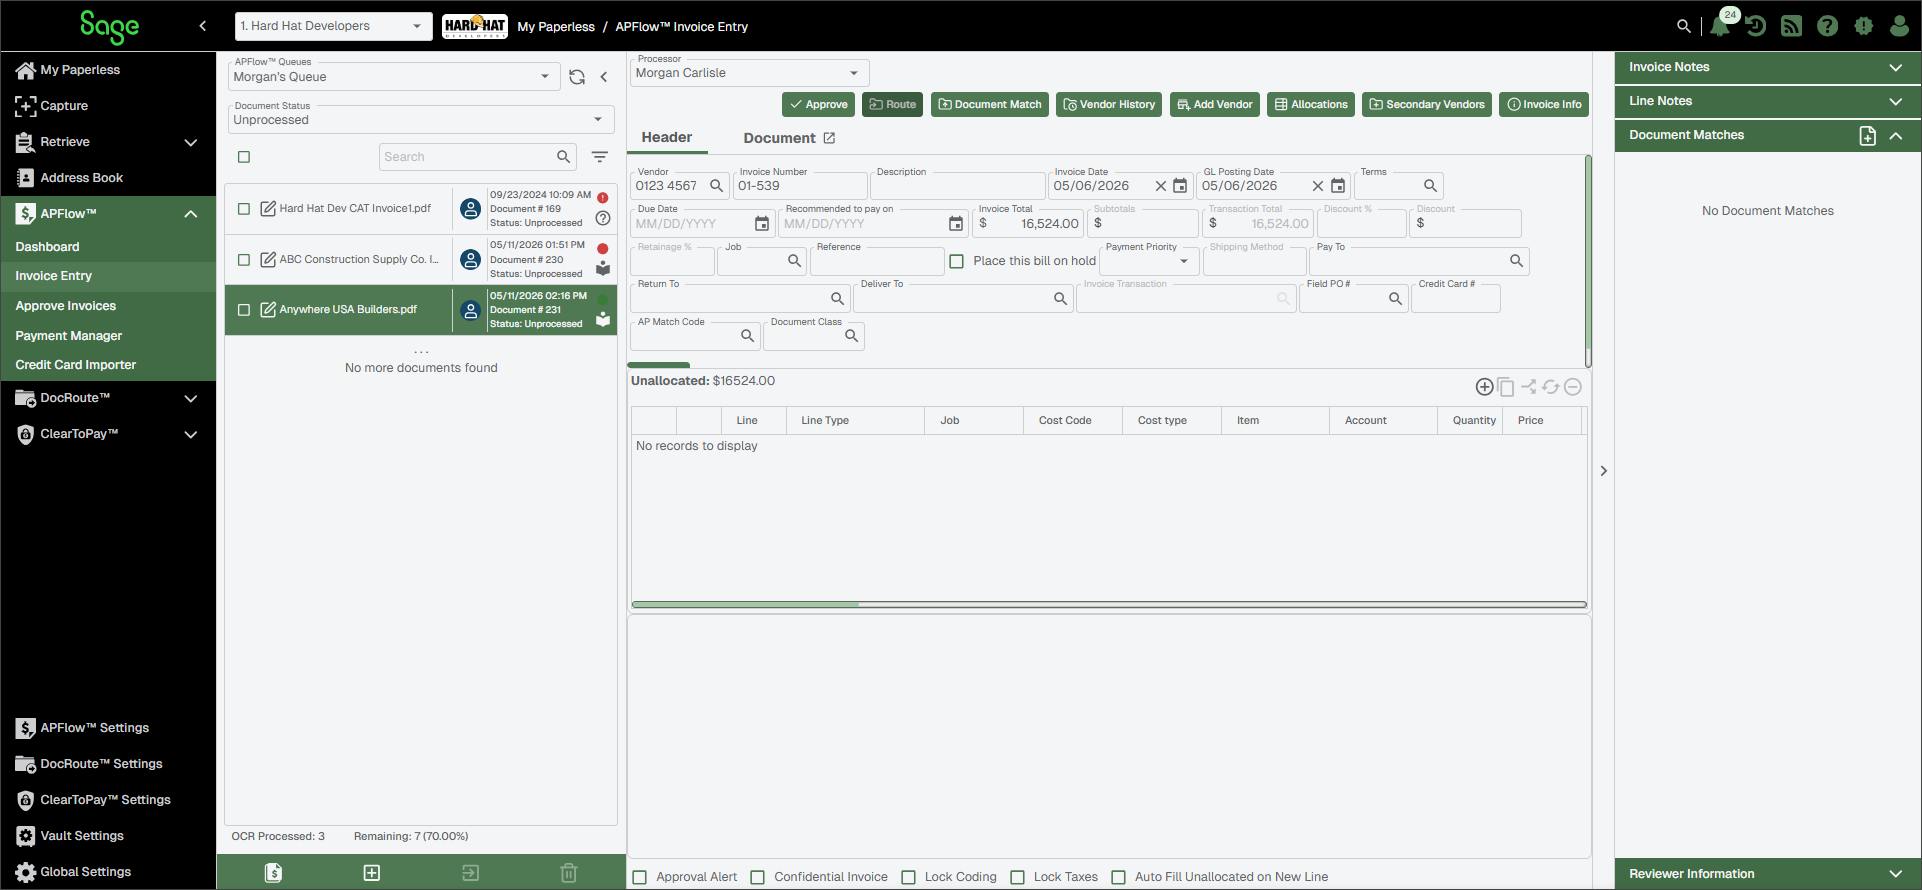
Invoices processed using OCR can display the following icons in the queue:
Blank OCR Entry | No icon means that the document was not picked by the Paperless OCR system for processing. | |
| This is the unprocessed OCR icon. | |
| A yellow icon indicates that the document is actively being processed by the OCR system. | |
| Click the question mark icon for more information about the status of the associated document. When you click the icon, a dialog displays describing the error:
| |
| A red icon indicates that the OCR system failed to capture all required fields. | |
| A red circle with an exclamation point indicates that a system error occurred during processing. | |
| Click this icon to access the OCR Learn page. See Train OCR for more information. | |
| A green icon indicates the Paperless OCR system successfully extracted all fields. For non-invoice document types that still remain in the queue as green, it is because not all fields required before saving were populated by a combination of OCR and backfilling. Non-invoice documents that processed successfully are saved and leave the queue. |





Immediately above the icons located at the bottom of the OCR Queue is a number and a percentage. The number reflects the number of documents that your company has processed using OCR. The percentage reflects the usage percentage according to your company's plan, so you know when you are about to reach (or have exceeded) your company's OCR plan limits.
 |
While in the Unprocessed Document Status field in Invoice Entry, Sage Paperless Construction remembers what tab was last open. You can switch between documents during the OCR process and the Invoice Entry page remains open. If new results generate from an OCR learn process generates during this time, a message similar to this displays:
 |
This visible message indicates that a change occurred during the OCR process for that identified document.
Note
Once the Document Status moves from Unprocessed to Incomplete, no OCR refresh notification generates.
AP Match Code
AP Match Code is an indexed value that can be added to any document which needs to be automatically attached to an invoice. Any value can be used as an AP Match Code. This is not a predefined field. Use this with backup documentation such as contracts that need to be attached to invoices during the invoice approval process.
Tip
Determine ahead of time what letters and/or numbers are used as AP Match Codes. For instance, an AP Match Code could be the initials of vendors. Be sure to maintain uniformity when creating the AP Match Codes to eliminate confusion when entering invoices and selecting AP Match Codes.
Use Field Lookups
For fields in Invoice Entry (and Approve Invoices) with the Lookup  icon, there are configurable filters.
From My Paperless, click APFlow™.
From the APFlow™ navigation bar, click Invoice Entry.
In the APFlow™ Queues field, use the dropdown to select the queue from which the Processor is entering invoices.
The dropdown lists any user queue to which the Processor has security rights.
Note
My Queue should display as the default.
In the Document Status field use the dropdown to select Unprocessed.
Click on a row in the grid.
This document displays to the right of the sidebar.
Click the Create New Invoice
icon at the bottom of the APFlow™ Queues pane. This generates a blank invoice template:Click the Lookup
icon in the Vendor field.In the dialog that displays, you can click
 to set how the columns are sorted (by column, either Sort Ascending or Sort Descending). You can also select which columns display in the dialog (shown below) or apply filters to narrow your results.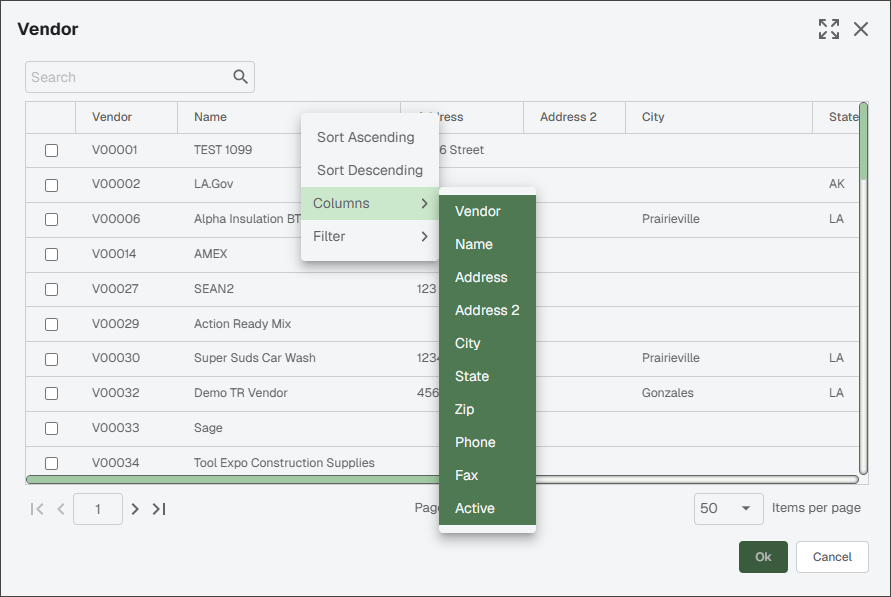
Note
To view the entire dialog, click the Expand
 icon located in the upper right corner of the dialog. If you expand this Vendor Lookup list, Sage Paperless Construction remembers. Every time you access this particular lookup dialog, it opens either as expanded or collapsed, depending on how you viewed it the last time.
Field PO #
Typically, companies use the Field PO # field in the invoice header for additional document matching.
For example, your vendor assigns a number to their purchase order. This number is in addition to a number that your company assigns for that same purchase order. This Field PO # field provides another way for document matching.
 |
Field PO numbers are not set up in your accounting system. This is not an accounting system-specific field. Administrators can configure which fields show in the header. See APFlow™ Entry Fields for more information.
Add a New Line in Invoice Entry
A new line is based on the blank line type selected by clicking one of the icons listed in the middle (lines) pane.
Note
You can expand or collapse invoice line column widths as necessary.
In the middle (lines) pane, click the New line
 icon to select a line type from the dropdown. The selections that display vary based on what is supported by the bridged accounting system as well as any additional bridge settings configured where applicable. For more information on bridge settings, see APFlow™ Bridge Settings.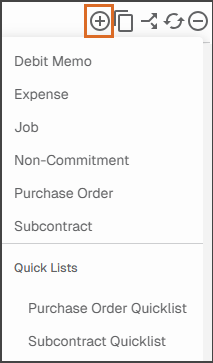
A new line based on the line type you selected displays in the middle (lines) pane.
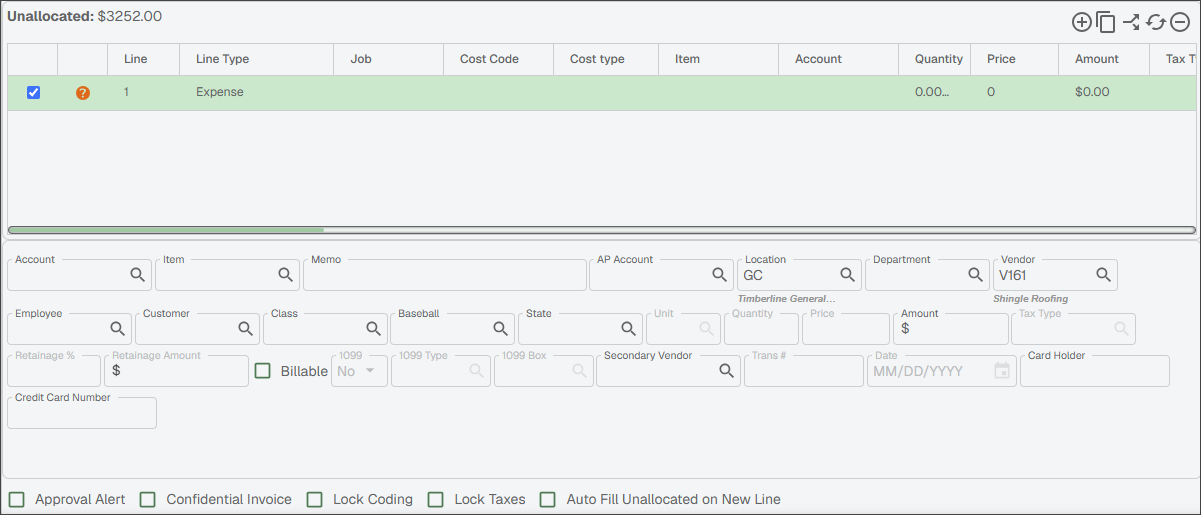
New line
Add a new line of the same line type.

Copy line
Click to add an exact duplicate of the line type that is highlighted when the Copy Line icon is clicked.
The replication includes all the fields in the Detail pane. See Copy Line for more information.

Split line
Click to split a line into two or more lines. See Split Line for more information.

Change line type
Click to display the Line Type list where you can change the current line type to a new line type.
Note
For those accounting systems with only one line type, this function is not available.
See Change Line Type for more information.

Remove line
Click to remove the selected line. Only one line can be deleted at a time.
See Remove Line for more information.
After adding a line, the bottom (detail) pane containing fields in which to code the invoice displays.
Based on the selected line type, different fields display.
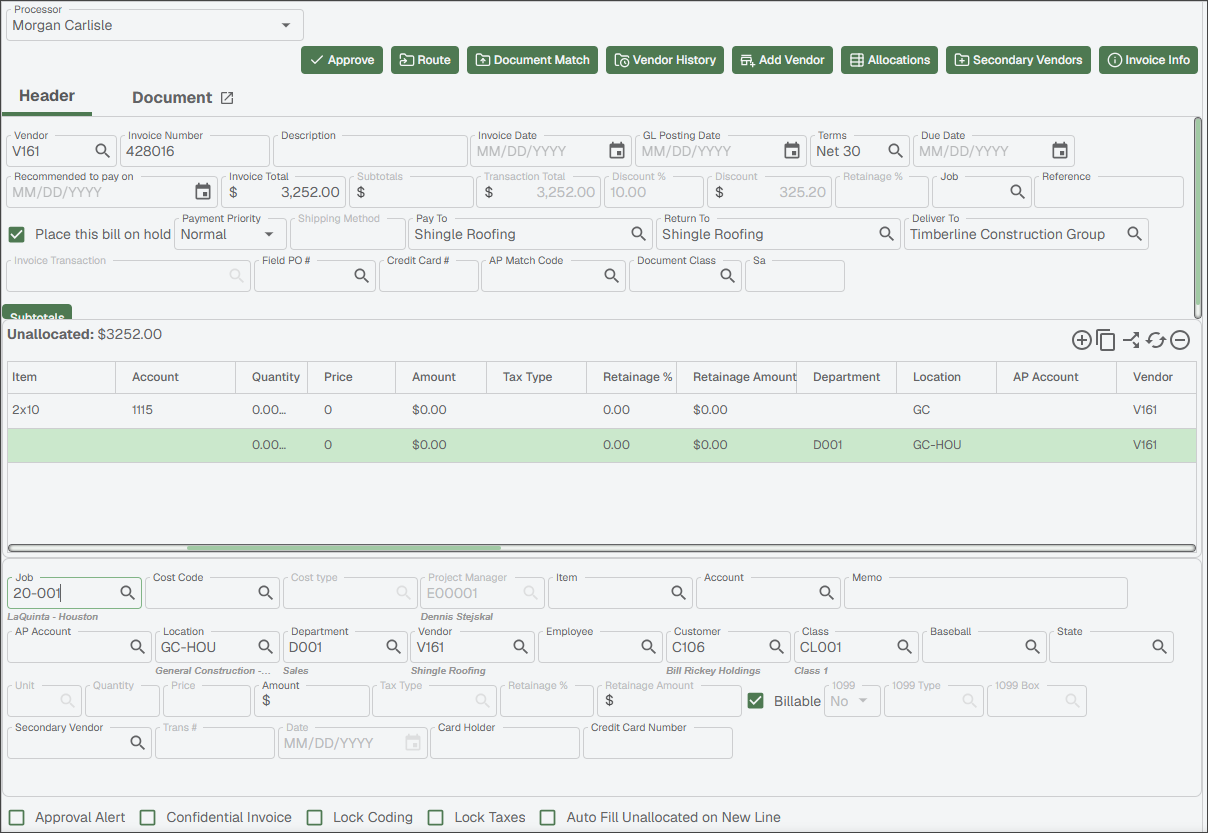
Continue adding and coding lines as needed.
If you have an invoice with multiple lines that should all have the same coding, you can copy an existing line in the middle (line) pane. There is no restriction as to the number of copied lines.
Enter the first line by clicking the New line
icon and completing the bottom (details) pane.Click to select the check box at the beginning of the line to be copied.
Click the Copy line
icon to create a new line that is identical to the existing line.Note
Not only is the new line an exact duplicate of the existing line, but all the fields in the bottom (detail) pane are also replicated.
If you have an invoice with a line that should be split into 2 or more lines, for example if you have multiple projects for which the invoice line amount must be distributed, you can split an existing line in the middle (line) pane.
There is no restriction as to the number of split lines.
Enter the first line by clicking the New line
icon and completing the bottom (details) pane.Click to select the check box at the beginning of the line to be split.
Click the Split line
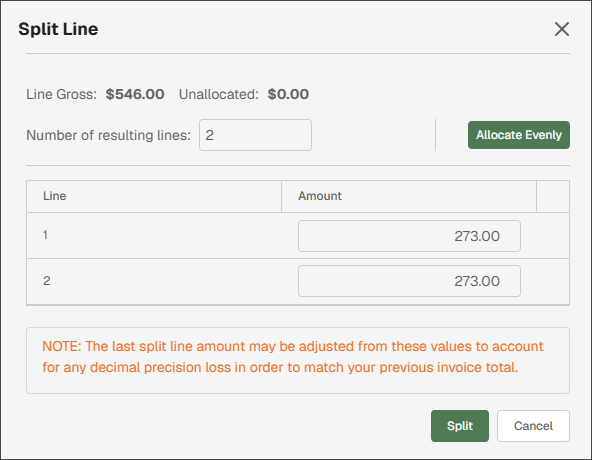
icon.A Split Line dialog similar to the following displays
Note
The line amount is split as evenly across all split lines as possible. If you split between two lines and then decide to increase the number of lines, the first line displays the entire amount and the remainder lines display with 0 (zero).
Click to redistribute the amount across all lines as evenly as possible.
Click .
If you have a line type that needs to be changed, you can change any existing line type in the middle (line) pane as long as your accounting system supports that line type.
Click to select the check box at the beginning of the line type you want to change.
Click the Change line Type
icon to bring up the available line types.A dropdown with the available line types displays
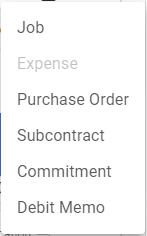
Note
The dropdown identifies the current line type for the existing line by displaying it as inactive.
In this example, Expense is the current line type.
Pick from the dropdown.
The bottom (details) pane fields update to support the new line type.
You can delete any existing line type in the middle (line) pane.
Click to select the check box at the beginning of the line type you want to delete.
Click the Remove line
icon.The line you selected is deleted.
Note
There is no confirmation message that displays before the line is removed.
Match Receipts on Invoice Lines
Invoice lines include matched receipt indicators to show if a single receipt was matched, if multiple receipts were matched, or if no receipts were matched. If no receipts have been matched, clicking the icon generates a Find Receipts dialog.
In Credit Card Importer, you can review multiple lines at once, by running the Run the Matched Receipts Report.
Note
Line Level Matching is available in Invoice Entry, Approve Invoices and Credit Card Importer.
Note
If the Receipt  icon displays, a single receipt was matched and no further receipt matching is necessary for that invoice line.
Choose a method to systematically get receipts, either through a request to a user or by searching the system.
Requests
Click the Match Receipts
 icon.
icon.The Find Matching Receipts dialog displays:
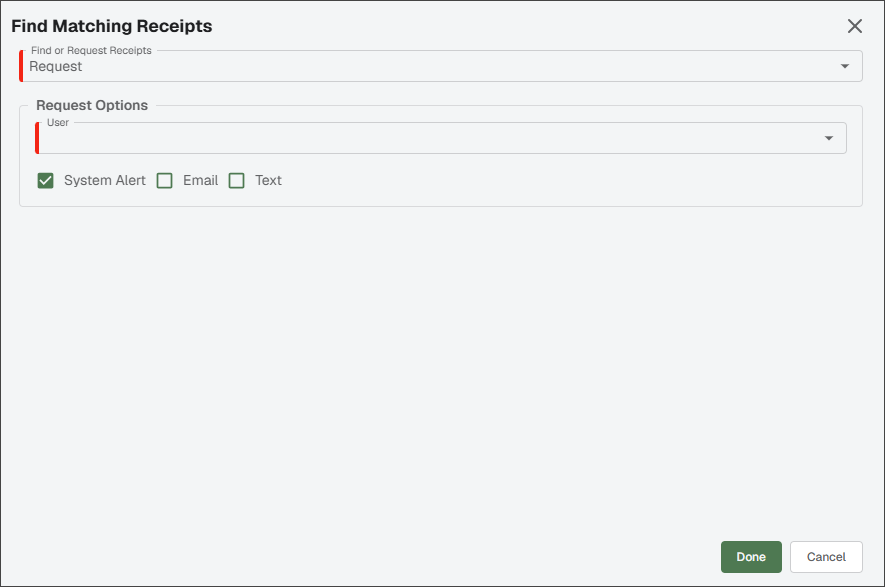
From the Find or Request Receipts dropdown, select Request.
In the User dropdown to select the user to whom the receipt request should be sent.
From the three check boxes (, , ), select the best method of sending the receipt request.
Click .
Search
Click the Match Receipts
icon on the line.The Find Matching Receipts dialog displays:
From the Find or Request Receipts dropdown, select .
The Criteria tab displays where you can enter keywords and/or advanced search conditions:
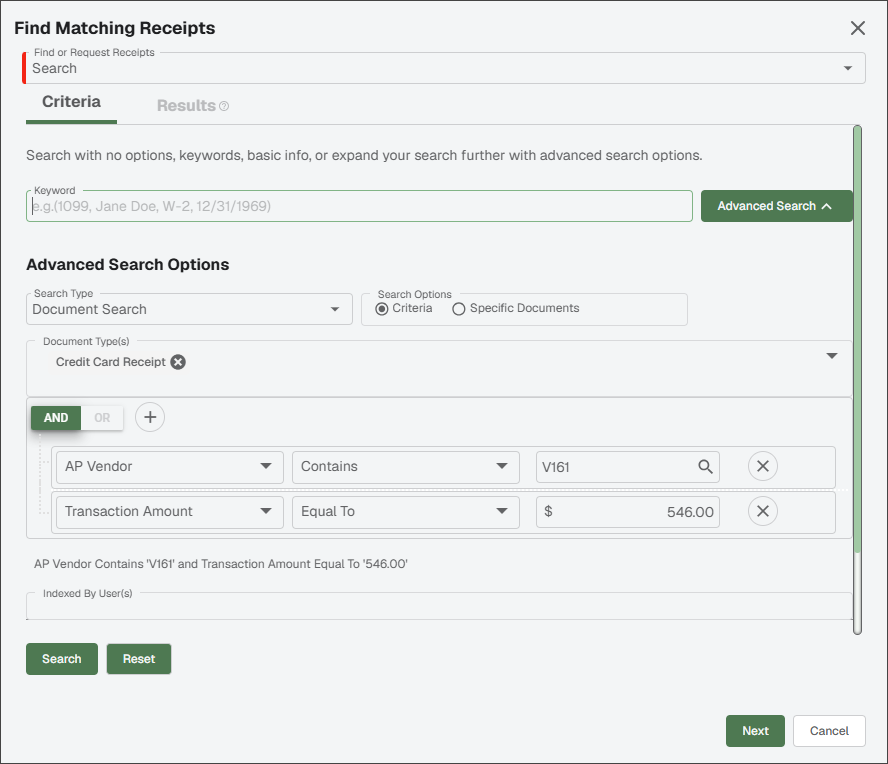
Click Search.
The Results tab lists potential matches.
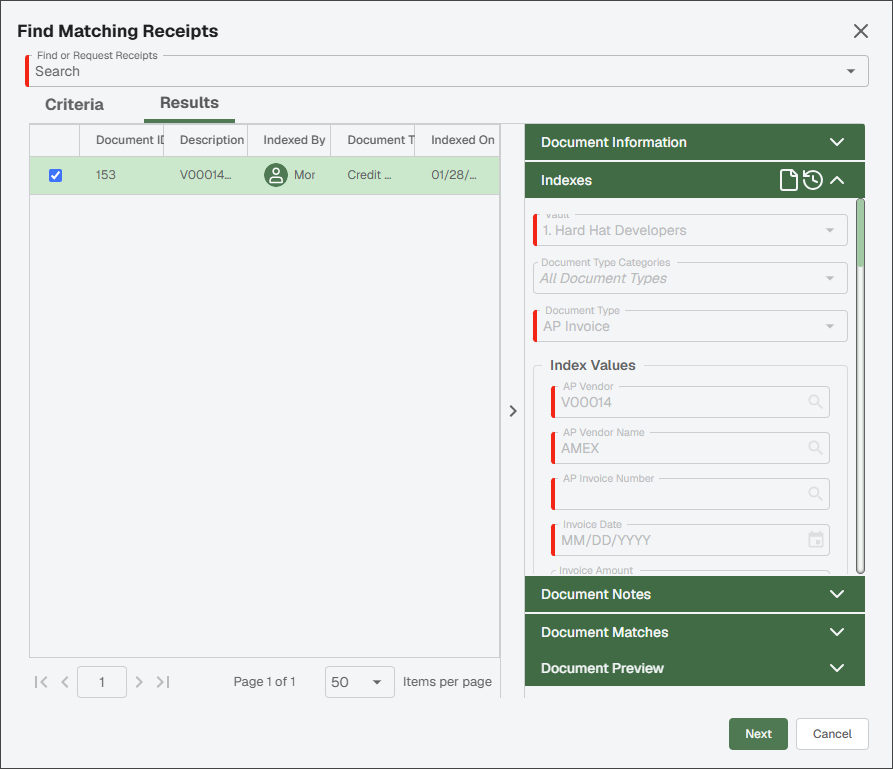
Click to select the entry.
Click .
Select the appropriate Match Receipt Option(s).
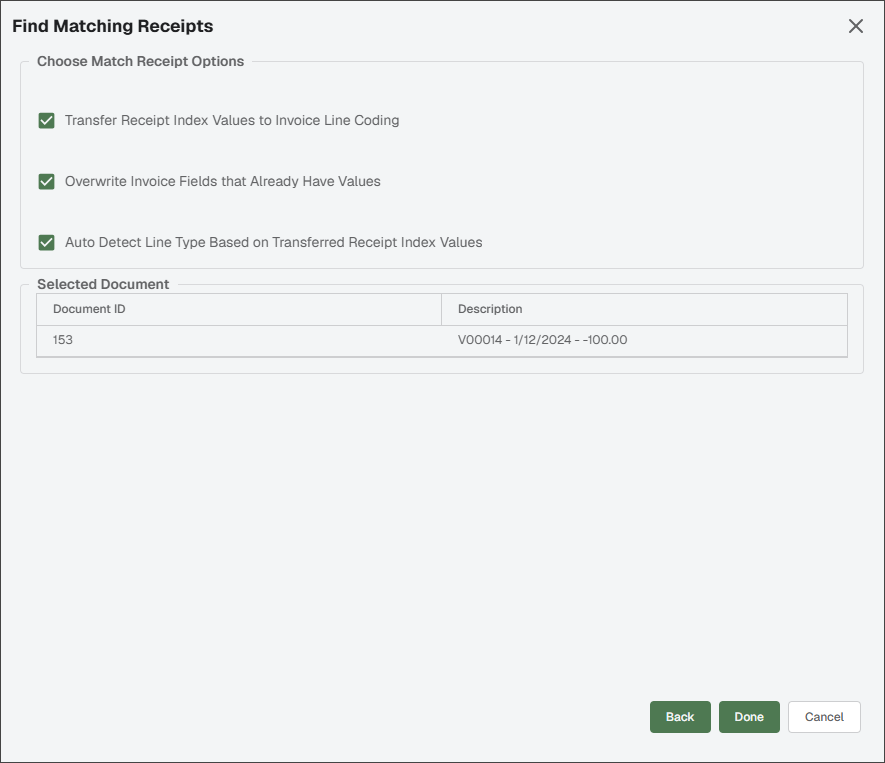
Click .
The In Progress Invoices tab redisplays and includes the
icon for the line with the matched receipt.