Company Settings
Important
You must be configured as with Compliance Manager or Auditor access permissions for the current vault to be able to view the Company pages within ClearToPay. Only a user with Compliance Manager permissions can edit this page.
The Company Settings page contains a list of settings that can be configured in ClearToPay™ for the entire company. From this page, users with Compliance Manager permissions can:
Review and update configuration settings
Create custom compliance rules, email groups, templates and wavier forms
Access other insurance, set accountant insurance mappings and manage endorsements on the company lookup tables tab
Complete the following steps to access the Company Settings page:
From My Paperless, click .
In the ClearToPay™ navigation bar, click .
Click .
A page similar to the following displays:
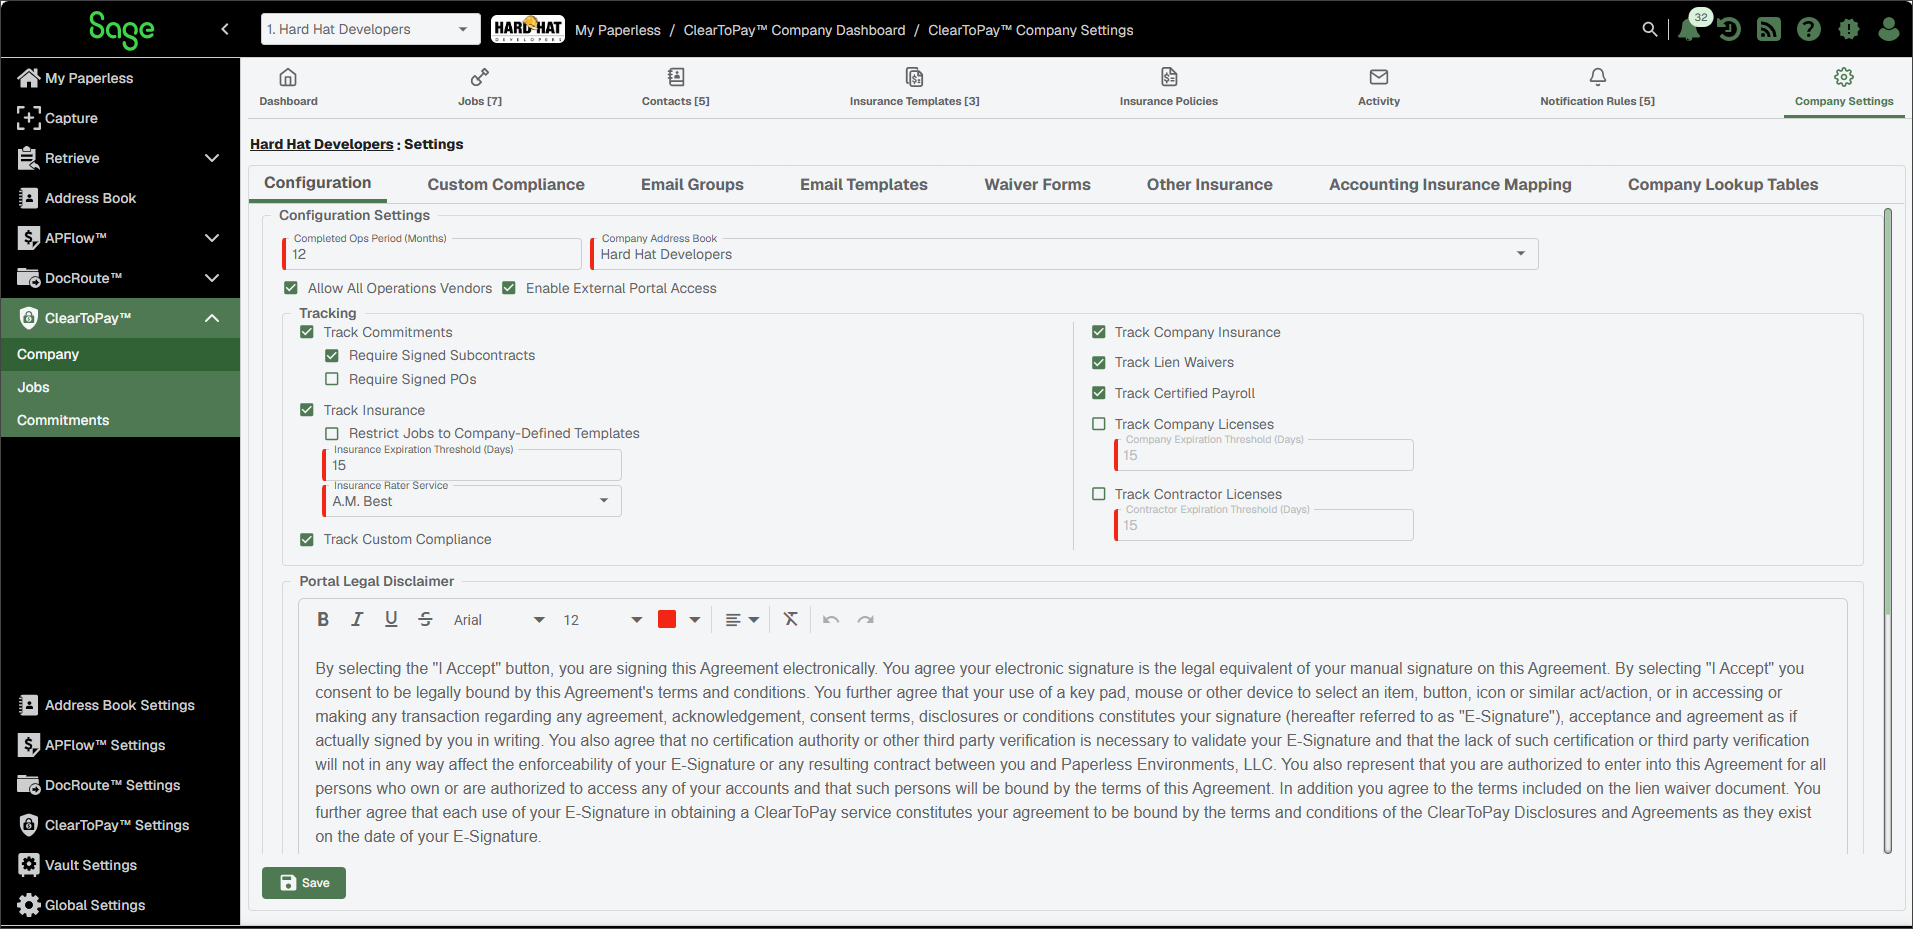
From the Company Settings page, use the tabs to configure the following settings at the company level:
ClearToPay™ Configuration
At the company level, ClearToPay provides configurable options that control the behavior of the program.
The Configuration page is where you choose which compliance information is tracked by ClearToPay. It is also where you identify which insurance rating service your company uses.
Important
To see this page and make changes:
Your ClearToPay module must be licensed
You must have ClearToPay Compliance Manager permissions
The Company Settings page opens with the Configuration tab selected.
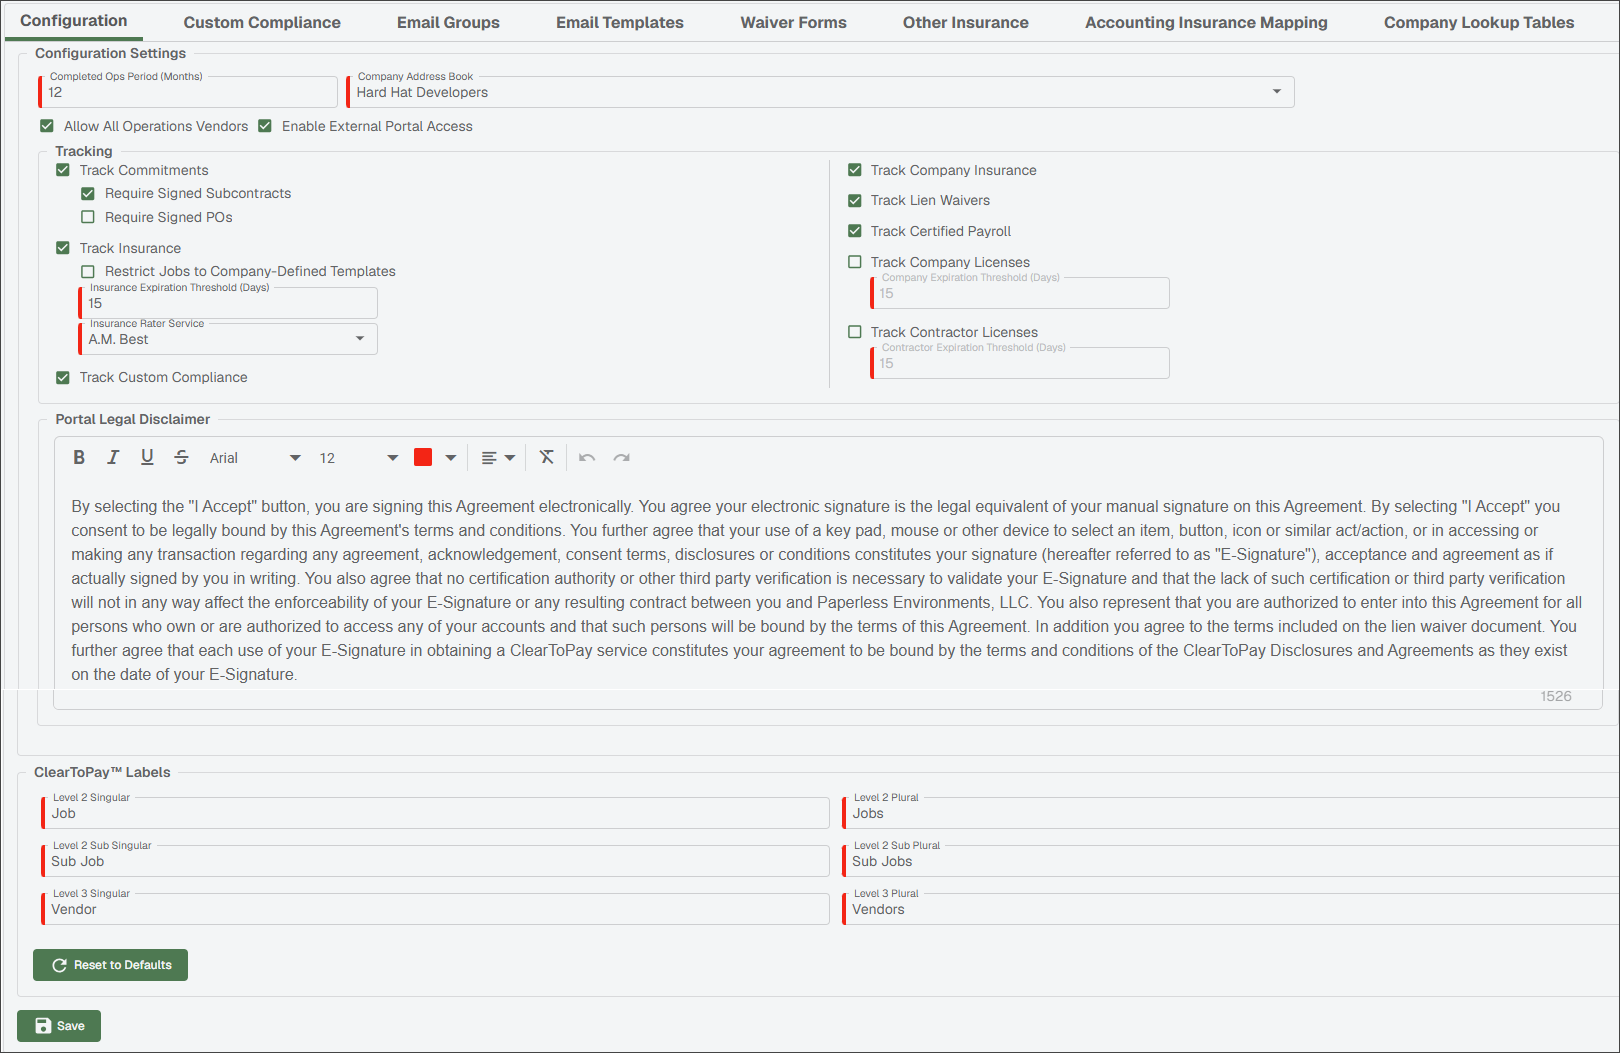
Refer to the table below and configure the settings for your company:
Completed Ops Period (Months)
The Completed Ops Period (Months) field sets the default number of months that a job remains in the completed operations period. After that period ends, the job enters Closed status.
Enter the default number (representing months) here. This number populates the Completed Operations Period (Months) field for jobs. During the completed operations period, the vendor is still expected to carry insurance.
This value can be overridden at the job level.
Company Address Book
Select the address book you want to pull contacts from when importing contacts to your company and jobs using the Company Address Book dropdown. By default, the main company address book is selected, meaning that your internal records are available as contacts at the company and job levels, while vendor contacts display as separate lists.
Allow All Operations Vendors
ClearToPay systematically creates an All Operations Vendors job and allows data entered in one location to be tracked across multiple jobs simultaneously. Insurance and custom compliance are still tracked for all operations vendors, they are simply entered at the All Operations level and not on a job-by-job basis.
Deselecting this option removes the ability to add or track all operations vendors for this vault.
Enable External Portal Access
If this check box is selected, ClearToPay allows access to the external portal. The external portal enables subcontractors and vendors to be self-sufficient in responding to requests to upload project documents and provide signatures.
If enabled within ClearToPay™ Settings, this setting can then be enabled at the job level in the job's Settings page. There is also an option to grant or revoke access on a per-vendor basis within vendor Contacts.
Track Commitments
A commitment is a purchase order or a subcontract that is generally tracked in your accounting system. Select the check box to enable commitment tracking in ClearToPay.
With the Track Commitments check box selected, the Commitments option displays in the left navigation bar and this setting can then be enabled in the applicable job and vendor Settings pages.
For more information, see Commitments.
Note
If Track Commitments is left blank, the Require Signed Subcontracts and Require Signed Purchase Orders check boxes are disabled.
Require Signed Subcontracts
If this check box is selected, ClearToPay allows you to track contract signatures. When this check box is enabled, a job or vendor are considered out of compliance if a subcontract does not include a valid value in the Date Signed field.
Note
If the Track Commitments check box is blank, the Require Signed Subcontracts option is disabled.
Require Signed POs
If this check box is selected, ClearToPay allows you to track executed purchase orders returned by vendors and subcontractors. When this check box is enabled, a job or vendor are considered out of compliance if a purchase order does not include a valid value in the Date Signed field.
Note
If the Track Commitments check box is blank, the Require Signed POs option is disabled.
Track Insurance
If this check box is selected, ClearToPay tracks job and vendor insurance against the selected Insurance Template.
Note
If Track Insurance is left blank, the Restrict Jobs to Company-Defined Templates check box and fields beneath are disabled.
Restrict Jobs to Company-Defined Templates
If this check box is selected, the template selected at the job level cannot be edited.
Note
If Track Insurance is left blank, this check box is disabled.
Insurance Expiration Threshold (Days)
If the Track Insurance check box is selected, you can enter the number of days in the Insurance Expiration Threshold field prior to expiration that ClearToPay sends vendors an automated email warning them that their insurance policy is about to expire.
If an insurance policy expiration date falls within the Insurance Expiration Threshold, the vendor(s) are added to the Vendor Expiring Insurance Policies dashboard widget.
Insurance Rater Service
Select an option from the Insurance Rater Service field to determine which insurance rating service is used across the company and its jobs. This selection generates labels for the Ratings and Size Ratings fields on the jobs' Insurance pages.
Note
If Track Insurance is left blank, this field is disabled.
Track Custom Compliance
Select to allow for the creation and tracking of unique compliance requirements beyond the standard types. See Custom Compliance Settings for more information.
If enabled within ClearToPay™ Settings, you can enable it at the job level in the job's Settings page. If tracking custom compliance items is enabled for the associated job, you can enable it for vendors on their Settings pages as well. See Job Settings and Vendor Settings for more information.
Track Company Insurance
Select to enable tracking for your company's own insurance policies. Once enabled, you may input your company's insurance policies ( and allow ClearToPay to track expiration dates.
Track Lien Waivers
Select to turn on lien waiver tracking for the company and make it possible to track lien waivers at the job and vendor levels. Lien waivers must also be enabled within job and vendor settings. See Job Settings and Vendor Settings for more information.
Track Certified Payroll
Select to enable certified payroll tracking for the company and make it possible to track certified payroll documentation at the job and vendor levels. See Job Settings and Vendor Settings for more information.
Track Company Licenses
Select to enable license tracking for the company.
Company Expiration Threshold (Days)
If the Track Company Licenses check box is selected, enter the number of days in the Company Expiration Threshold field prior to expiration that ClearToPay sends vendors an automated email warning them that their license is about to expire. A value between 1 and 90 is required before the configuration can be saved.
Track Contractor Licenses
Select to enable license tracking for vendors. When enabled, the License Templates tab becomes available at the company level.
Contractor Expiration Threshold (Days)
If the Track Contractor Licenses check box is selected, enter the number of days in the Contractor Expiration Threshold field prior to expiration that ClearToPay sends contractors an automated email warning them that their license is about to expire. A value between 1 and 90 is required before the configuration can be saved.
Portal Legal Disclaimer
If external portal access is enabled, enter your disclaimer text in this field to ensure user's consent to the terms and conditions of using the portal.
ClearToPay™ Labels
(Optional) Configure the terms used for the different levels of jobs in ClearToPay. Be sure to update both the singular and plural fields. By default, ClearToPay uses the terms Job, Sub Job and Vendor. However, if your company use terms like "Installers" (instead of Vendors) or "Extras" (instead of Sub Jobs), you can customize labels and override the defaults. The selected terminology is then used throughout the ClearToPay module.
Note
Click to return all ClearToPay labels back to the system defaults. Anywhere in the system where the labels were altered return to the original values.
Click to save your configuration.
Custom Compliance Settings
Out of the box, ClearToPay™ Compliance Manager provides functionality for tracking insurance, lien waivers, certified payroll, contractor licenses and commitments. However, if you and your company need to track the receipt and collection of other required documentation to make sure the company is adequately protected, you can configure Custom Compliance rules.
Use the custom compliance module within ClearToPay™ Settings to enter compliance tracking items beyond those that ClearToPay initially provides to:
Determine if items are tracked for informational purposes or if they affect vendors' overall compliance
Configure testing for rules and validation
Classify the rules as applicable to jobs, vendors and/or all operations vendors
Important
To see this page and make changes:
Your ClearToPay module must be licensed
You must have ClearToPay Compliance Manager permissions
From Company Settings, click the tab. Then, use the page to do the following:

Complete the following steps to add a custom compliance rule and make it available to jobs or vendors:
Click .
The Add Custom Compliance Rule dialog displays:
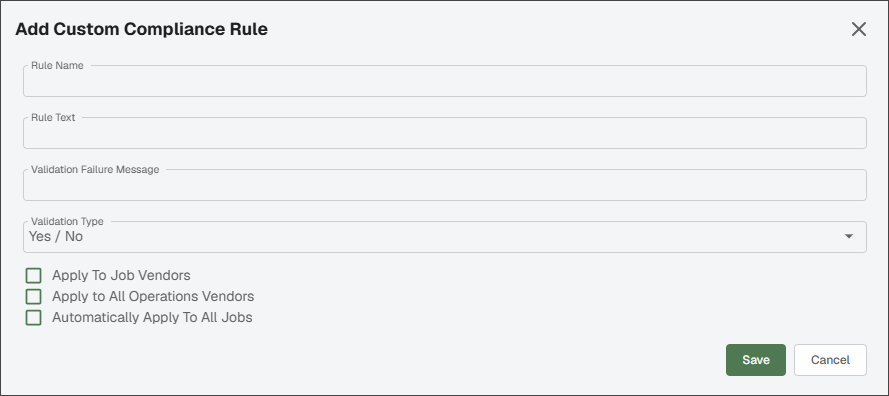
Enter a meaningful name for the rule in the Rule Name field.
Note
For example, "SOC Compliance Tracking."
Enter a description of the rule in the Rule Text field.
Enter a message in the Validation Failure Message field that displays if validation requirements are not met.
Select one of the following options from the Validation Type dropdown.
Yes/No: Use to indicate if the terms of the rule have been met.
Numeric Value: Use to track coverage amounts, deductibles or cost to determine if the number provided by the vendor is appropriate.
Date Value: Use to track a deadline or expiration date.
Ranked List: Create a list of valid values where the minimum and maximum are established and ranked.
Note
If you select the Ranked Lists option, an additional Select Ranked List dropdown along with a Manage Ranked Lists button display. You can choose an existing list from the dropdown if you want to use those list criteria or click the button to edit or create new lists and values for this rule. See Manage Ranked Lists for more information.
Select the check boxes for , or as appropriate.
Click to save and exit.
The custom compliance rule can now be applied and tracked for the group(s) you selected.
Complete the following steps to configure a ranked list to validate your custom compliance rule:
While creating or editing a ranked list custom compliance rule, click .
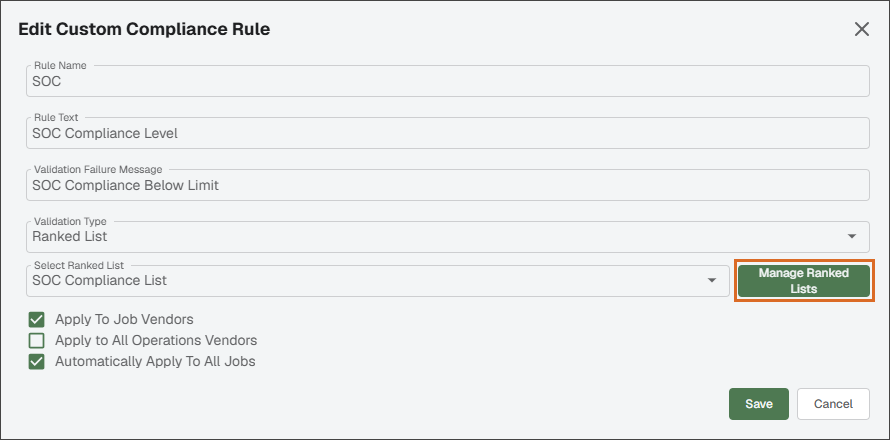
(Optional) To create a new list to use in your custom compliance rule, click .
From there, you can give the list a name and set it to if it's ready to use.
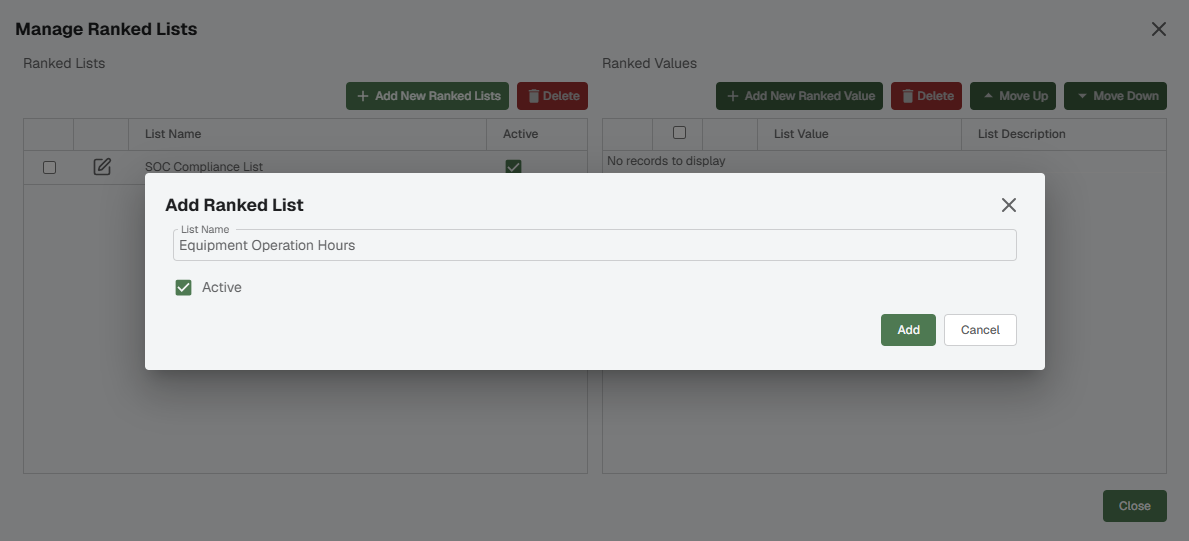
(Optional) Select a list from the Ranked Lists section to view its values in the Ranked Values section.
From there, you can add, edit or rearrange the list's values:
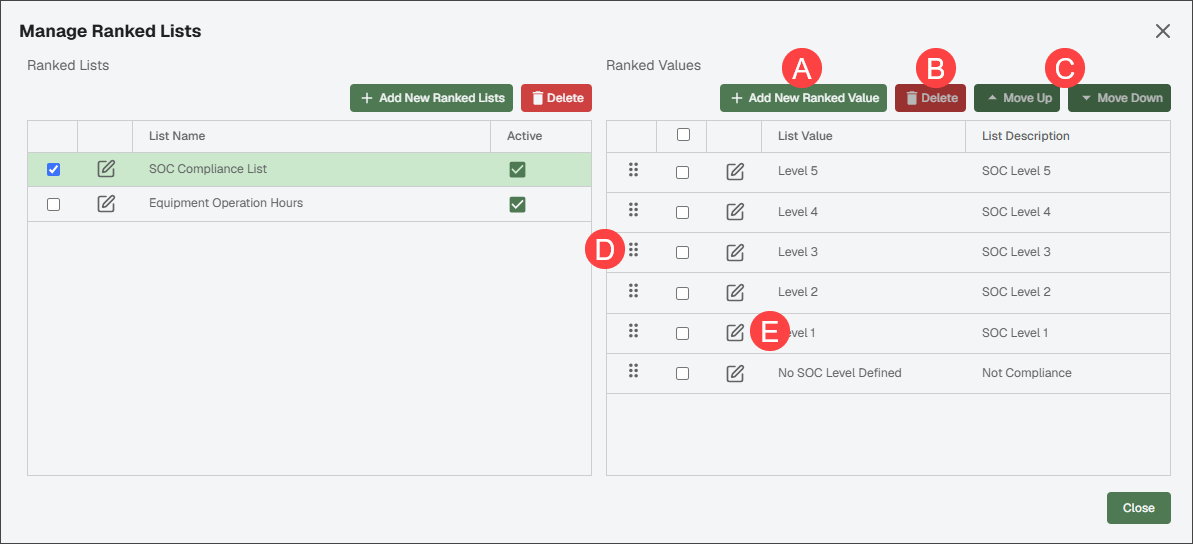
A: Click to add a new list value and give it a description. The description should indicate if the value meets or does not meet your compliance requirements. B: Select one or more values in the list, then click . C: Select a value in the list, then use the or buttons to reorder the list one value at a time. D: Use the drag feature to rearrange the values. E: Click the icon to update a list value's name and description.
Complete the following steps to make updates to an existing custom compliance rule:
Click the Edit
 icon.
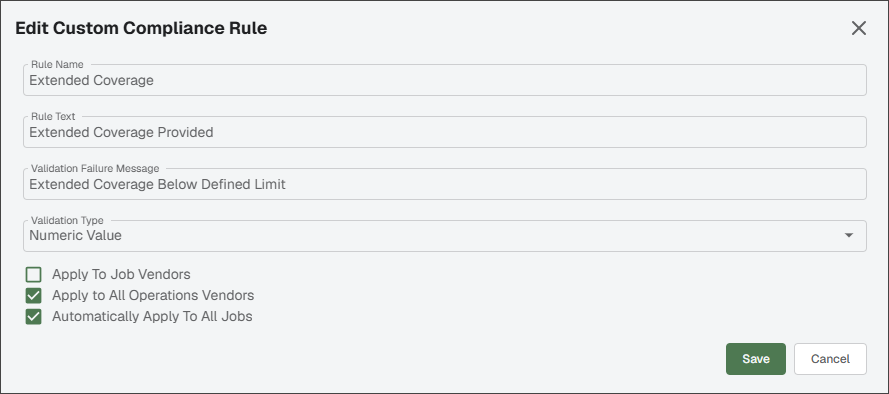
icon.In the Edit Custom Compliance Rule dialog, make the necessary updates to the rule's name, text, validation and applications.
Note
See Create a Custom Compliance Rule for more information on the recommended values for each field.
Click .
Select one or more custom compliance rules from the list.
Click .
In the Delete Custom Compliance dialog, click .
Email Groups
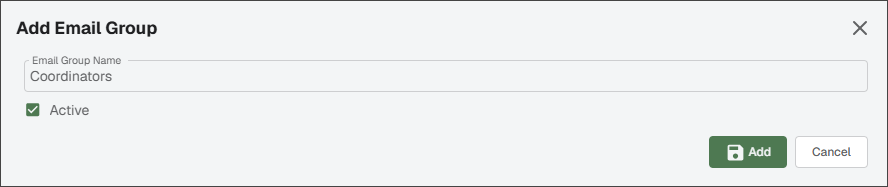
Every ClearToPay™ user is assigned to an email group at the company, job or vendor level when their contact is created. Email groups can be assigned to be used by specific email templates.
Note
For example, you may want to create a project management email group so that all the project managers are sent regular reporting updates by email.
Company contacts, job contacts and vendor contacts can be assigned to email groups created within ClearToPay™ Settings. For more information on assigning users to different email groups, see:
Important
To see this page and make changes:
Your ClearToPay module must be licensed
You must have ClearToPay Compliance Manager permissions
From Company Settings, click the tab. From the Email Group Type dropdown, select , or .
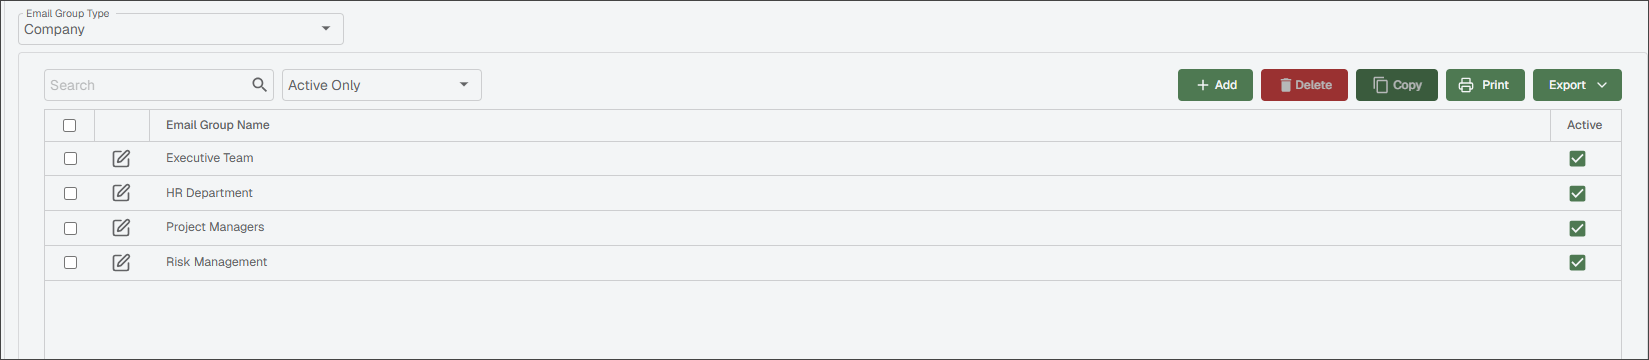
Then, use the page to do the following:
 |
| |
 |
| |
 |
| |
 | Click to print the Email Groups grid for your selected tab. | |
 | Click to export the grid information to Excel, CSV or PDF. | |
|
|
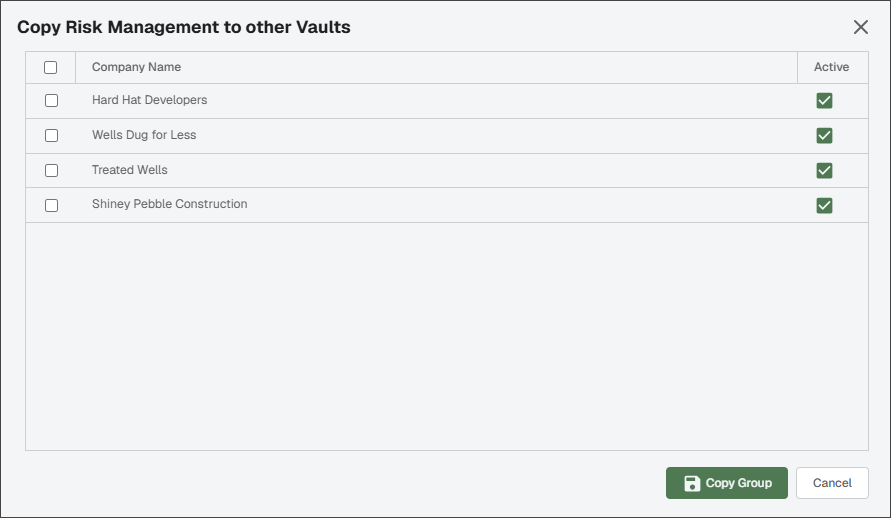
Email Templates
Email templates in ClearToPay™ are used to generate and automate communications about compliance status and requirements. Building templates in advance ensures that emails include the correct recipients (based on the individuals assigned to email groups at the company, job or vendor level. See Email Groups for more information), prefilled subject and body content, attachments and reports.
You can create the following types of email templates, and the type you select impacts the variables that are available for entry within the email subject and body:
Email Template Type | Available Variables |
|---|---|
General/Insurance | 1st Level Tier List; Company; Current Date; Compliance ID; Job Address; Job Address 2; Job City; Job County; Job Name; Job Number; Job State; Job Zip; Parent Vendor Name; Portal Hyperlink; Portal URL; Prime Tier List; Prime Vendor Name; Vendor Address; Vendor Address 2; Vendor City; Vendor County; Vendor Name; Vendor Number; Vendor State; Vendor State; Vendor Zip NoteThe variables above are available on all email types. |
Lien Waiver | Commitment List; Commitment Number; Commitment Retention; Commitment Total; Waiver Amount; Waiver Due Date; Waiver Miscellaneous; Waiver Through Date; Waiver Type |
Certified Payroll | Certified Payroll Due Date; Certified Payroll End Date; Certified Payroll Number |
Contractor Licenses | License City; License Expiration Date; License Number; License State; License Type |
Important
To see this page and make changes:
Your ClearToPay module must be licensed
You must have ClearToPay Compliance Manager permissions
From Company Settings, click the tab. Then, use the page to do the following:
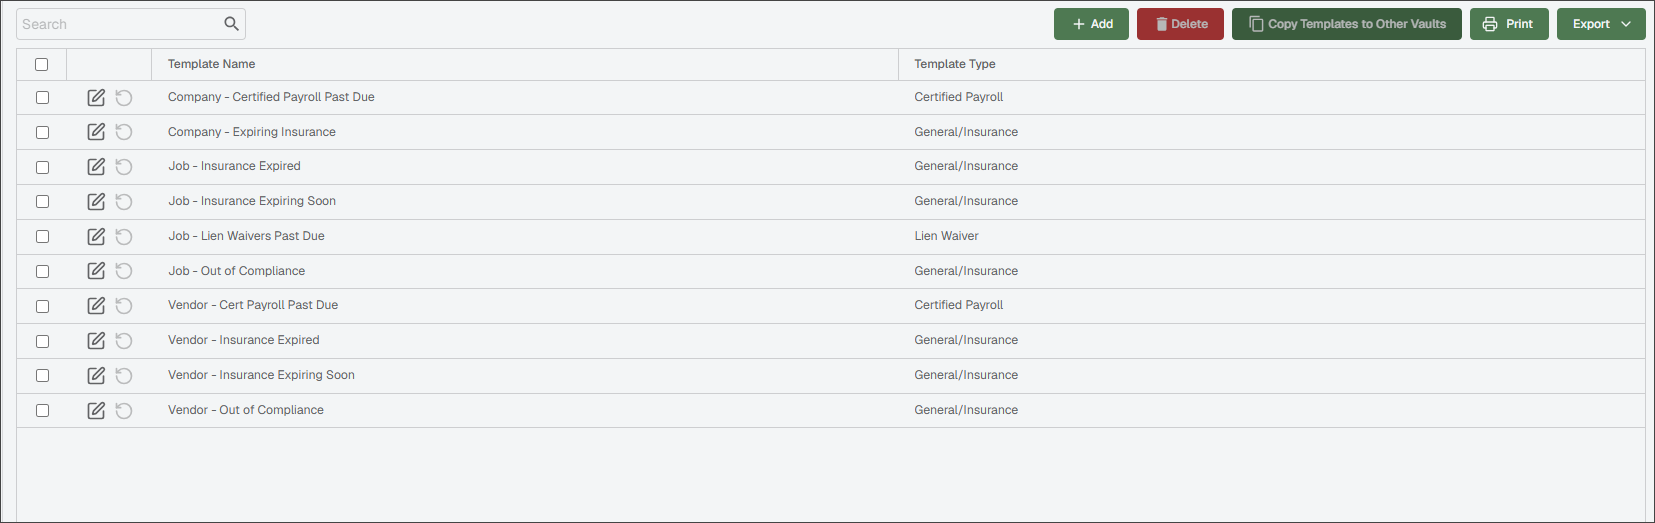
Click .
The Add Template dialog displays:
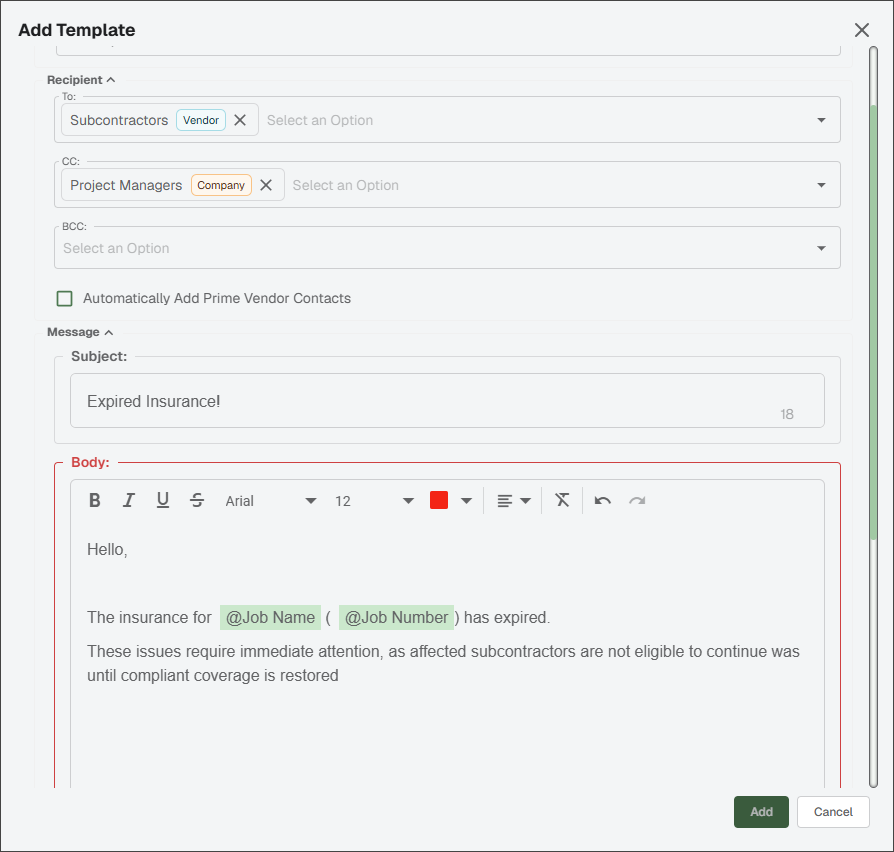
In the Template Configuration section:
Enter a meaningful name in the Template Name field.
Note
For example, "Lien Waiver Template," "Expiring Insurance Template," etc.
Choose an option from the Email Template Type dropdown.
Note
Your selection impacts which parts of ClearToPay the template can be used in.
In the Recipient section:
Select the appropriate email group from the To: dropdown.
Note
Recipient groups are organized by Company, Job and Vendor and have an indicator to help you select the correct group. For more information, see Email Groups. To see which contacts are assigned to which groups, navigate to the Contacts page within the Company, Job or Vendor. When users select a template to send an email, they see the recipient's contact name(s) as opposed to the email group to which they belong.
Select the appropriate email group from the CC: dropdown or leave blank.
Select the appropriate email group from the BCC: dropdown or leave blank.
Select the check box if you want to include the primary vendor automatically when you are emailing their lower tier vendors.
In the Message section:
Type the subject line you want to display in users' inboxes.
Note
Use the @ symbol to enter a variable to fill in information such as vendor name, job number, date, etc. This adds flexibility and ensures that the email can be reused on any applicable job. Variable tags are replaced by actual values when the email is being prepared and sent.
Type the body of the email as you want it to display when the template is selected.
Note
Use the @ symbol to enter a variable to fill in information such as vendor name, job number, date, waiver amount, commitment list, etc. This adds flexibility and ensures that the email can be reused on any applicable job. Variable tags are replaced by actual values when the email is being prepared and sent.
In the Attachments section:
Click to attach one or more document types to every email using this template. Select the appropriate document types(s) from the list, then choose if they should be included in the Company, Job and/or Vendor communications. Click .
Note
Documents are attached based on files that are matched and indexed into the system.
Click to attach one or more reports to every email using this template. Select the report(s) from the list and click .
Click to save and exit.
The template can now be selected when sending emails and used for scheduled sends on the Notification Rules pages.
Complete the following steps to make updates to an email template:
Click the Edit
icon.In the Edit Template dialog, make the necessary updates to the configuration, recipients, message and/or attachments options.
Note
See Create a New Email Template for more information on the values available for each field and how to configure variable text.
Click .
The updated version of the template is now available to send to vendors.
Select a single email template from the list.
Click .
From the list, select which vault you want to copy the email template to.
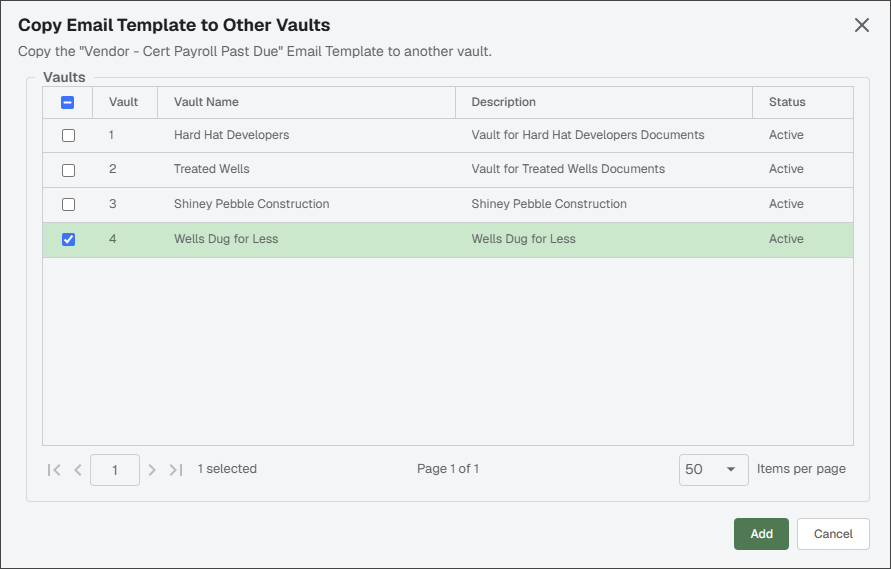
Click .
Select one or more email templates from the list.
Click .
In the Delete Email Template dialog, click .
Waiver Forms
Lien waivers are tracked using the Through Date value that is assigned at the job and vendor level.
Note
Through Date represents the end of the work billing period.
See the sections below for more information:
Important
To see this page and make changes:
Your ClearToPay module must be licensed
You must have ClearToPay Compliance Manager permissions
From Company Settings, click the tab. Then, use the page to do the following:

Click .
The Add Waiver Form dialog displays:
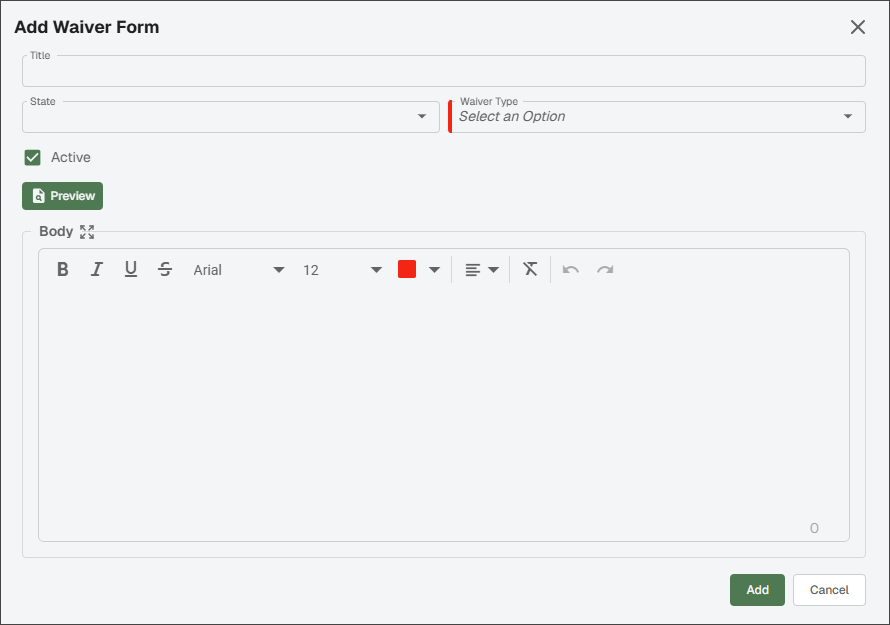
Enter a meaningful name for the lien waiver form in the Title field.
Note
For example, "California Conditional Progress Waiver."
Select the state this waiver form can be used for from the State dropdown.
Note
Waiver forms are only available for selection on jobs with the same state.
Select one of the following options from the Waiver Type dropdown. See Waiver Forms for a list of definitions:
Conditional Progress
Unconditional Progress
Conditional Final
Unconditional Final
Keep the Active check box selected if this form is ready for use.
Enter the waiver form text in the Body field. This wording must meet the state regulations for the state selected above.
Note
Use the @ symbol to enter a variable to fill in information such as vendor name, job number, date, exceptions, exception amount, etc. This adds flexibility and ensures that the form can be reused on any applicable job or vendor. When the waiver document is generated for printing or distribution, the variable placeholders are replaced by actual data values from the job, vendor, and waiver records.
Click to save and exit.
The form can now be set as the default form on the Settings pages at the job and vendor level.
Click the Edit
icon.In the Edit Waiver Form dialog, make the necessary updates to the title, state, waiver type and/or body text.
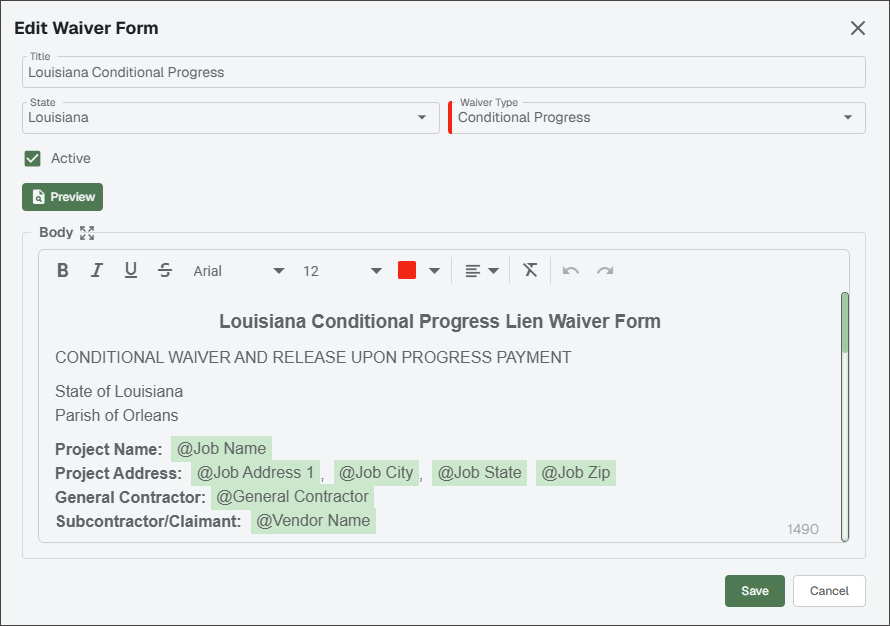
Note
See Create a Lien Waiver Form for more information on the values available for each field and how to configure variable text.
(Optional) You can also deselect the Active check box to make the waiver form unavailable for use.
Click .
Select a single waiver form from the list.
Click .
From the list, select which vault you want to copy the waiver form to.
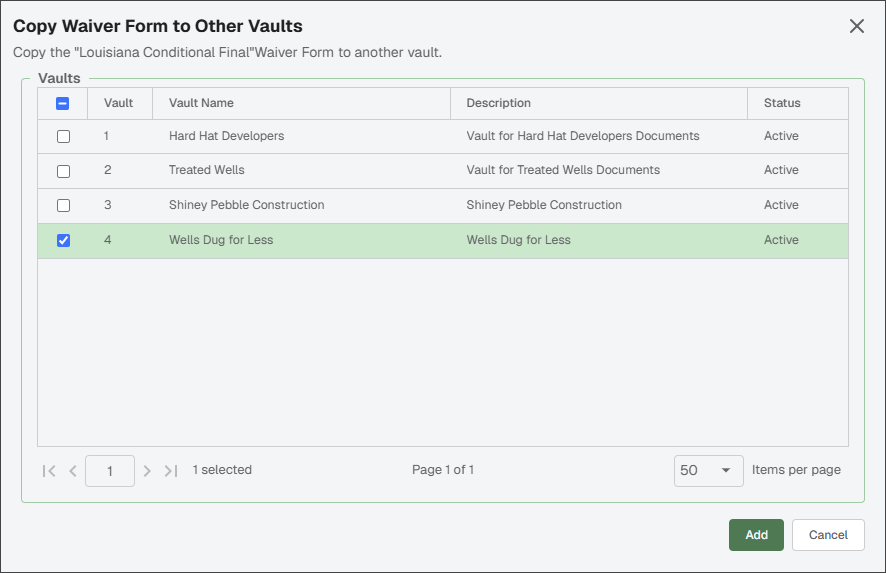
Click .
Select one or more lien waivers from the list.
Click .
In the Delete Waiver Form dialog, click .
Other Insurance
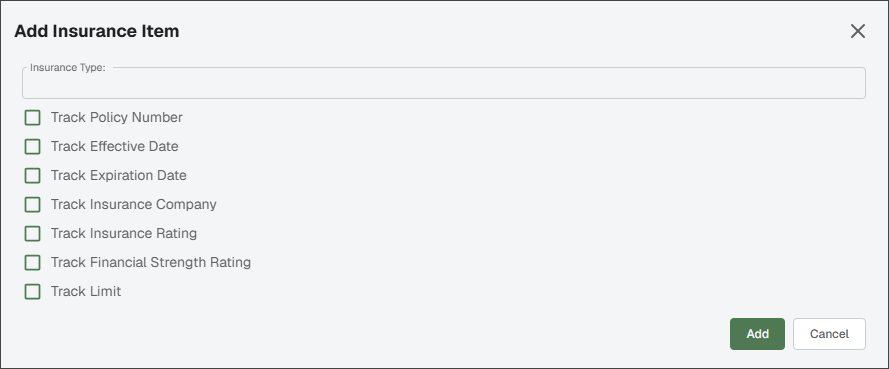
The Other Insurance page can be used to add supplemental insurance types to ClearToPay™ for tracking purposes.
Important
To see this page within ClearToPay™ Settings:
Your ClearToPay module must be licensed
You must be a Vault, System or ClearToPay Administrator
From Company Settings, click, the tab. Then, use the page to do the following:

 |
| |
|
| |
| Click to print the Additional Insurance Items grid. | |
| Click to export the grid information to Excel, CSV or PDF. | |
|
|
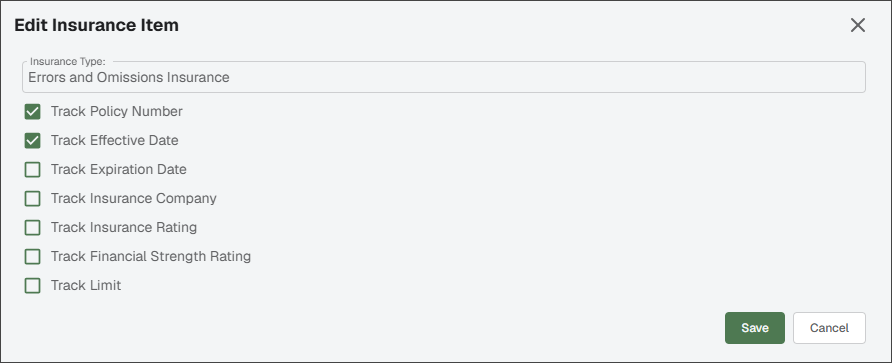
Accounting Insurance Mapping
The Accounting Insurance Mapping page allows you to map the insurance code used in your accounting system to the insurance type name that is used in ClearToPay™. Once the mapping is established, the system checks for a record in the accounting system that has the correct policy number, effective date and expiration date.
Policy data checks can only occur if there are matching records in ClearToPay and the accounting system.
Important
To see this page and make changes:
Your ClearToPay module must be licensed
You must have ClearToPay Compliance Manager permissions
From Company Settings, click the tab, then use the page to do the following:
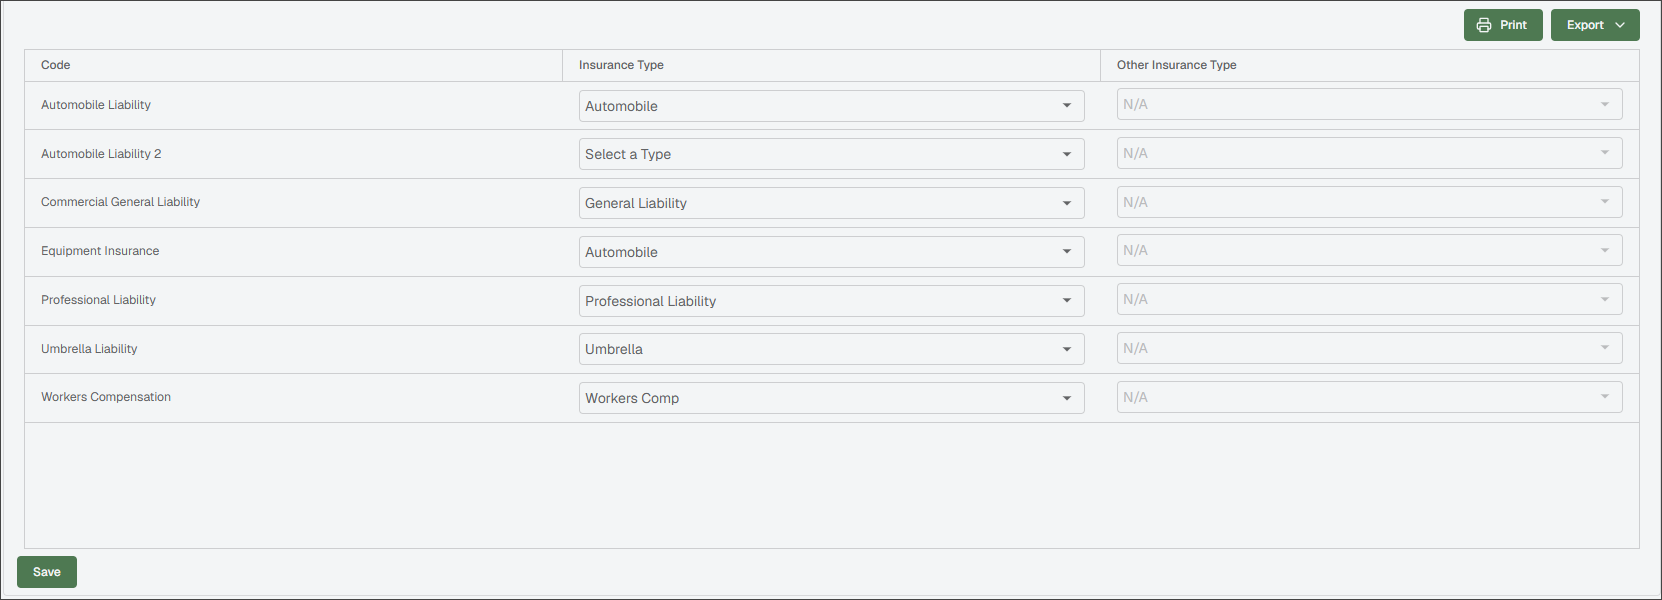
For each item in the Code (accounting system) column, use the dropdown in the Insurance Type column to select the appropriate policy match.
(Optional) If you select in the Insurance Type column, select a more specific policy type in the Other Insurance Type column to ensure an accurate match.
Note
For all insurance types besides Other, the dropdowns in the Other Insurance Type column default to N/A.
Click .
ClearToPay™ Company Lookup Tables
Important
To see this page and make changes:
Your ClearToPay module must be licensed
You must have ClearToPay Compliance Manager permissions
From Company Settings, click the tab. Then, select an option from the Lookup Table dropdown:
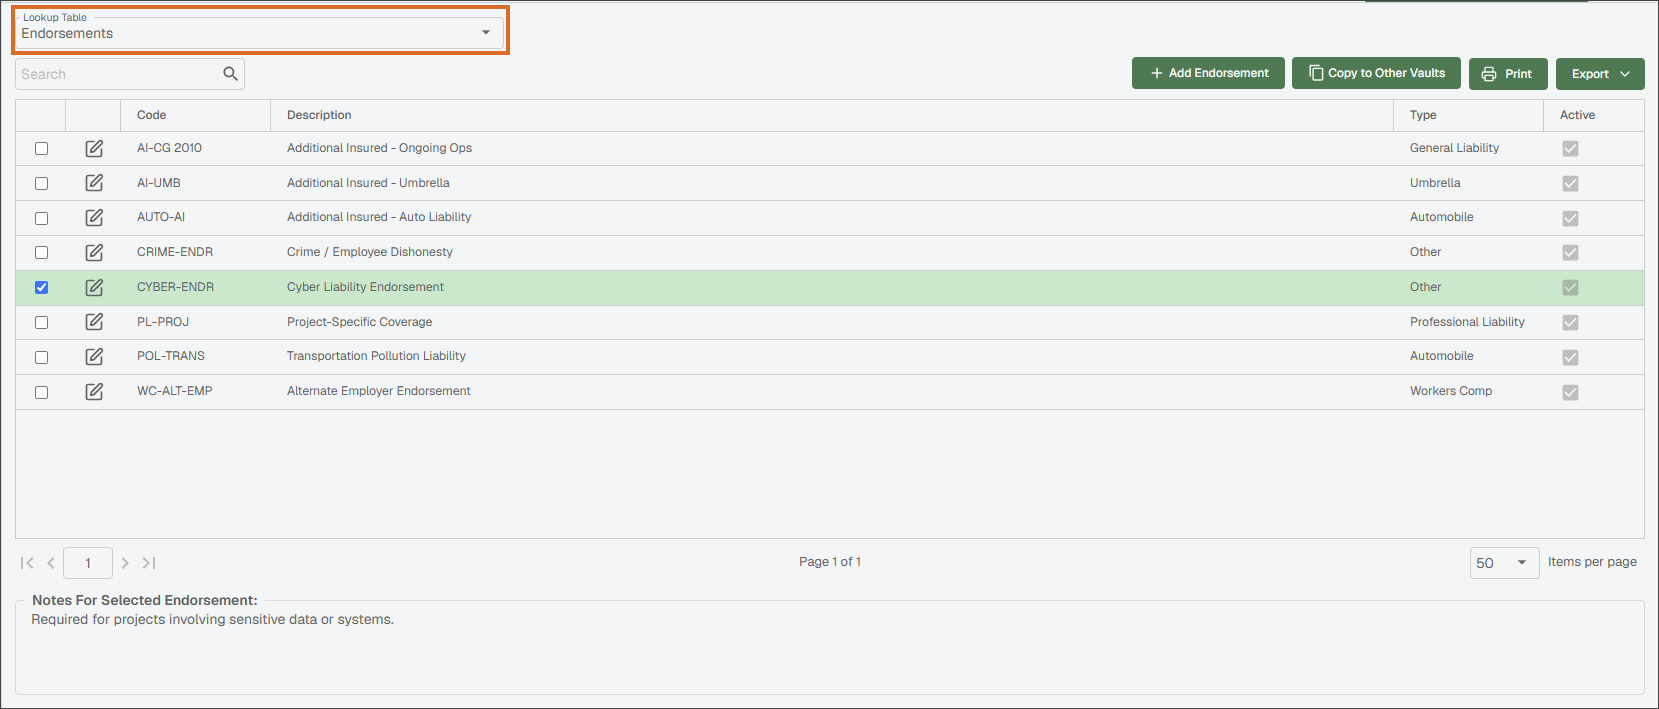
Use this page to define a master list of endorsements, which track legally binding changes to a policy. Once they are created, the endorsements entered in this lookup table are included in insurance templates at the Company level, where they can be set to Required.
Endorsement requirements established at the company level carry into the templates assigned at the job level and must be honored by jobs and vendors.
From this page, you can perform the following tasks:
| Search for endorsements by code or description to narrow the list. | |
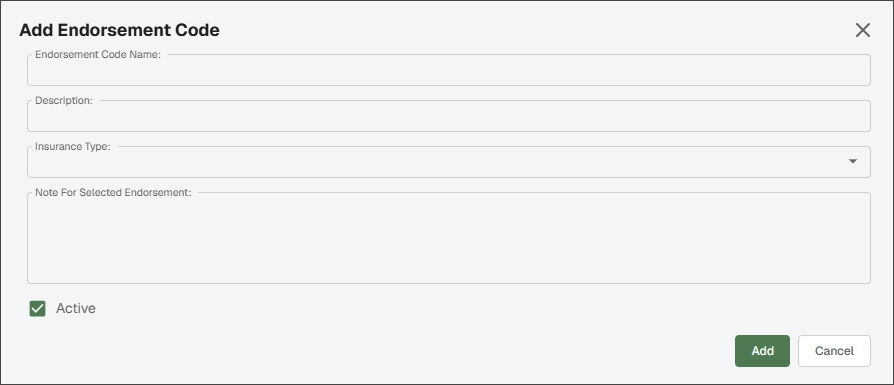
 | Click to access the Add Endorsement Code dialog and create a new endorsement. Enter information in the fields shown, then click .
| |
 | The list of endorsements displayed on the page is only valid for the current vault. To copy an endorsement to another vault, select its check box and click . Select the vault check box in the Copy Endorsements to Other Vault dialog, then click . | |
| Click to print the Endorsement Configuration grid. | |
| Click to export the grid information to Excel, CSV or PDF. | |
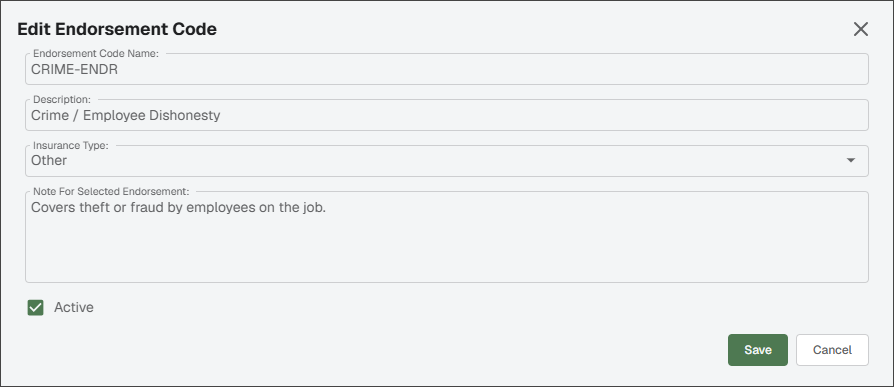
| Click the Edit
|