Job Settings
You can use the Settings page to manage the job's configuration and what compliance information is tracked for this job. Most standard jobs are configured in association with a specific project, but ClearToPay™ also has an ALLOPS job option (if that functionality is enabled within company's configuration) used to configure All Operations Vendors that can be used as subcontractors across multiple jobs in a single organization.
Complete the following steps to access the Jobs page, then choose if you are configuring the settings for a project-based job or for All Operations Vendors:
From My Paperless, click .
In the ClearToPay™ left navigation, click .
Configure Standard Job Settings
Choose the job from the list.
Click .

A page similar to the following displays:
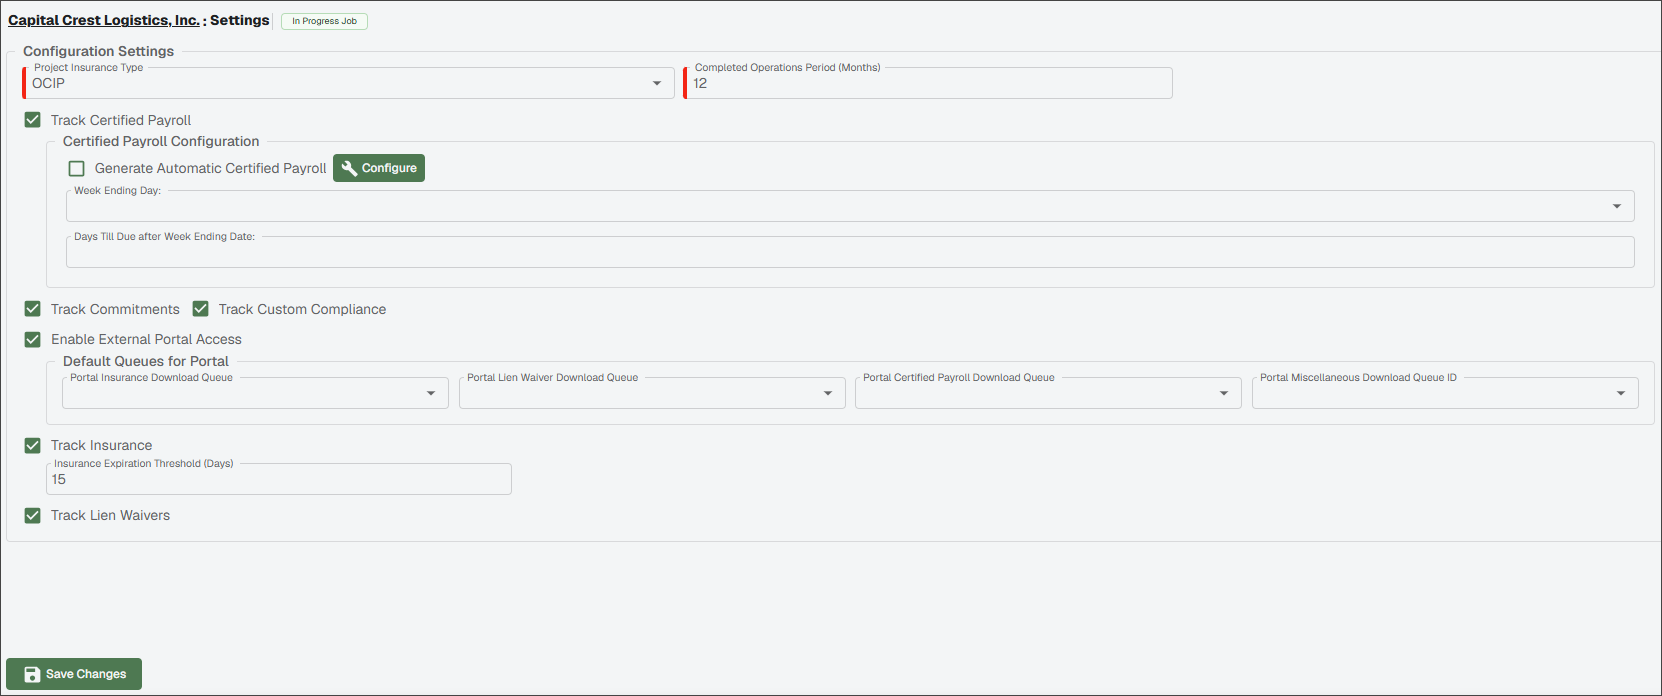
Review the information in the table below and perform configuration actions as needed:
Note
The check boxes and fields on this page vary based on which options are enabled on the Company Settings page.
Project Insurance Type
Select this dropdown to choose between standard insurance or if this job requires an Insurance Controlled Program.
The list of options available is managed within . See Configure Project Insurance Types for more information.
Completed Operations Period (Months)
Enter the completed operations period in months. During the completed operations period, the vendors are still expected to carry insurance so the customer is protected from liability.
Note
This number may be provided by project management staff or imported from your accounting system.
Track Certified Payroll
If selected, tracking certified payroll is enabled for this job. If you select this check box, an additional group of settings displays for configuring. See Configure Job Certified Payroll Settings for more information.
Track Commitments
If selected, commitments are tracked and the Commitments menu option displays for this job.
Track Custom Compliance
Select to allow for the creation and tracking of unique compliance requirements beyond the standard types. If this check box is selected, a Custom Compliance tab displays where you can view and test current custom compliance items or choose new custom compliance rules to begin tracking. See Job Custom Compliance for more information.
If tracking custom compliance items is enabled for a job, it can be enabled for that job's vendors on their Settings pages as well.
Enable External Portal Access
Select to be able to grant or revoke access to the ClearToPay portal individual vendors working on this job. See Vendor Contacts for more information.
If portal access is enabled, you need to designate download queues for insurance, lien waivers and certified payroll from each respective dropdown. If you do not have tracking enabled for one of those options, that dropdown does not display.
These queues serve as the upload location for vendor documents that are uploaded from the portal into ClearToPay. From there, further processing can occur from within the queue.
Track Insurance
If selected, insurance requirements are tracked and the Insurance Templates menu option displays for this job.
Insurance Expiration Threshold (Days)
Enter the number of days before an insurance policy expires that ClearToPay begins taking automated actions (such as system and email notifications to the vendor) to prevent a lapse in compliance. For example, 30 days before insurance expires, a notice is generated and sent.
Note
This check box does not display if the Track Insurance check box is blank.
Track Lien Waivers
If selected, tracking lien waivers is enabled for this job. If you select this check box, an additional group of settings displays for configuring. See Job Lien Waiver Config for more information.
Click .
Configure Job Certified Payroll Settings
If enabled at the company level, you can complete the following steps to configure when and how often certified payroll records should be created for a specific job:
Note
This configuration automatically generates certified payroll tracking records for every vendor associated with the job, unless:
A tracking record for the period already exists for a vendor.
The vendor's last period was marked as "final."
Select to allow for the automatic creation certified payroll records on scheduled intervals for all vendors that meet your criteria. Once you select the check box, click the button to set timing parameters:
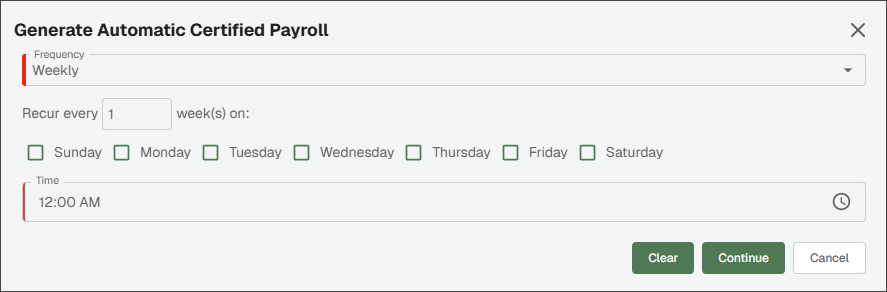
In the Frequency dropdown, select how often you want certified payroll records to be generated. You can select , , or . The selectable options vary based on the frequency, including day of the week, day of the month or a specific calendar date.
Note
Ideally, the record generation should occur on the first day of a pay period.
In the Time field, enter the time of day you want the records to generate.
Click to exit the Generate Automatic Certified Payroll dialog.
Select the week ending day from the Week Ending Day dropdown.
Enter the number for the records' due date (calculated based on the Week Ending Day) in the Days Till Due after Week Ending Date field.
Click .
Note
Insurance and custom compliance are the only ClearToPay compliance items that are tracked at the All Operations Vendor level. Lien waivers, certified payroll and commitments are always job-specific and cannot be tracked for an All Operations Vendor unless they are added to a job.
Choose the job from the list.
Click .
A page similar to the following displays:
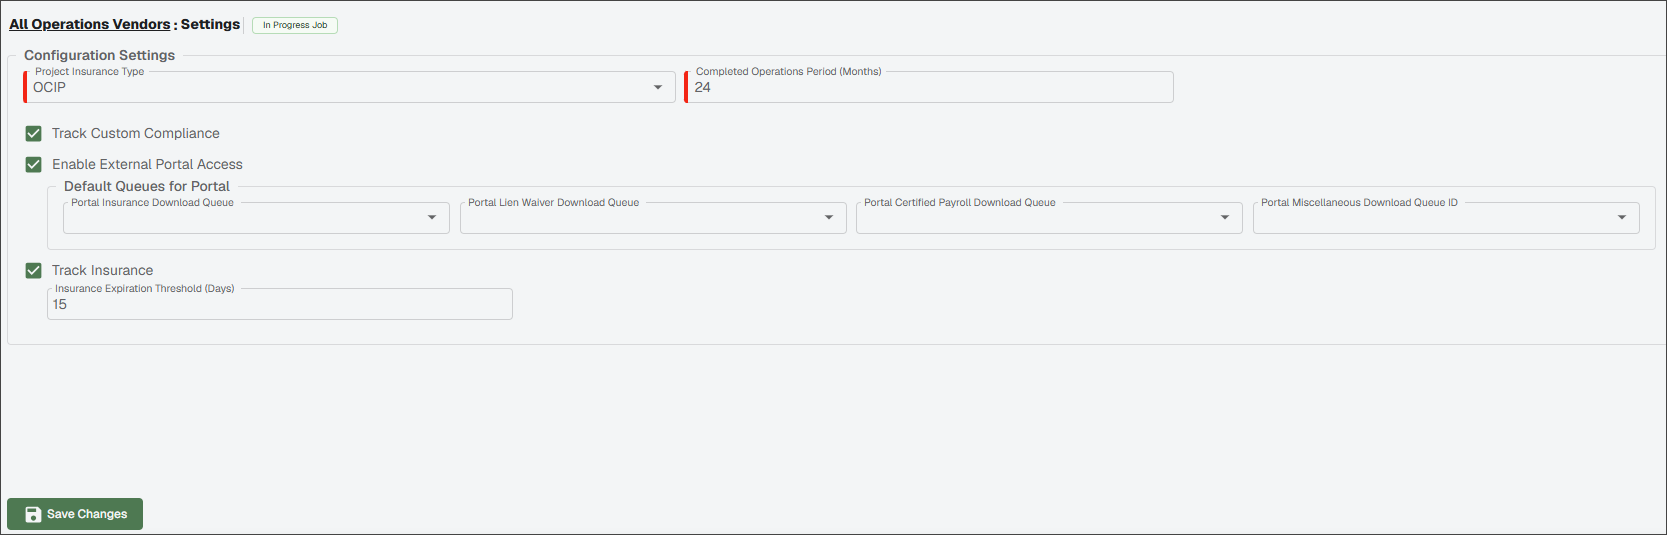
Review the information in the table below and perform configuration actions as needed:
Note
The check boxes and fields on this page vary based on which options are enabled on the Company Settings page.
Project Insurance Type
Select this dropdown to choose between standard insurance or if this job requires an Insurance Controlled Program.
The list of options available is managed within . See Configure Project Insurance Types for more information.
Completed Operations Period (Months)
Enter the completed operations period in months. During the completed operations period, the vendors are still expected to carry insurance so the customer is protected from liability.
Note
This number may be provided by project management staff or imported from your accounting system.
Track Custom Compliance
Select to allow for the creation and tracking of unique compliance requirements beyond the standard types. If this check box is selected, a Custom Compliance tab displays where you can view and test current custom compliance items or choose new custom compliance rules to begin tracking. See Job Custom Compliance for more information.
Enable External Portal Access
Select to be able to grant or revoke access to the ClearToPay portal for individual vendors. See Vendor Contacts for more information.
If portal access is enabled, you need to designate download queues for insurance, lien waivers and certified payroll from each respective dropdown. If you do not tracking enabled for one of those options, that dropdown does not display.
These queues serve as the upload location for vendor insurance documents that are uploaded from the portal into ClearToPay. From there, further processing can occur from within the queue.
Track Insurance
Select to allow for the tracking of insurance requirements for All Operations Vendors.
Insurance Expiration Threshold (Days)
Enter the number of days before an insurance policy expires that ClearToPay begins taking automated actions (such as system and email notifications to the vendor) to prevent a lapse in compliance. For example, 30 days before insurance expires, a notice is generated and sent.