Documents
Documents are the main object within the Sage Paperless Construction system. A "document" is any type of file with indexes associated with it. Indexes enable users to easily find the files they are searching for.
Within Global Settings, Administrators can configure the categories, classes and types that can be applied to documents used throughout the system.
From My Paperless, click .
In the Global Settings navigation bar, click .
Sage Paperless Construction was built to store electronic documents. An organization may handle hundreds or even thousands of documents and document types on a daily basis. In Sage Paperless Construction, Document Types can be assigned to Document Categories as a way to group and organize the documents. Instead of a user seeing all the documents to which they have security access in one continuous list, document types can be added to one or more categories.
When you log in to Sage Paperless Construction for the first time, you see four default Document Categories:
Accounts Payable
Accounts Receivable
Human Resources
Payroll
Create Document Categories
From the Documents dropdown, click .
The following page displays:
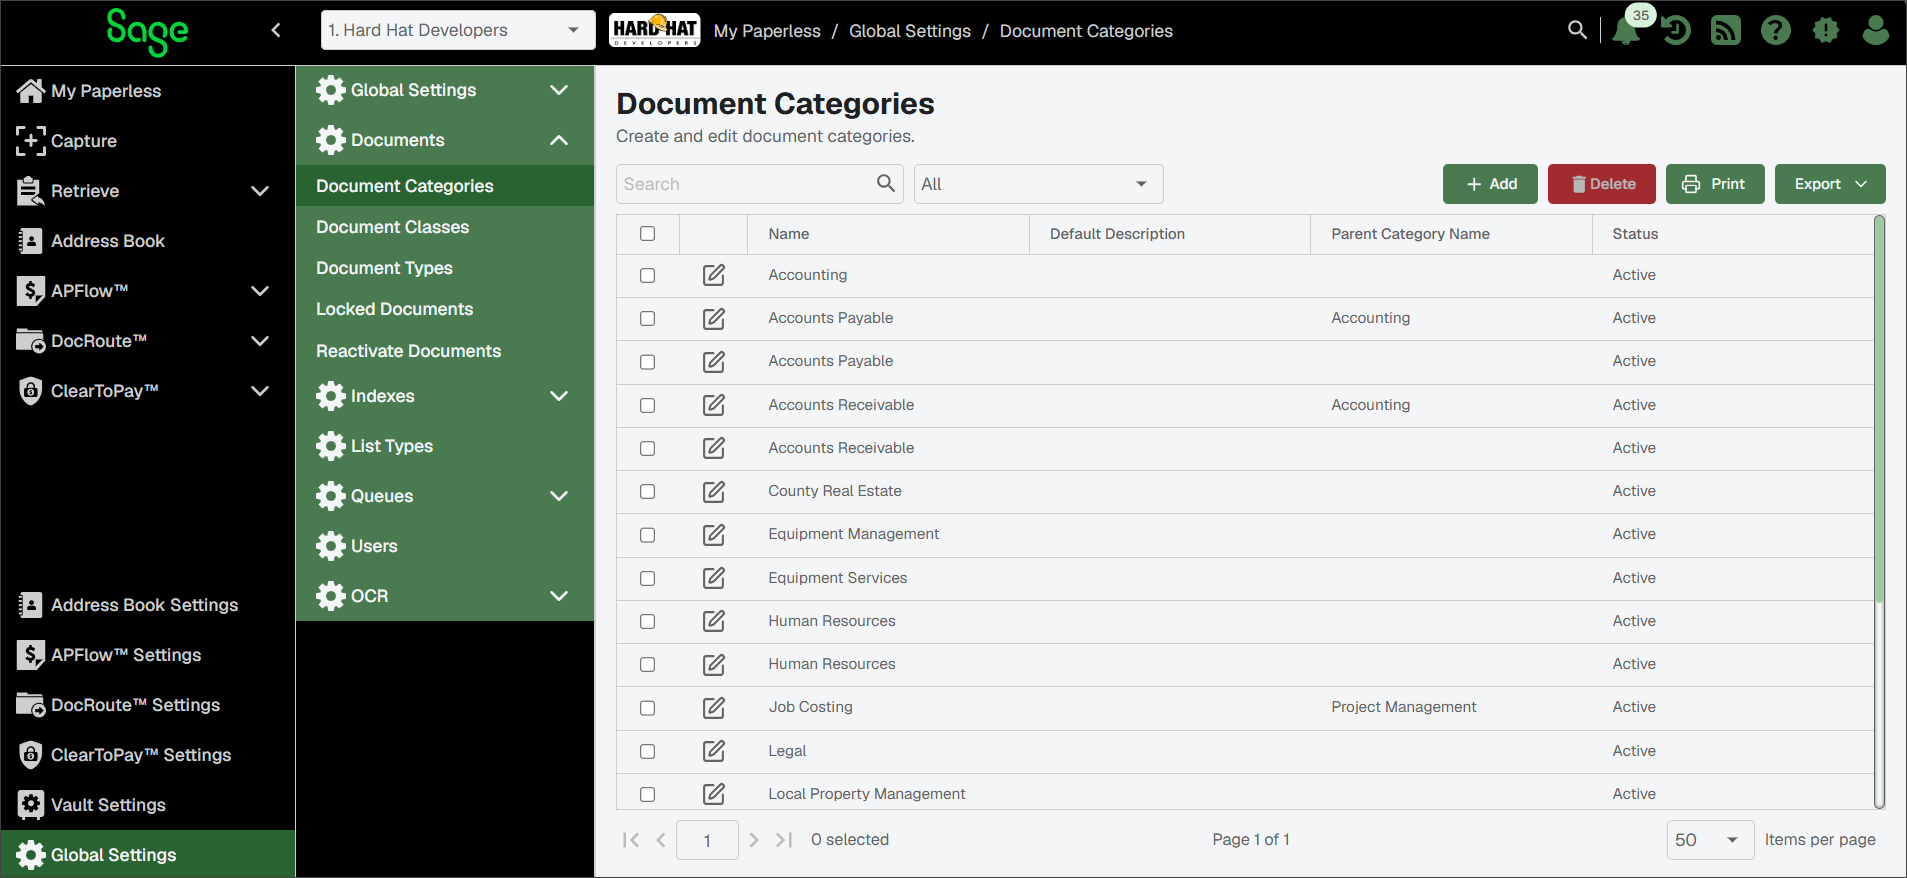
Click .
The Category Properties dialog displays on the GENERAL tab.
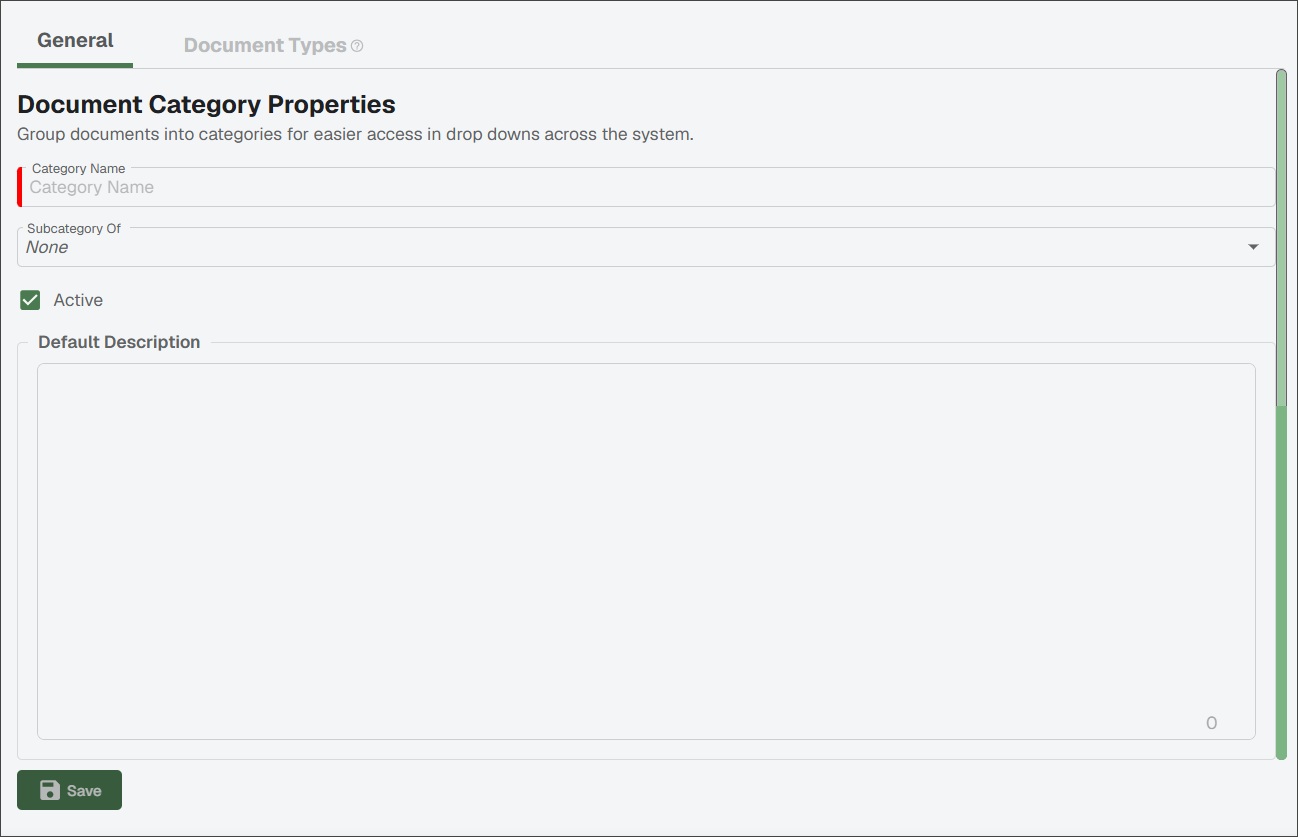
In the Category Name field, enter a name that make sense for the document types you are grouping in the category.
Note
For example, you could create an Accounts Payable category to organize all document types that relate to the accounts payable process. Other categories could include Project Management, Human Resources, Payroll or Equipment Services.
In the Subcategory Of field, accept the default of or select an existing category from the dropdown list.
The Active check box is selected by default. If the new category should remain inactive, deselect the check box.
In the Default Description field, enter a default document description "template" for use later when creating new document types.
Click .
Assigning Document Types to Categories
After all document categories are in place, the next step is to assign document types to the each of the document categories.
On the Category Properties page, click the tab.
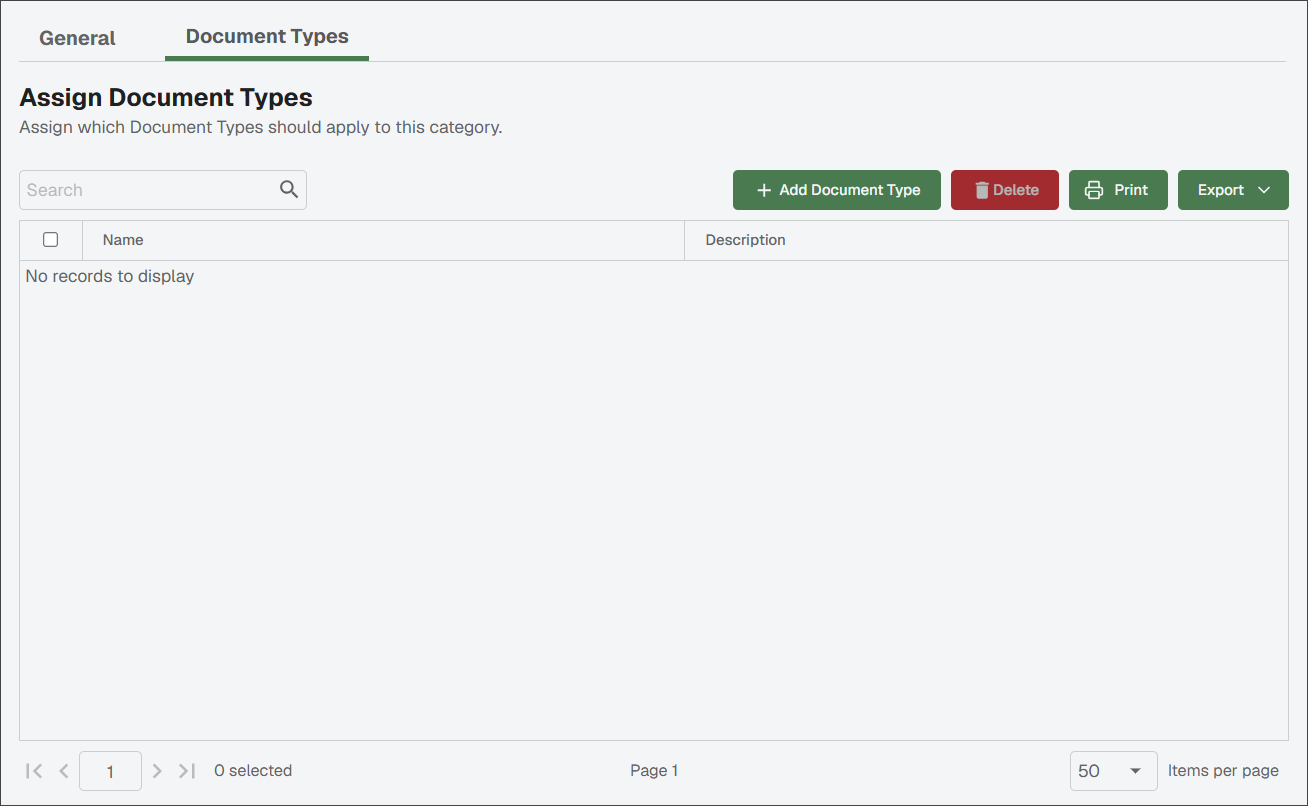
Click .
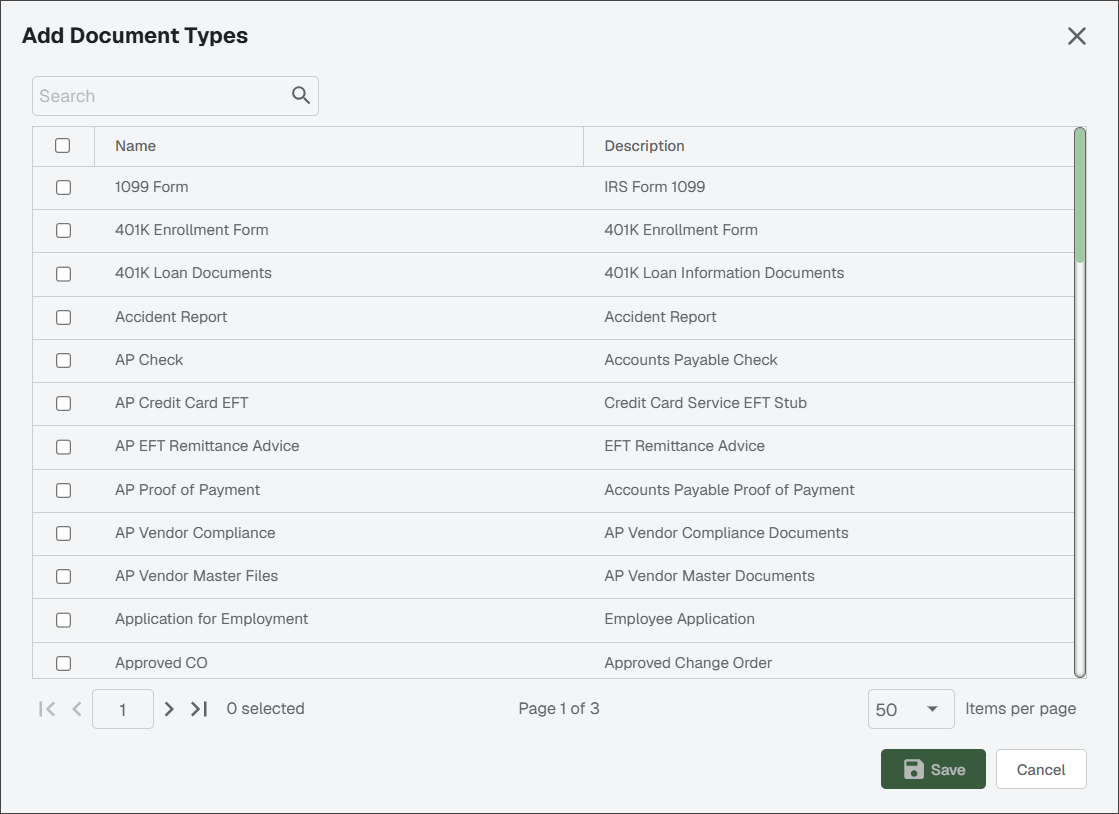
Select all of the the document types you want to include in the selected document category.
Click Save and return to the updated Document Types grid.
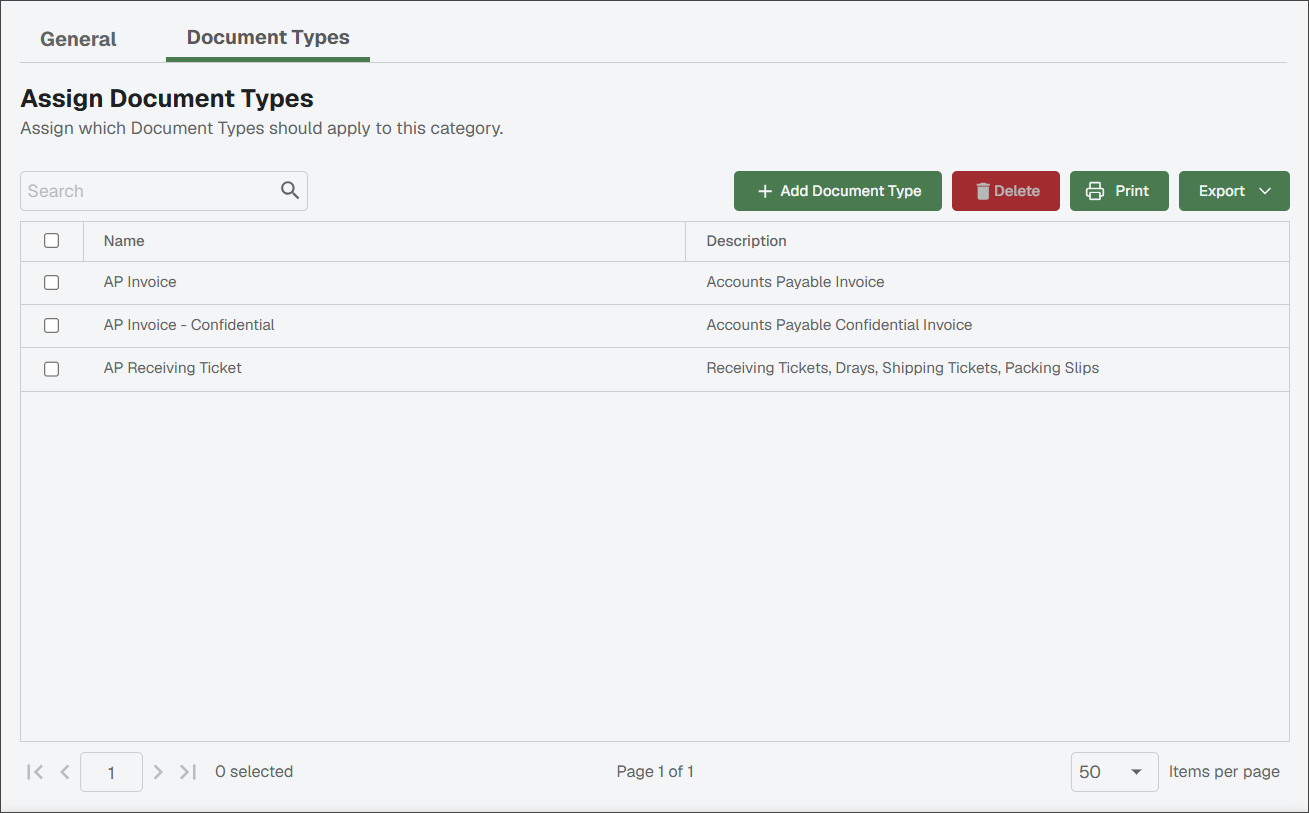
The Document Types tab redisplays and includes the document types you added.
Special cases dictate the need to create document classes. Document classes are custom classifications that can be used to further classify invoices or other documents as belonging to a specific location or group.
For example, if your business has multiple locations, you may want to separate invoices by location. This way, invoices belonging to the location on Main Street are kept separate from those invoices belonging to the location on Broadway. In addition, the document class index can be added to document types to further classify them while searching.
Configuring document classes is not required. However, for this process to work as designed, it is important that you follow the steps as shown below:
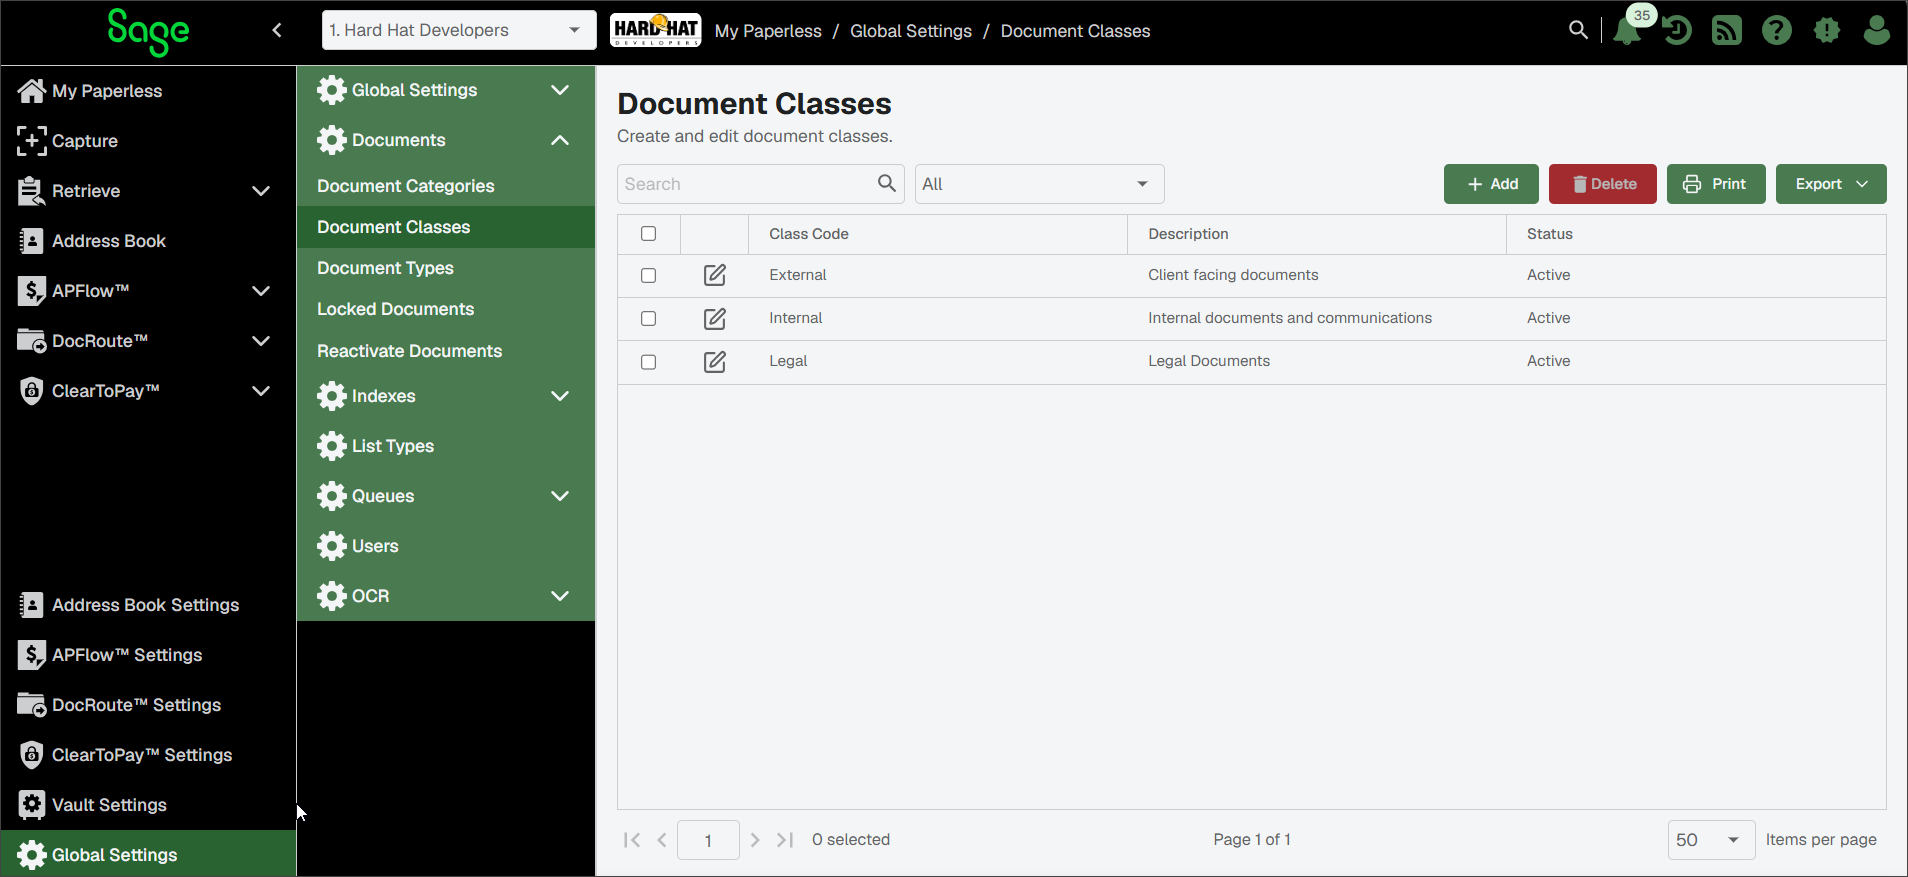
From the Documents dropdown, click .
The following page displays:
Click .
The following Document Class Properties dialog displays:
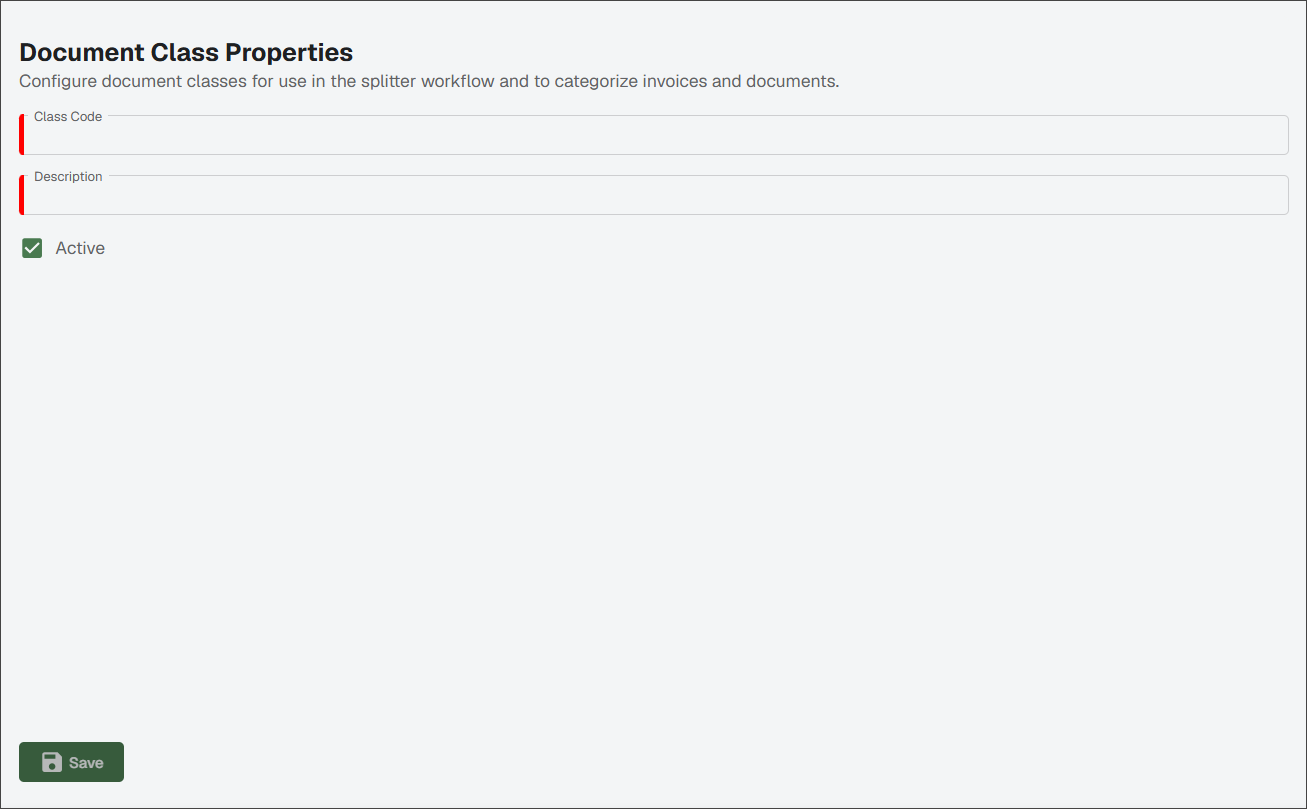
In the Class Code field, type a brief code for the document class.
Note
For example, "Legal."
In the Description field, enter a description for the documents in this class.
Note
For example, "Legal Documents."
Select the check box.
Click to save your new document class code and see it listed in the document class grid.
The Sage Paperless Construction system is configured and installed with many predefined document types. Administrators have the ability to add new document types as well as edit any of the predefined document types to fit their company's needs. When determining the document types that each department stores in Sage Paperless Construction, new document types can be added.
From the Documents dropdown, click .
The following page displays:
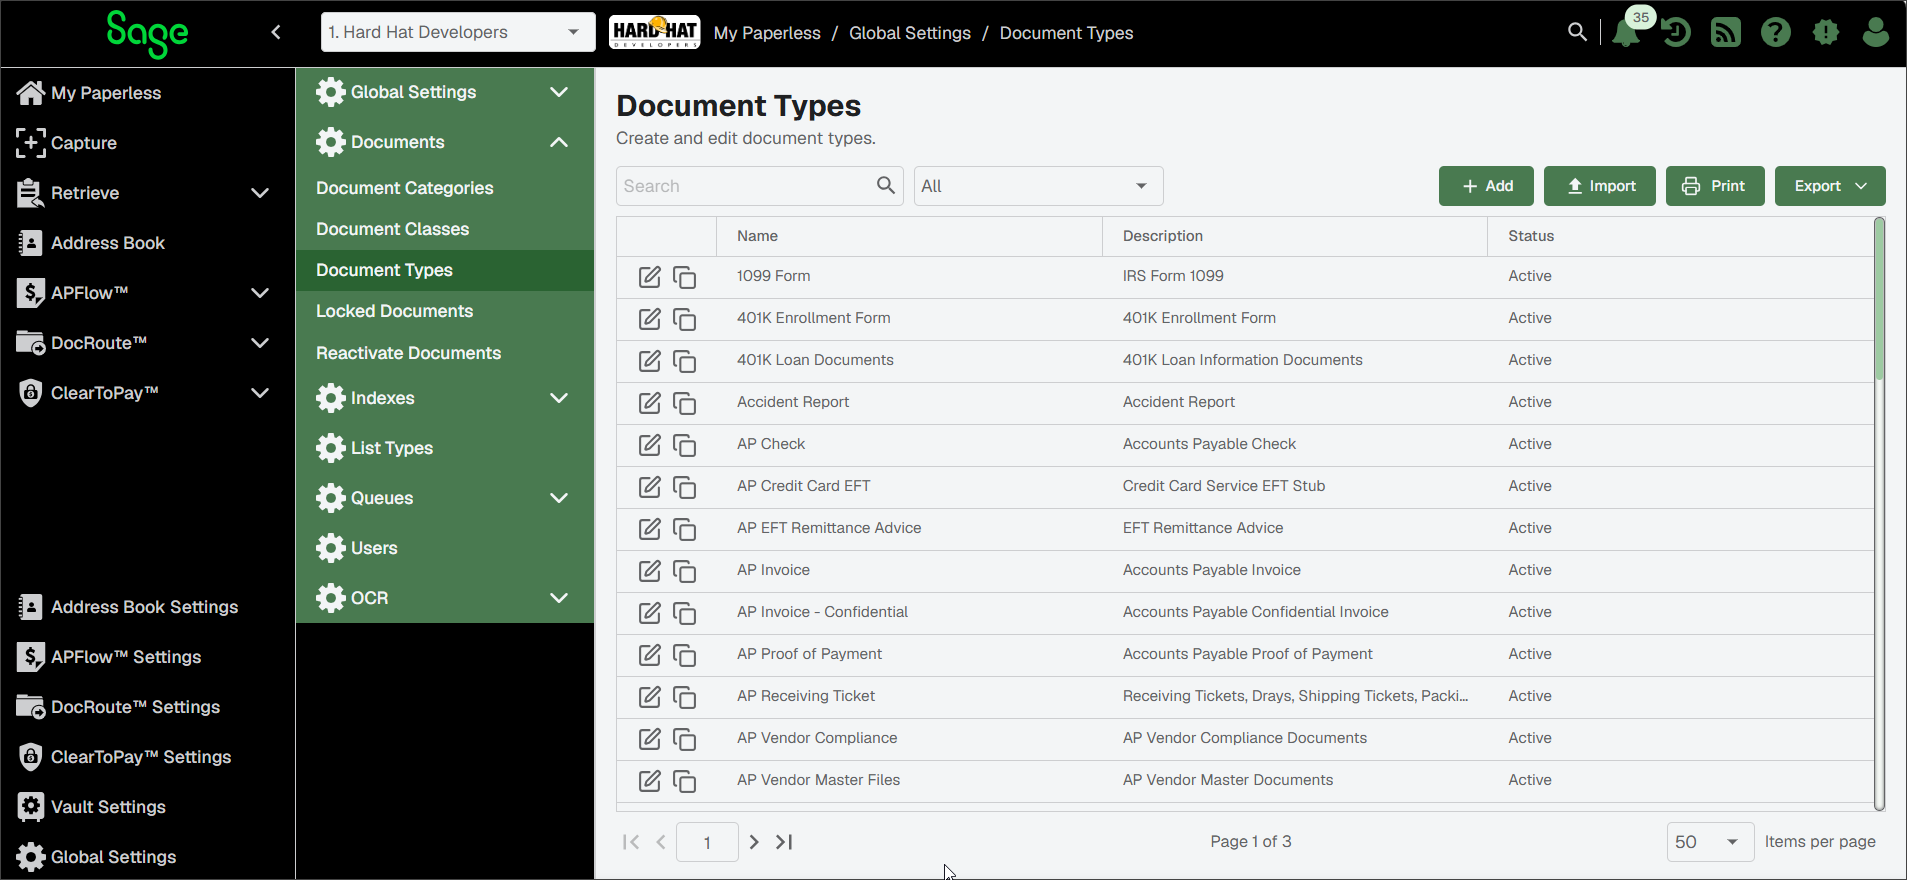
From this page, you can do the following:
Create new or custom document types. See Add Document Types for more information.
Import standard document types. See Import Document Types for more information.
Edit existing document types. See Edit Document Types for more information.
Add Document Types
Complete the following steps to add new, individual document types quickly and easily. They can be customized to meet company preferences using the Create Document Types functionality.
Note
You must have system administrator permissions to complete this procedure.
Click .
The Create Document Type - General Properties dialog displays:
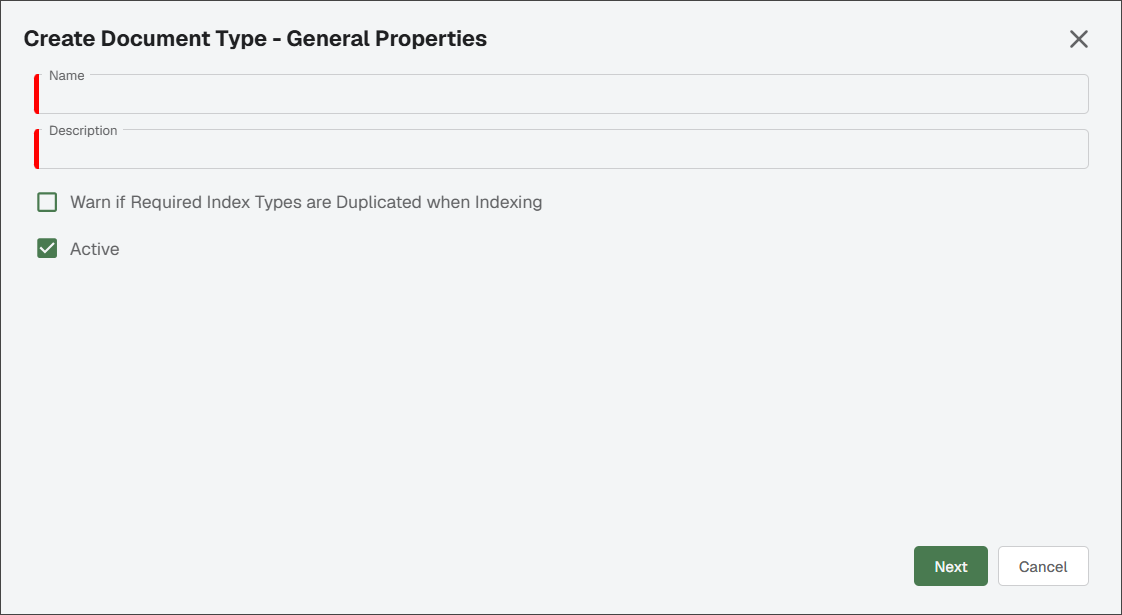
In the Name field, enter the document type name. This is a required field.
Note
For example, the new document type could be called "Project Contracts."
In the Description field, enter a description of the document type. This is a required field.
Note
For example, the new document type description could be "Contracts from Vendors."
To be notified when a possible duplicate index type is identified, select the check box so a warning generates.
Note
If this check box is populated, the system checks to see if there is already a document in the system with the same required field values. If one is identified, you are presented with options. For more information, see How to Use the Sidebar in Sage Paperless Construction.
The Active check box is selected by default.
Click .
In the Create Document Type - Index Types dialog:
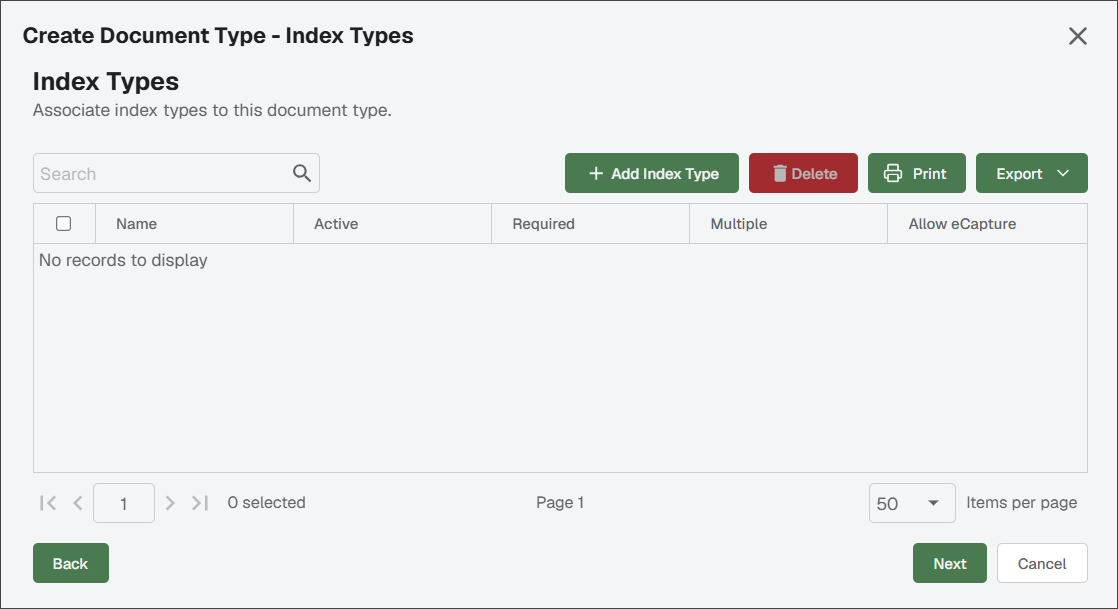
Click .
In the Add Index Types dialog, select the appropriate index types.
Important
A document must be associated with at least one index type to be stored in the Sage Paperless Construction system.
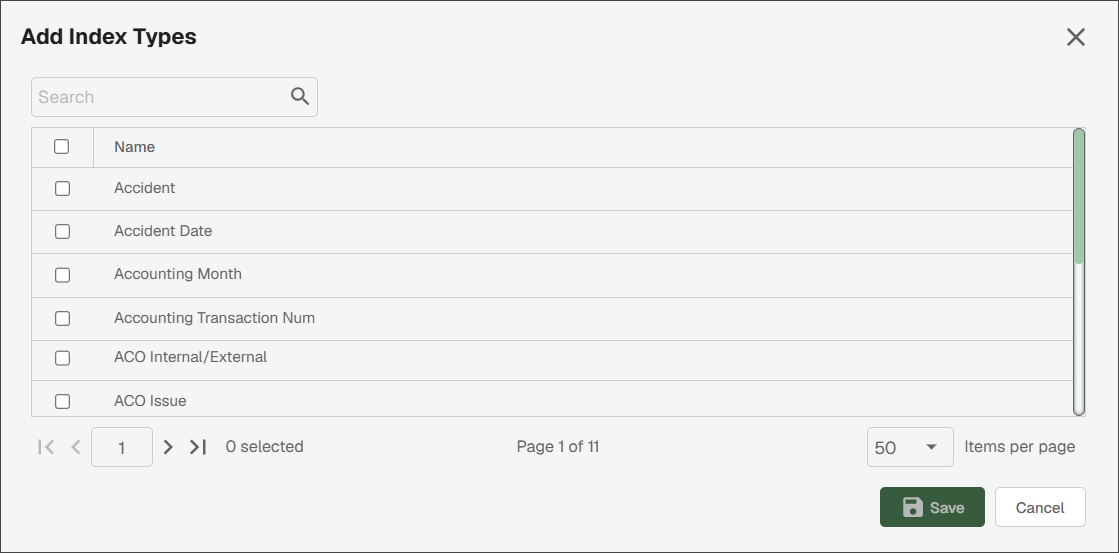
Click .
The Index Types dialog redisplays, populated with the choices you made in the Add Index Types dialog:
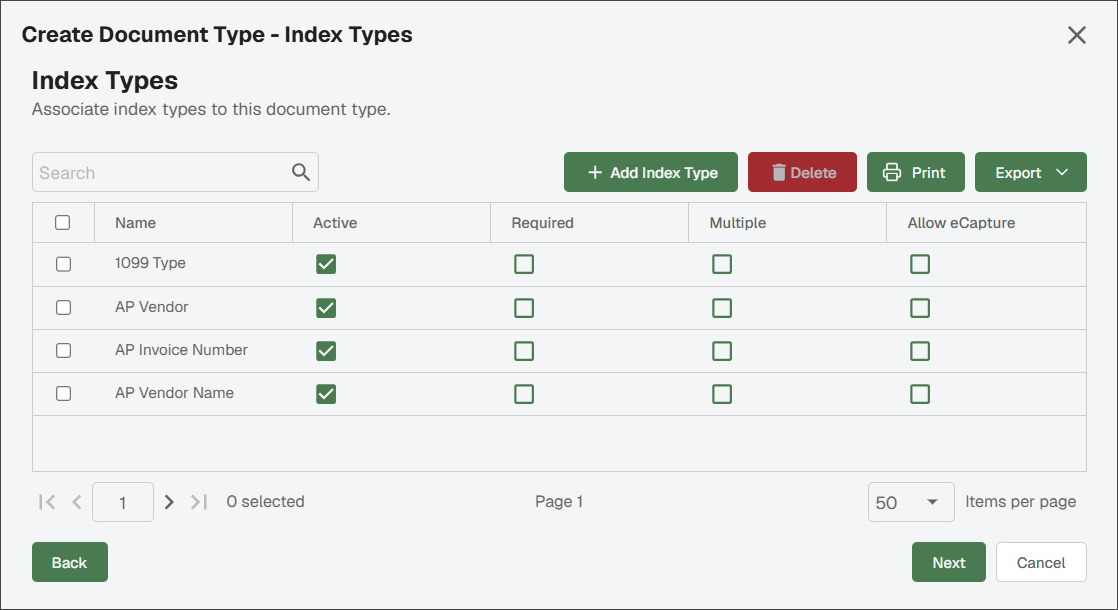
For each index type listed, click the column check box, the column check box and/or the check box.
Click .
In the Create Document Type - Default Documentation Description dialog:
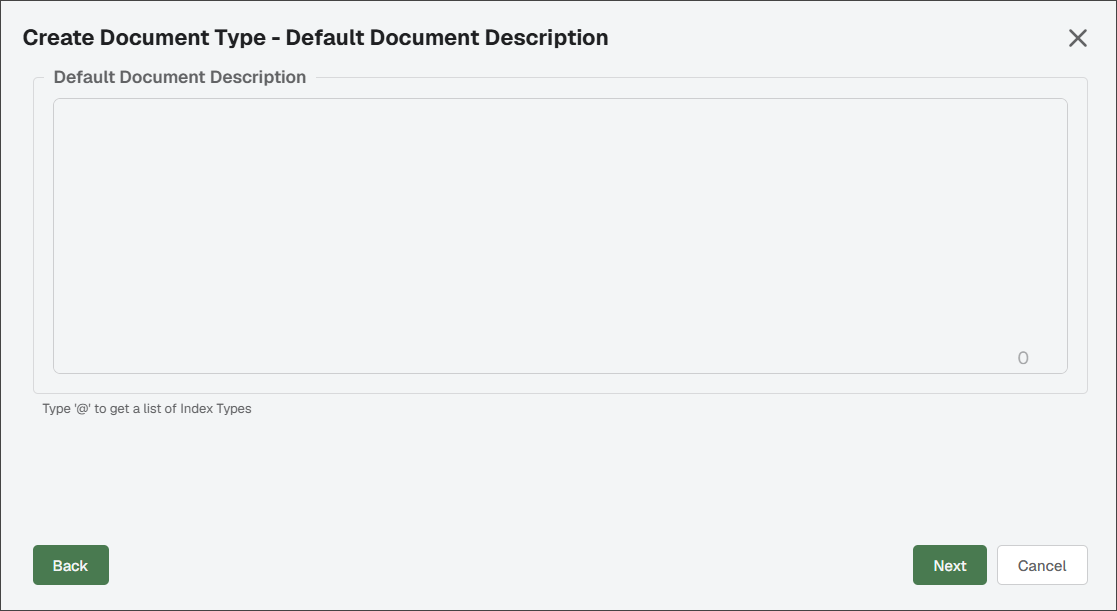
Enter a default document description to the document type.
Type an symbol to include Index Types in the document description.
Note
The default document description is automatically assigned when the document is indexed and stored in Sage Paperless Construction. This ensures that all documents are consistently named. The description can be built using static text, as well as values stored in index fields.
Click .
In the Create Document Type - Default DocRoute™ Description dialog:
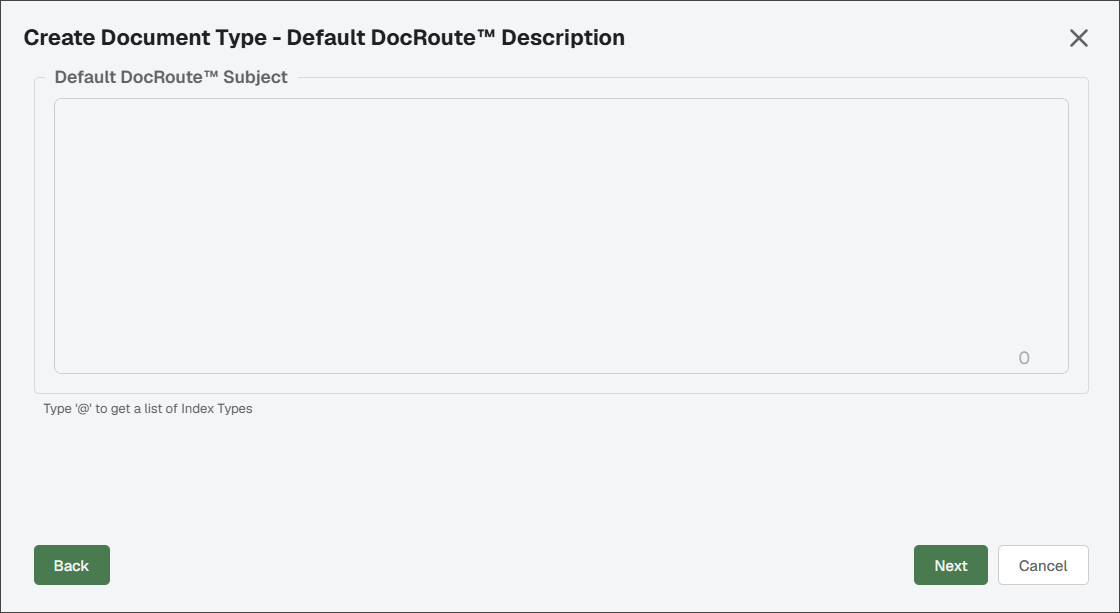
Enter a default DocRoute™ subject for this document type.
Type an symbol to include Index Types in the DocRoute document description.
Click .
In the Create Document Type - Document Type Categories dialog:
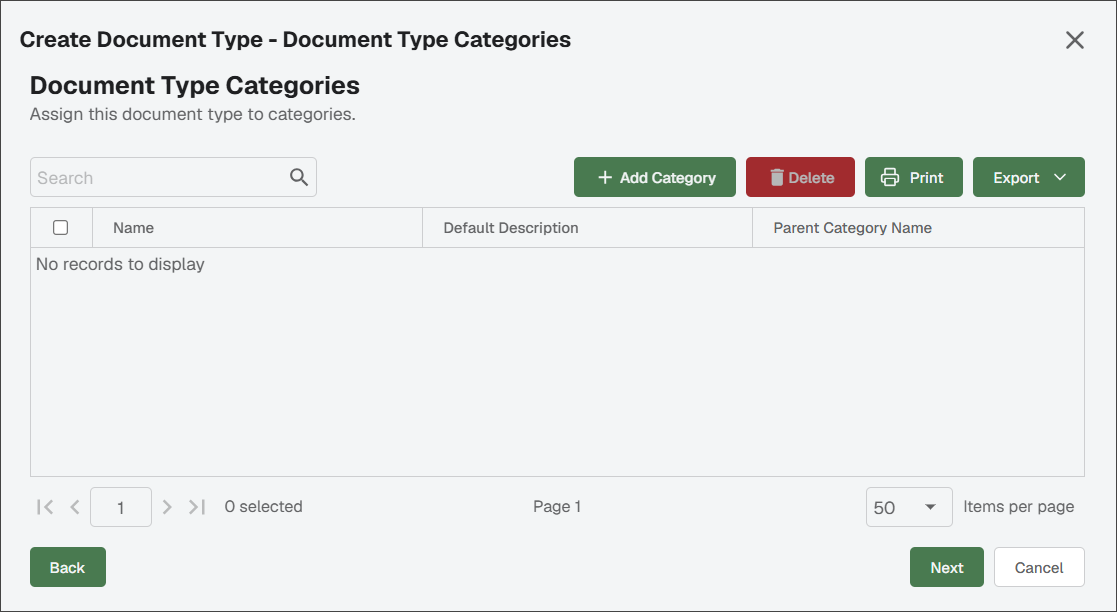
Click .
Click to select the appropriate categories:
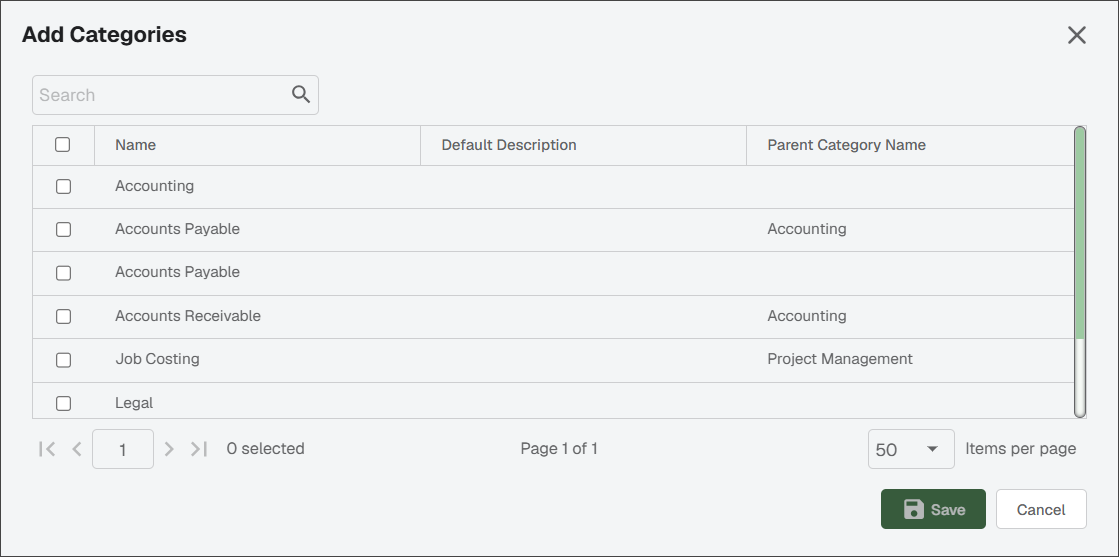
Click .
The Document Types Categories dialog redisplays, populated with the choices you made in the Add Categories dialog:
Important
Be sure to select the check box of all categories you selected.
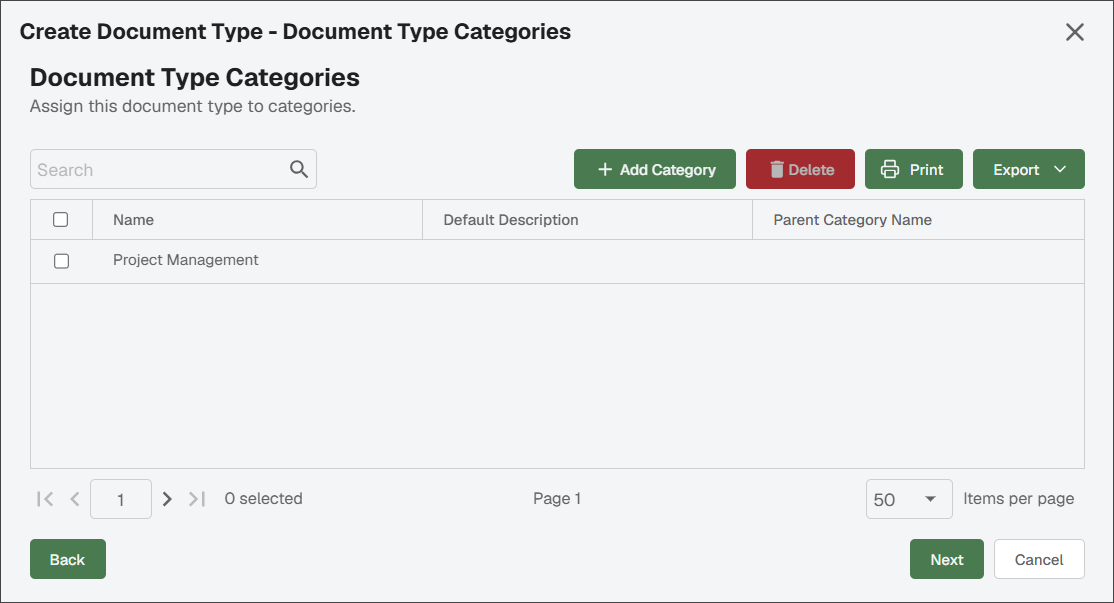
Click .
In the Create Document Type - Snapshot Options dialog:
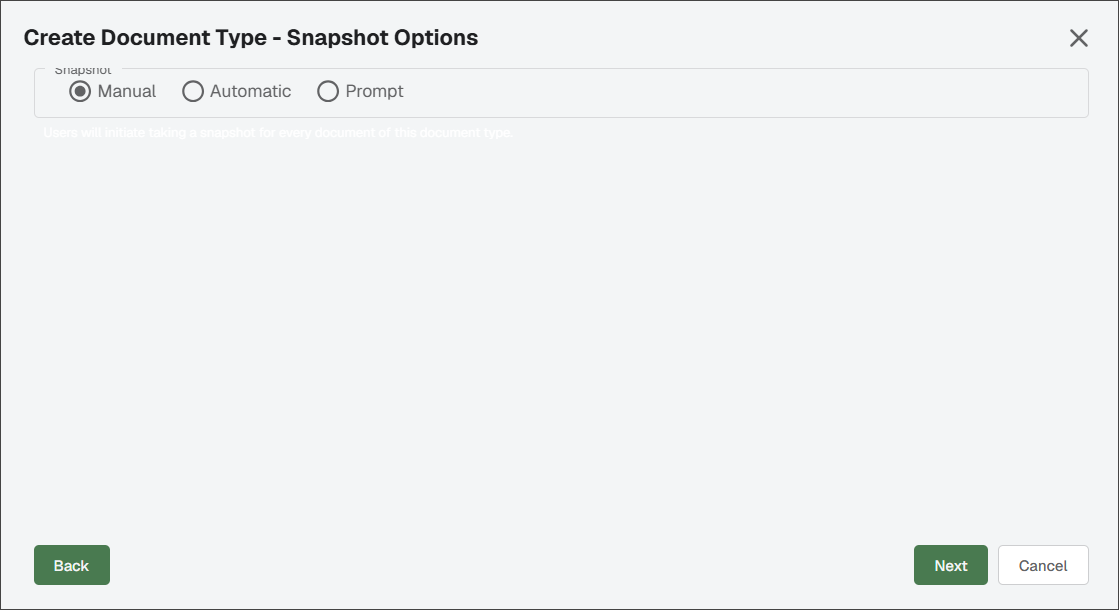
Determine the relationship with snapshots and this document type. Choose from Manual, Automatic and Prompt options. For more information, see Configure and Take Document Snapshots.
Click .
In the Create Document Type - Retention Options dialog:
Set the retention details.
Note
These settings determine the period of time that must elapse before the purging process can delete the documents from primary storage.
Click .
In the Create Document Type - Assign Security Groups dialog:
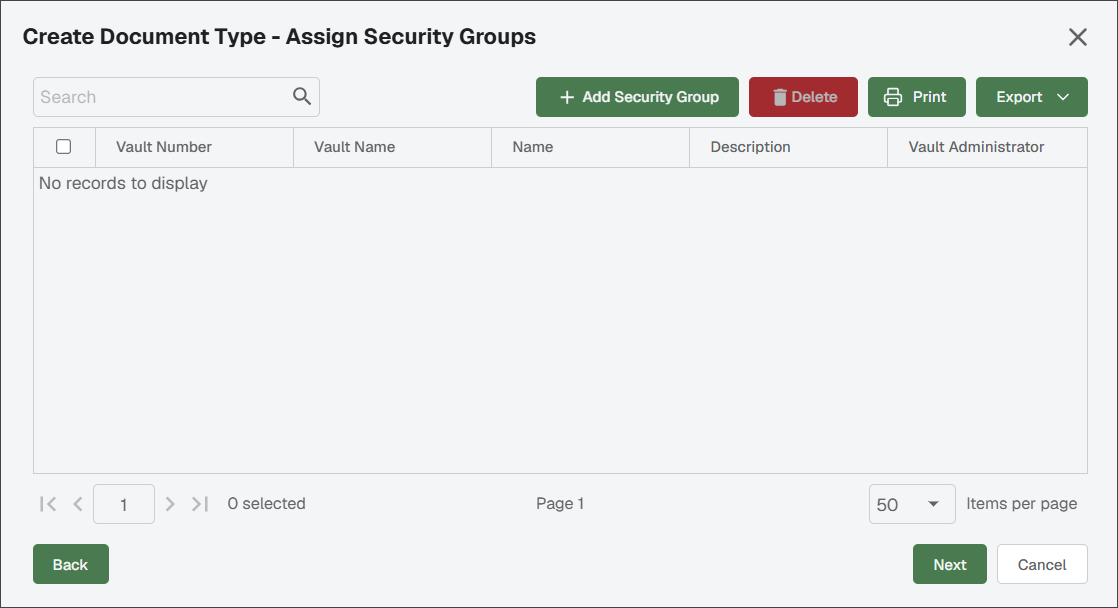
Click .
Click the check box(es) for the appropriate security group(s) to be associated with this document type.
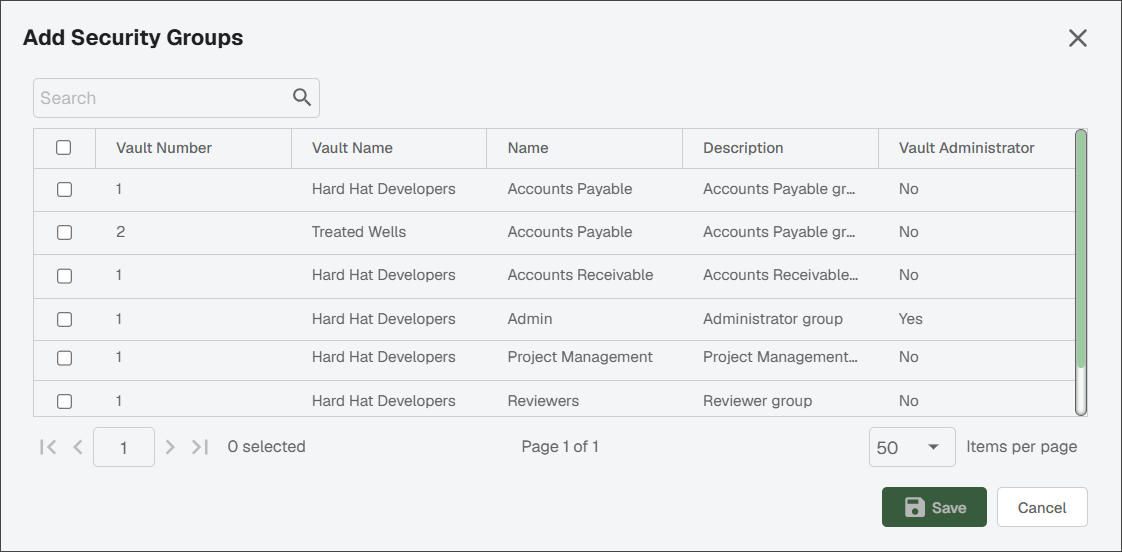
Click .
The original Assign Security Groups dialog redisplays, populated with the choices you made in the Add Security Groups dialog:
Important
Be sure to select the check box of all categories you selected.
Click .
In the Create Document Type - Assign Backfills dialog:
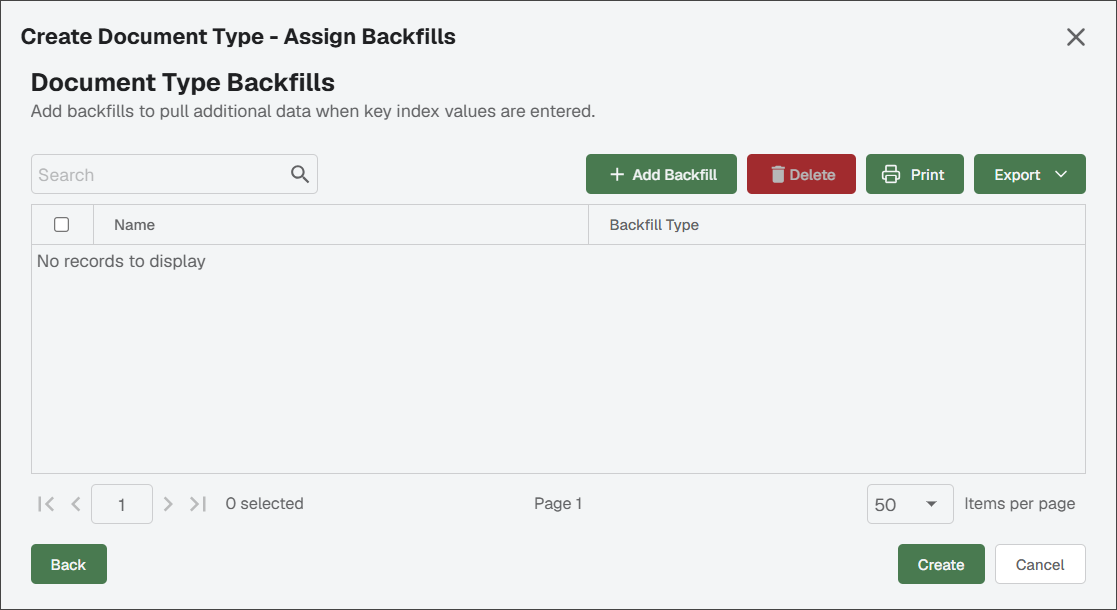
Click .
(Optional) Select the check box of the backfill(s) to associate with the document type.
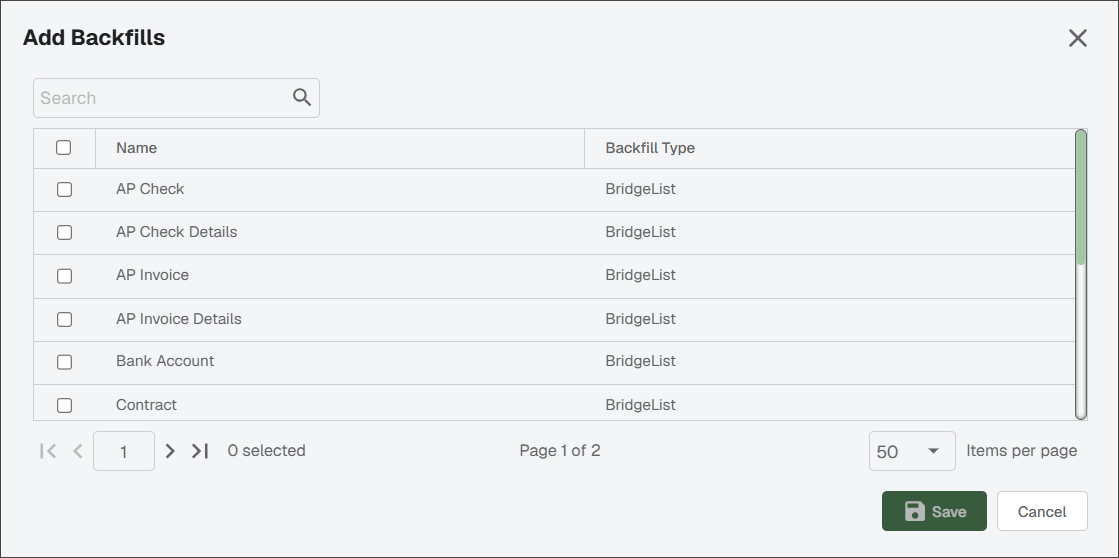
If a backfill was selected, click . If you did not select a backfill, click .
Important
Be sure to click the check box of the backfill(s) you selected.
The Assign Backfills dialog redisplays, populated with the choices you made in the Add Backfills dialog:
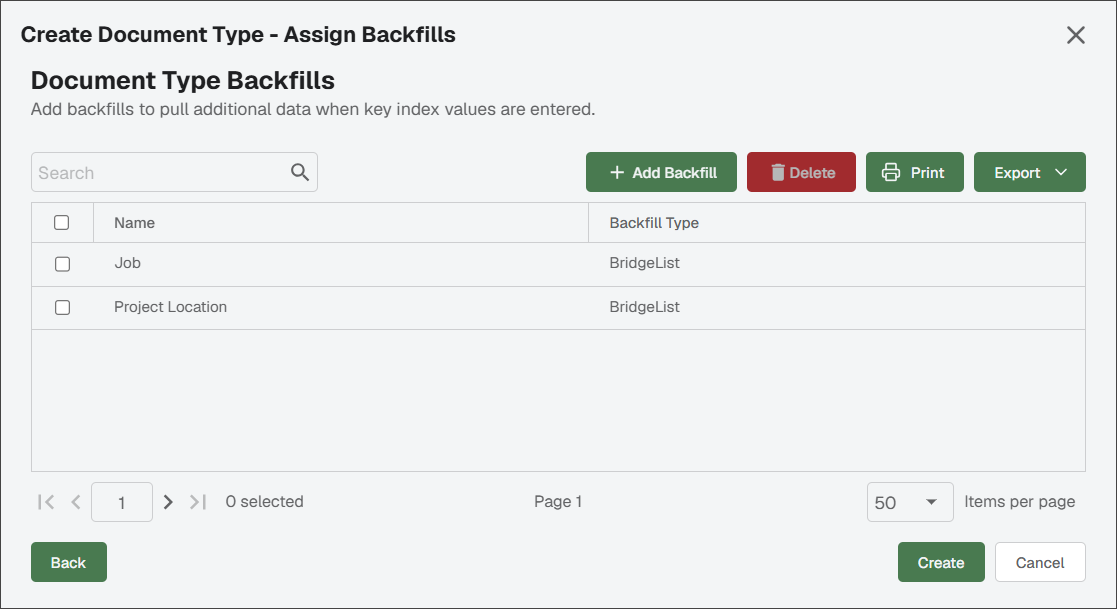
Click .
Your new document type has been created.
Import Document Types
If your company uses standard document types, an Administrator can import them quickly.
Click .
An Import Document Types wizard dialog displays with a list of available standard document types:
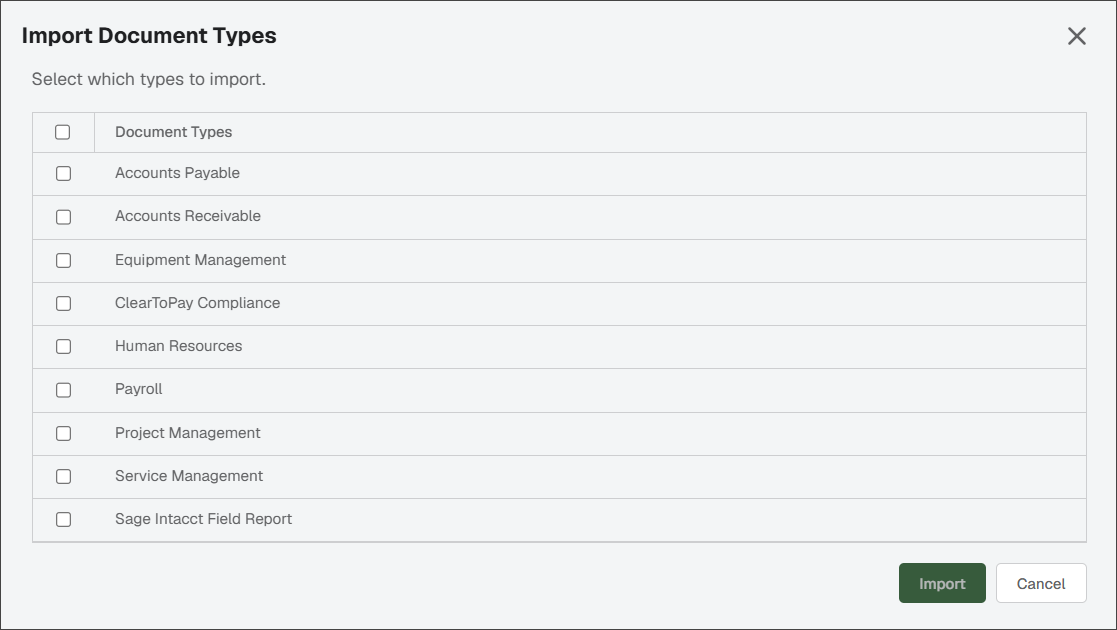
Click the check box of the document type(s) you want to import.
Note
The Import button is not enabled until you click a document type check box to make a selection.
Click .
The document type(s) you selected import systematically. The Document Types page updates and resembles the following:
Note
For more information on adding custom document types, see Add Document Types.
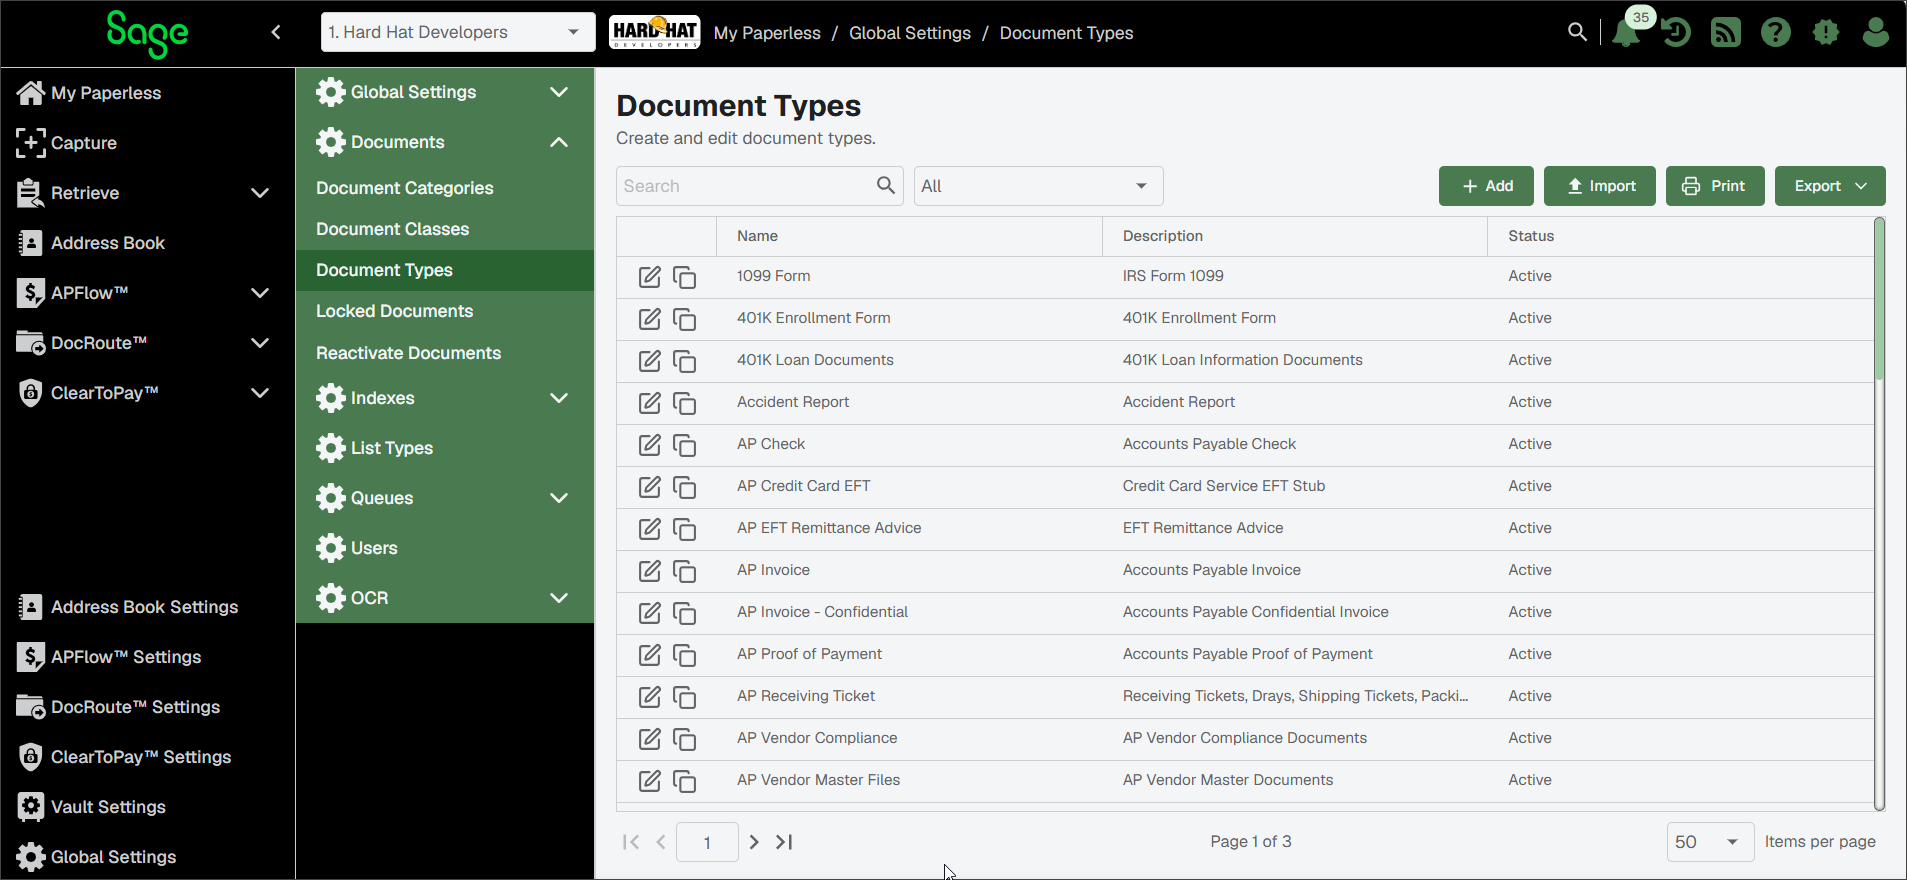
Once the import is complete, click to access the tab.
Note
The Categories, Index Types and Backfill tab information is system-generated.
In the Snapshot grid, Manual is selected by default. If you want snapshots to be performed automatically or for you to be prompted to take a snapshot with this document type, you must click either Automatic or Prompt.
If the system should check to see if there is a document in the system with the same required field values already indexed when any new document is indexed, then click the check box. This check box is not selected by default.
Click the tab. You must manually enter information in the fields located on this tab. See Edit Document Types for more information.
Click the tab. You must manually add security groups. See Edit Document Types for more information.
Edit Document Types
You can access an existing document type and make updates to how it functions as shown below:
On the Document Types page, locate the document type in the list that you want to update.
Click the Edit
 icon.
icon.The page displays with the General tab active.
Proceed through the tabs outlined in the table below and make necessary changes:
Table 1. Document Type TabsTab
Options
General
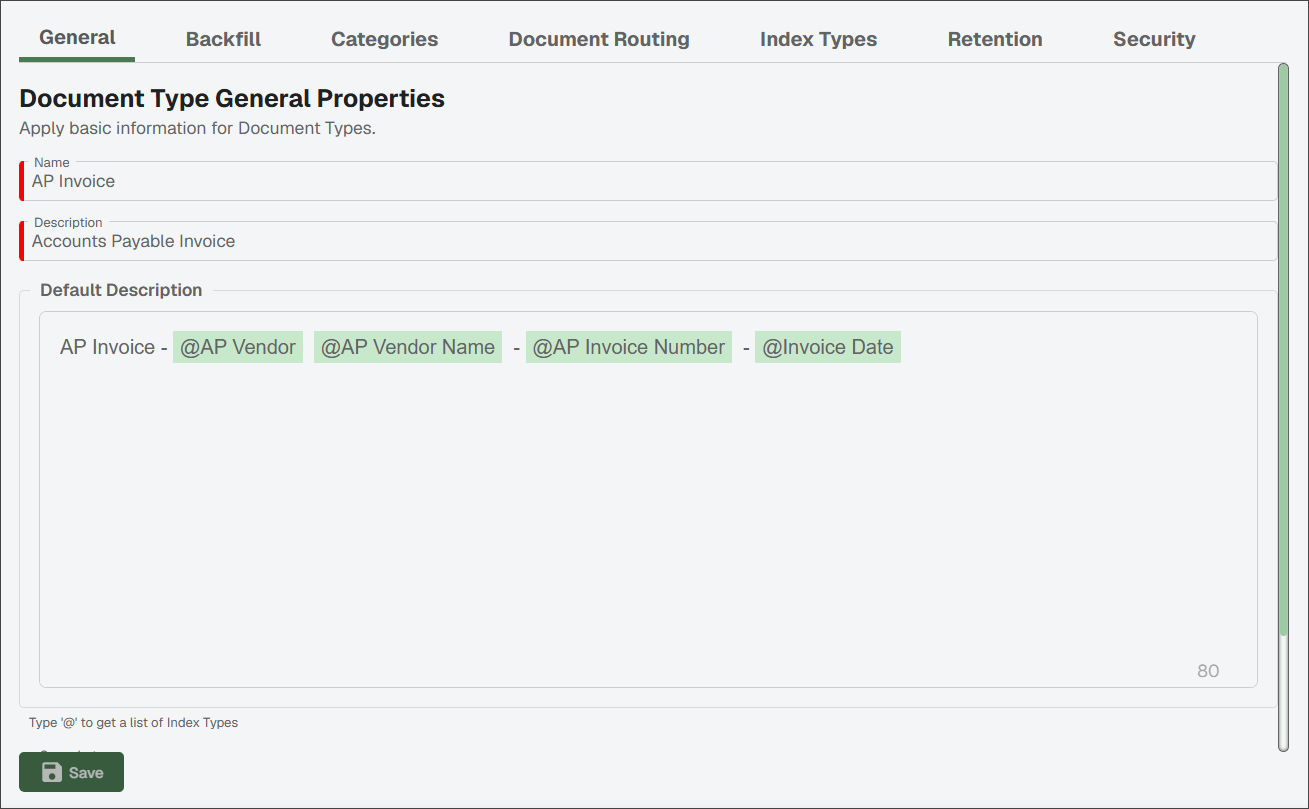
The General tab contains basic information about the document type.
Name field: The document name. This is a required field.
Description field: A brief description of the document type. This is a required field.
Default Description field: The default description is automatically assigned to the document when indexing and storing it in Sage Paperless Construction. This ensures that all documents stored in the system are consistently named.
The description can be built using static text, as well as values stored in index fields. In the Default Description field, type to display a list of index types.
Snapshot section: Choose how to document snapshots should be handled:
Manual: Select this option (default) to require the user to manually take a snapshot.
Automatic: Select this option to automatically take a snapshot of the document before any changes are saved.
Prompt: Select this option to have the system prompt the user asking them if they want to take a snapshot before saving any changes to the document.
Warn if Required Index Types are Duplicated when Indexing check box: Select to be notified when a possible duplicate index type is identified.
Active check box: If selected, the document type available in the system.
Note
Document types cannot be deleted from Sage Paperless Construction but can be made inactive by deselecting this check box. This hides the inactive document type from any non-System Administrative users so they cannot inadvertently index new documents with this document type. You can continue to search for and display inactive document types.
Backfill
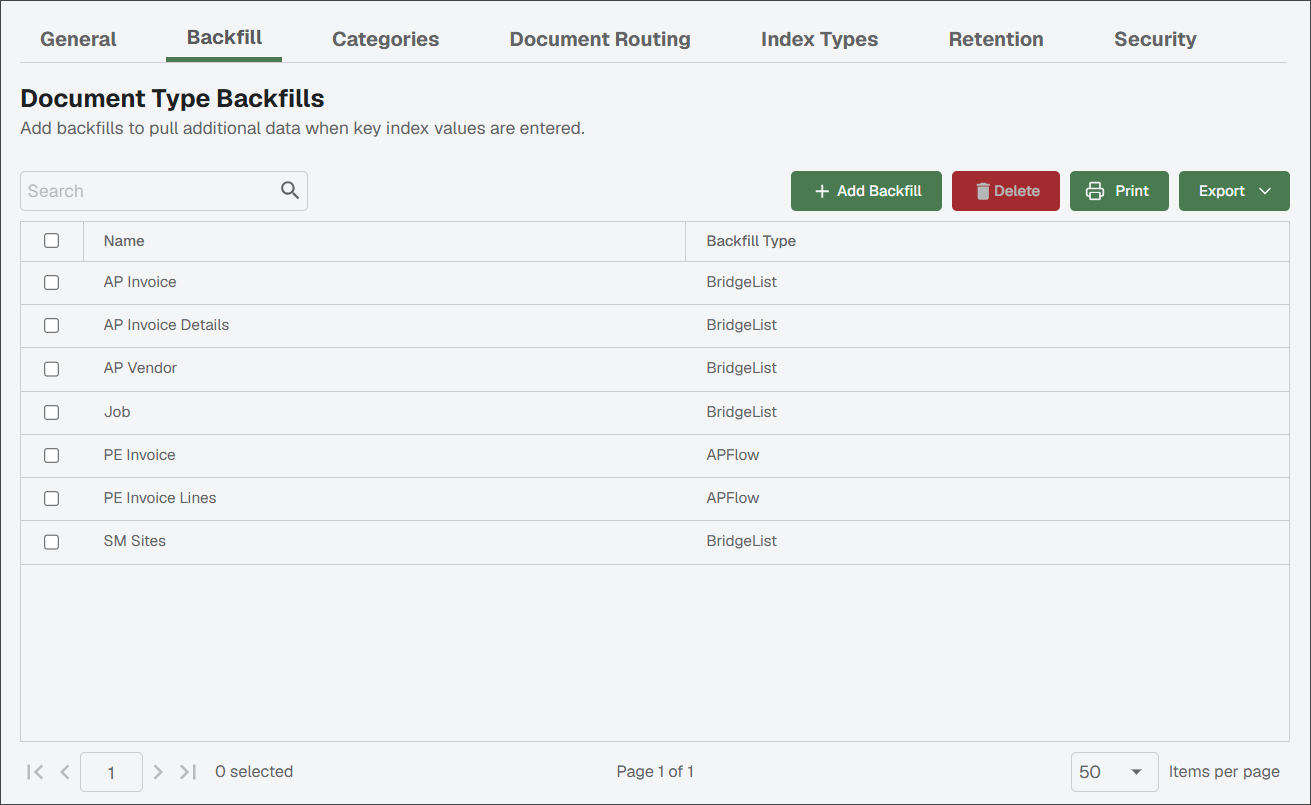
The Backfill tab is used to add or remove index “backfills” from the document type.
Note
Backfills are trigger mechanisms that populate additional related index values when users enter minimal information. These index values can come from Sage Paperless Construction lists or the bridged accounting system and other external databases. (See Set up Index Backfills for more information on configuring backfills details.)
Click to display the Add Backfills dialog where you can select one or more backfills to assign to the current document type.
To remove one or more existing backfills from the current document type, select the appropriate backfill(s) from the list and click . Review the Remove Backfill confirmation dialog and click .
Categories
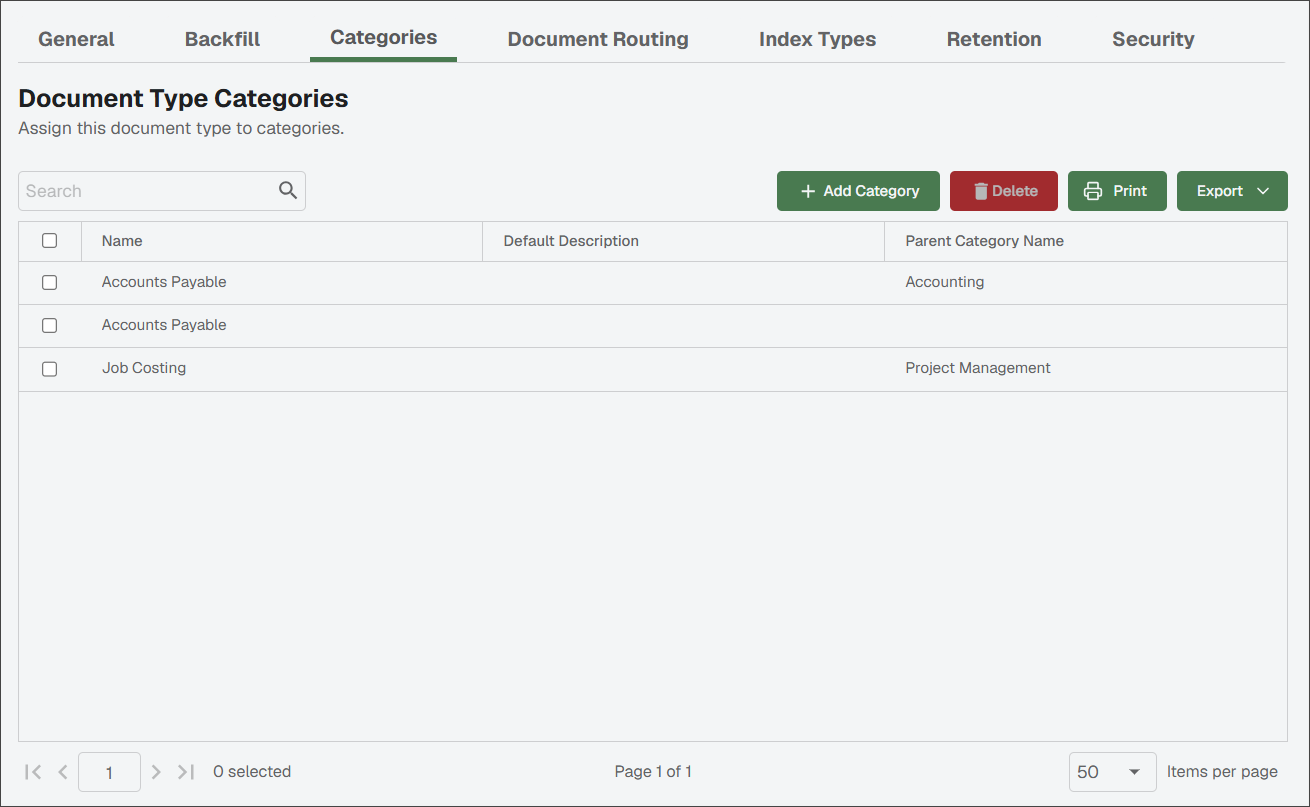
The Categories tab is used to assign categories to document types and assign the current document type to one or more document search categories. These categories are used to group "like" document types into a folder structure on the Search page.
Note
A document type can be assigned to more than one category.
Click to display the Add Categories dialog where you can select one or more categories to assign to the current document type.
To remove one or more existing categories from the current document type, select the appropriate category from the list and click . Review the Remove Category confirmation dialog and click .
Document Routing
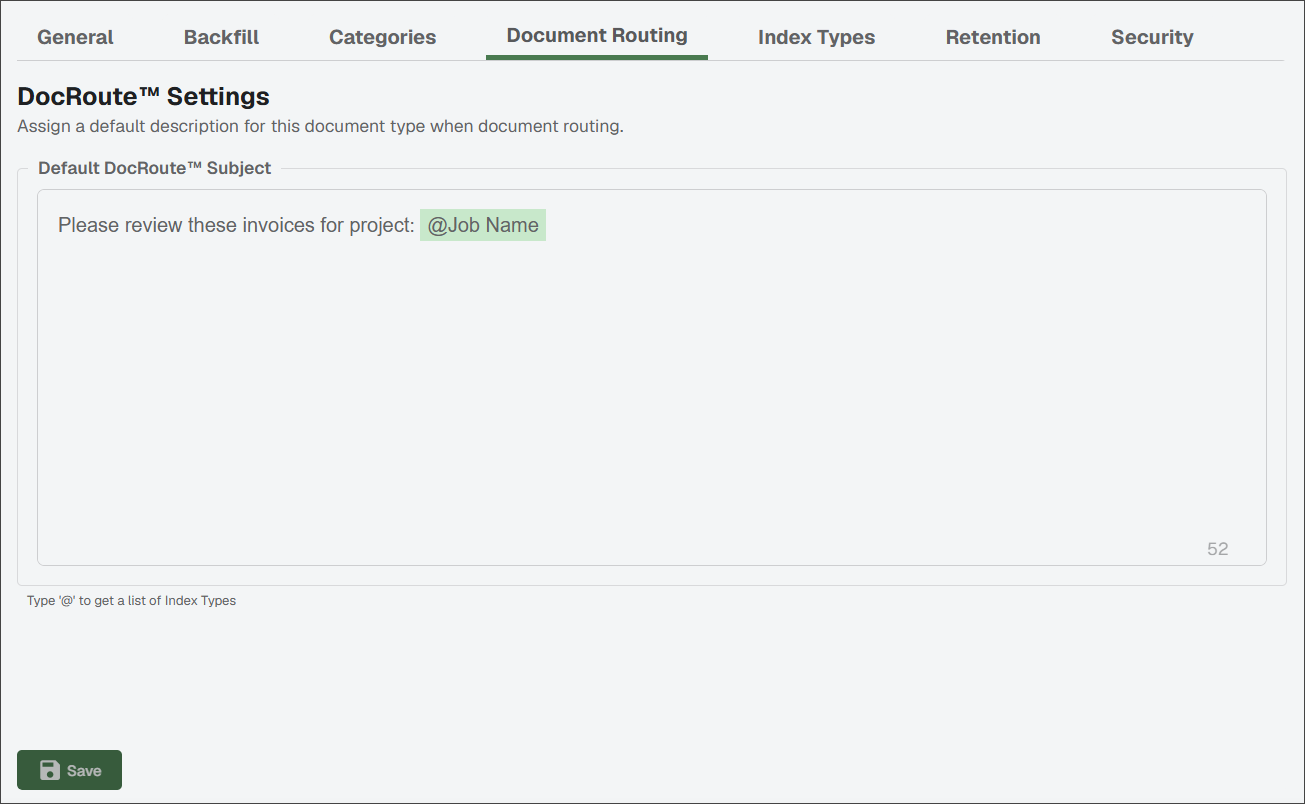
The Document Routing tab contains default route subject functionality that once set up, you can reuse it whenever you send out a route and want to use the same subject format. When you have created a default route subject for a specific document type, and add a document associated with that specific document type to a route, the DocRoute™ subject is populated based on what you have configured here.
Note
This tab does not display if you do not have a DocRoute license.
Default DocRoute™ Subject field: Type the subject line you want to display when you route documents of a specific document type and click . If you manually enter text in the subject field when creating the document route, it overrides what is entered here.
Note
For example, "Please review these invoices for project @Job Name." In this example, @Job Name is a placeholder for the corresponding index value which systematically populates.
Index Types
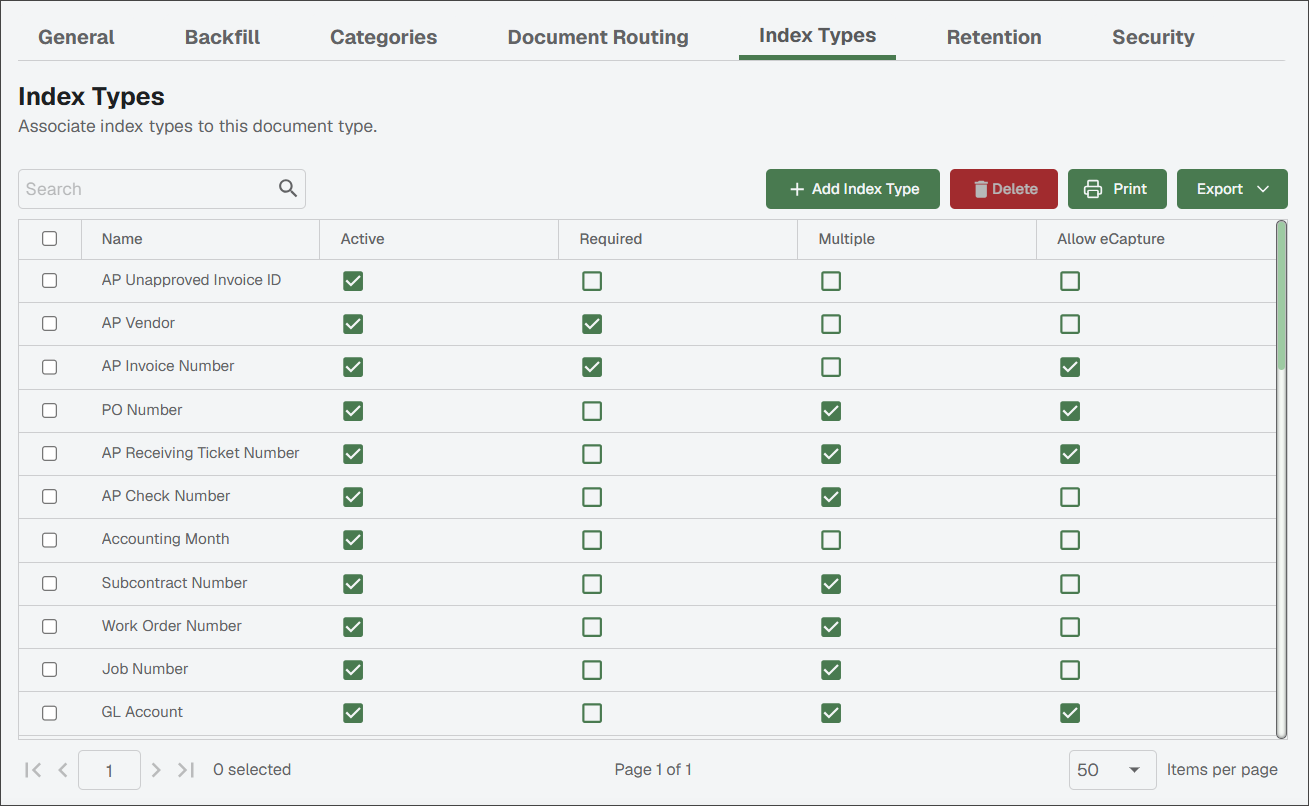
The Index Types tab displays the associated index types for this document type and the check boxes described below:
Active: If selected, indicates that the index type is active and can be used to index a document of this document type.
Required: If selected, indicates that a user must enter a value for the index type to index a document of this document type. This check box must be selected if you have selected the Warn if Required Index Types are Duplicated when Indexing check box.
Multiple: If selected, indicates a user can add multiple values in an index field. For example, an AP Check may pay for more than one AP Invoice; selected for the Invoice Number index type so multiple invoice numbers can be entered when indexing the check document.
Allow eCapture: If selected, indicates documents can be imported through eCapture.
You can also add or remove index types for the current document type:
Click to display the Add Index Types dialog where you can select one or more index types to assign to the current document type.
To remove one or more existing index types from the current document type, select the appropriate index types from the list and click . Review the Remove Index Types confirmation dialog and click .
Retention
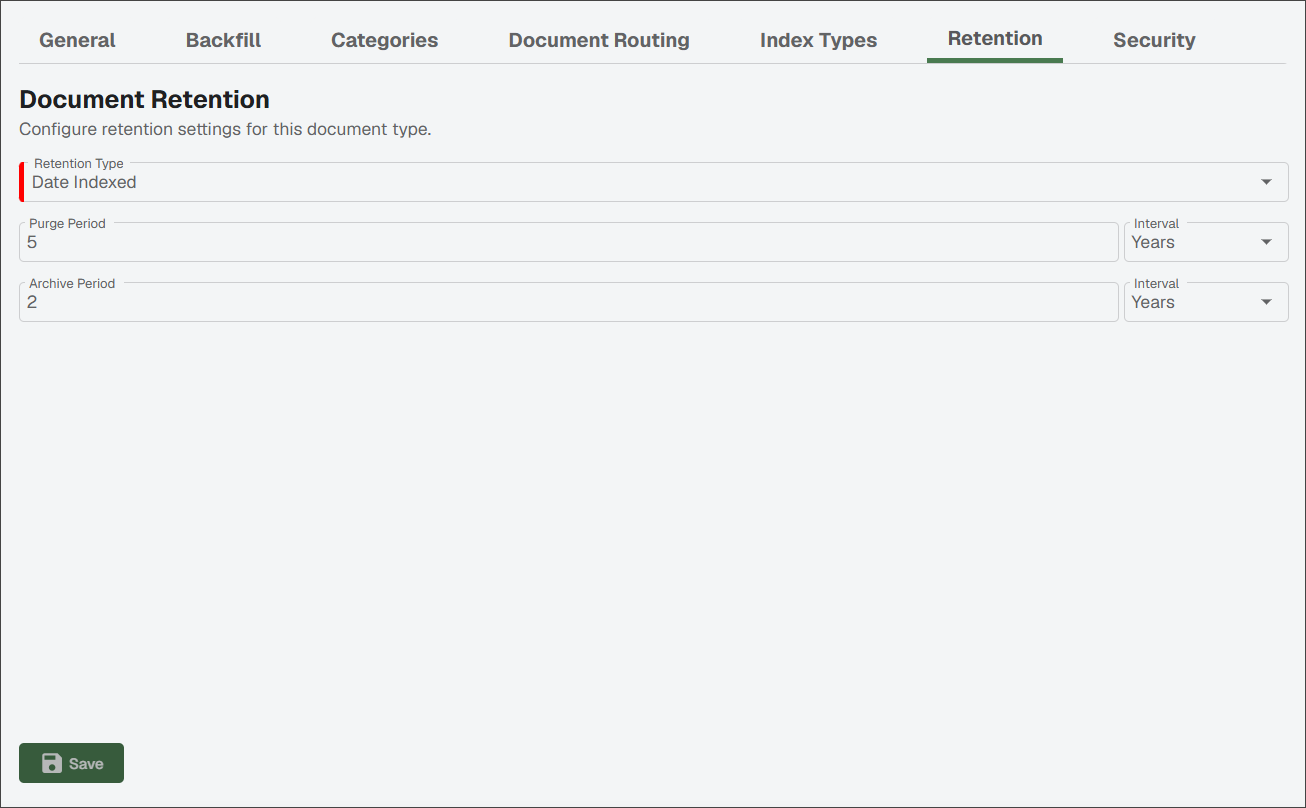
The Rentention tab is used to configure the period of time that must elapse before the purging process can delete documents of the selected document type from primary storage.
Retention Type dropdowns: Select the appropriate Retention Type for the current document type. This could be Date Indexed, Calendar Year, Fiscal Year or Date Index Type.
Associated Index Type dropdown: This dropdown only shows if is selected in the Retention Type dropdown.
Purge Period field: Enter the numerical value and related interval (months or years) from the Interval dropdown. For more information, see Purge Documents.
Archive Period field: Enter the numerical value and related interval (months or years) from the Interval dropdown. For more information, see Archive Documents.
Security
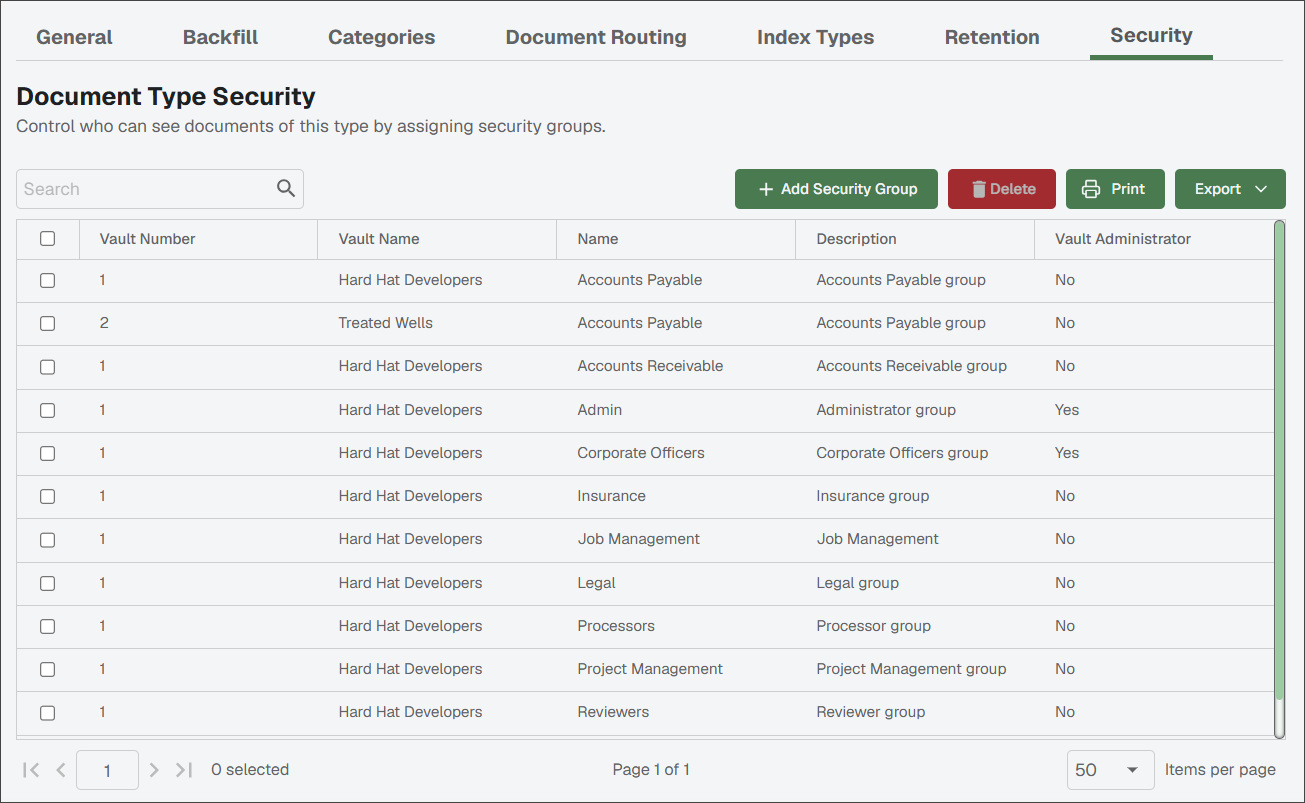
The Security tab is used to assign vault groups that can access and work with the current document type:
Click to display the Add Security Groups dialog where you can select one or more groups to assign to the current document type.
To remove one or more existing security groups from the current document type, select the appropriate group from the list and click . Review the Remove Security Group confirmation dialog and click .
As you retrieve a document stored in Sage Paperless Construction, a "lock" is placed on the file.
The same "lock" occurs when you "check out" a document for editing. This occurs when you are in a queue and you click the Check Out  icon in the Viewer. Once you have finished editing the checked out document, you can click the Check In
  icon.
icon.
Note
The Check out and Check in icons exist in the same space on the Viewer. You can use the icon as a visual queue to determine if the document you want to edit is available to be checked out or has already been checked out by another user.
Under certain circumstances (i.e. a computer crash or user leaves the company with checked out files), the file remains "locked" and Administrators need a way to remove the file lock to bring the document back into production. The Locked Documents utility is that tool.
Complete the following steps to view and unlock "locked" files:
From the Documents dropdown, click .
The following page displays:
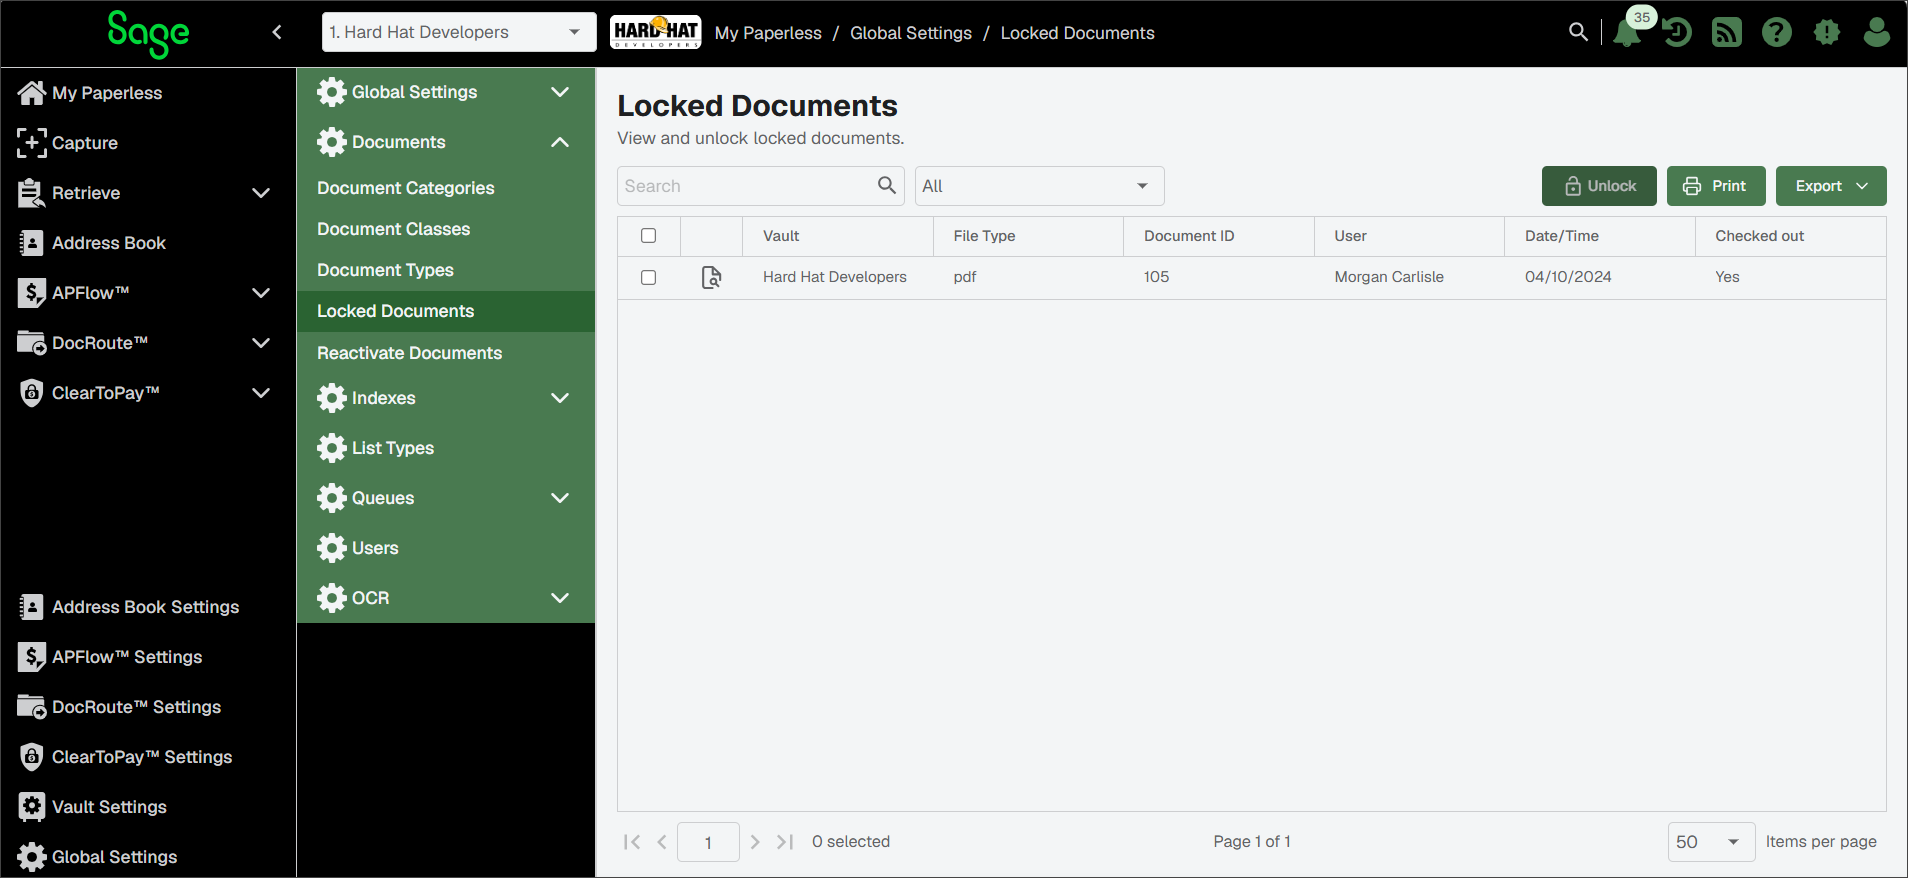
Select the check box for any locked document.
Click the View
 icon to open the document in a standalone viewer.
Note
You can click the Check In
icon from this Viewer page.Click .
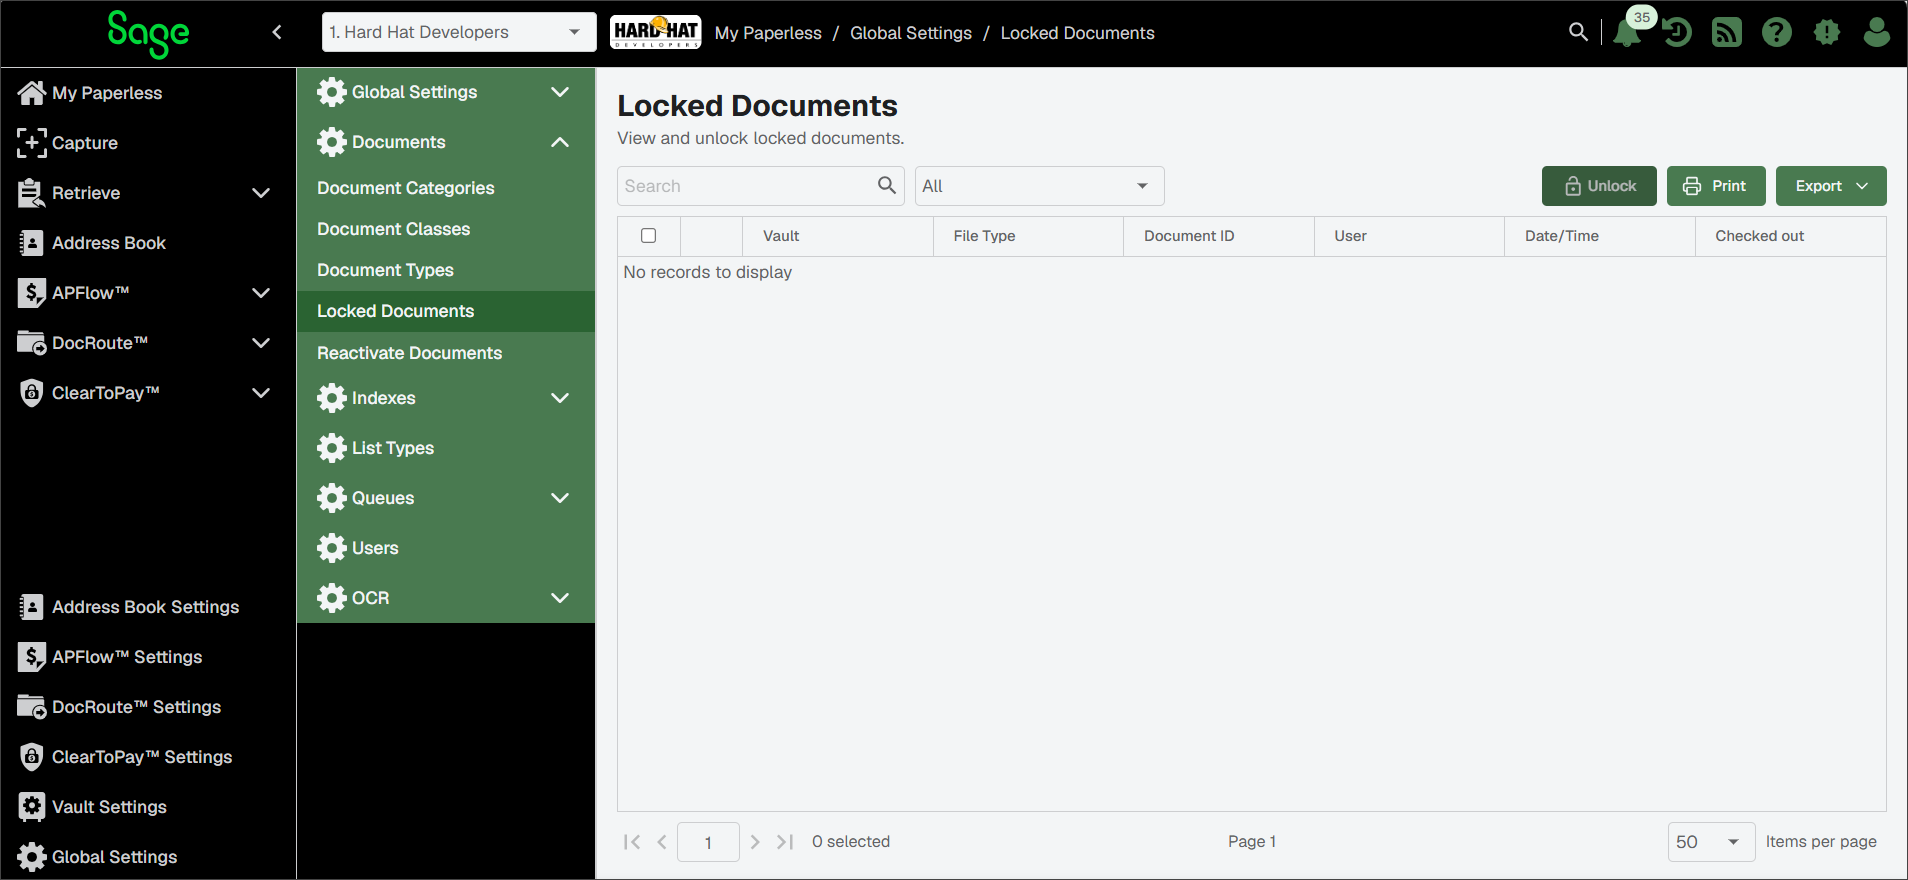
The entry no longer displays on the Locked Documents page.
Documents that are "deleted" from Sage Paperless Construction are not actually deleted until the purge process is performed.
Deleted documents are initially marked Inactive. Administrators can "reactivate" documents that were previously deleted but have not yet gone through the purging process.
From the Documents dropdown, click .
The following page displays:
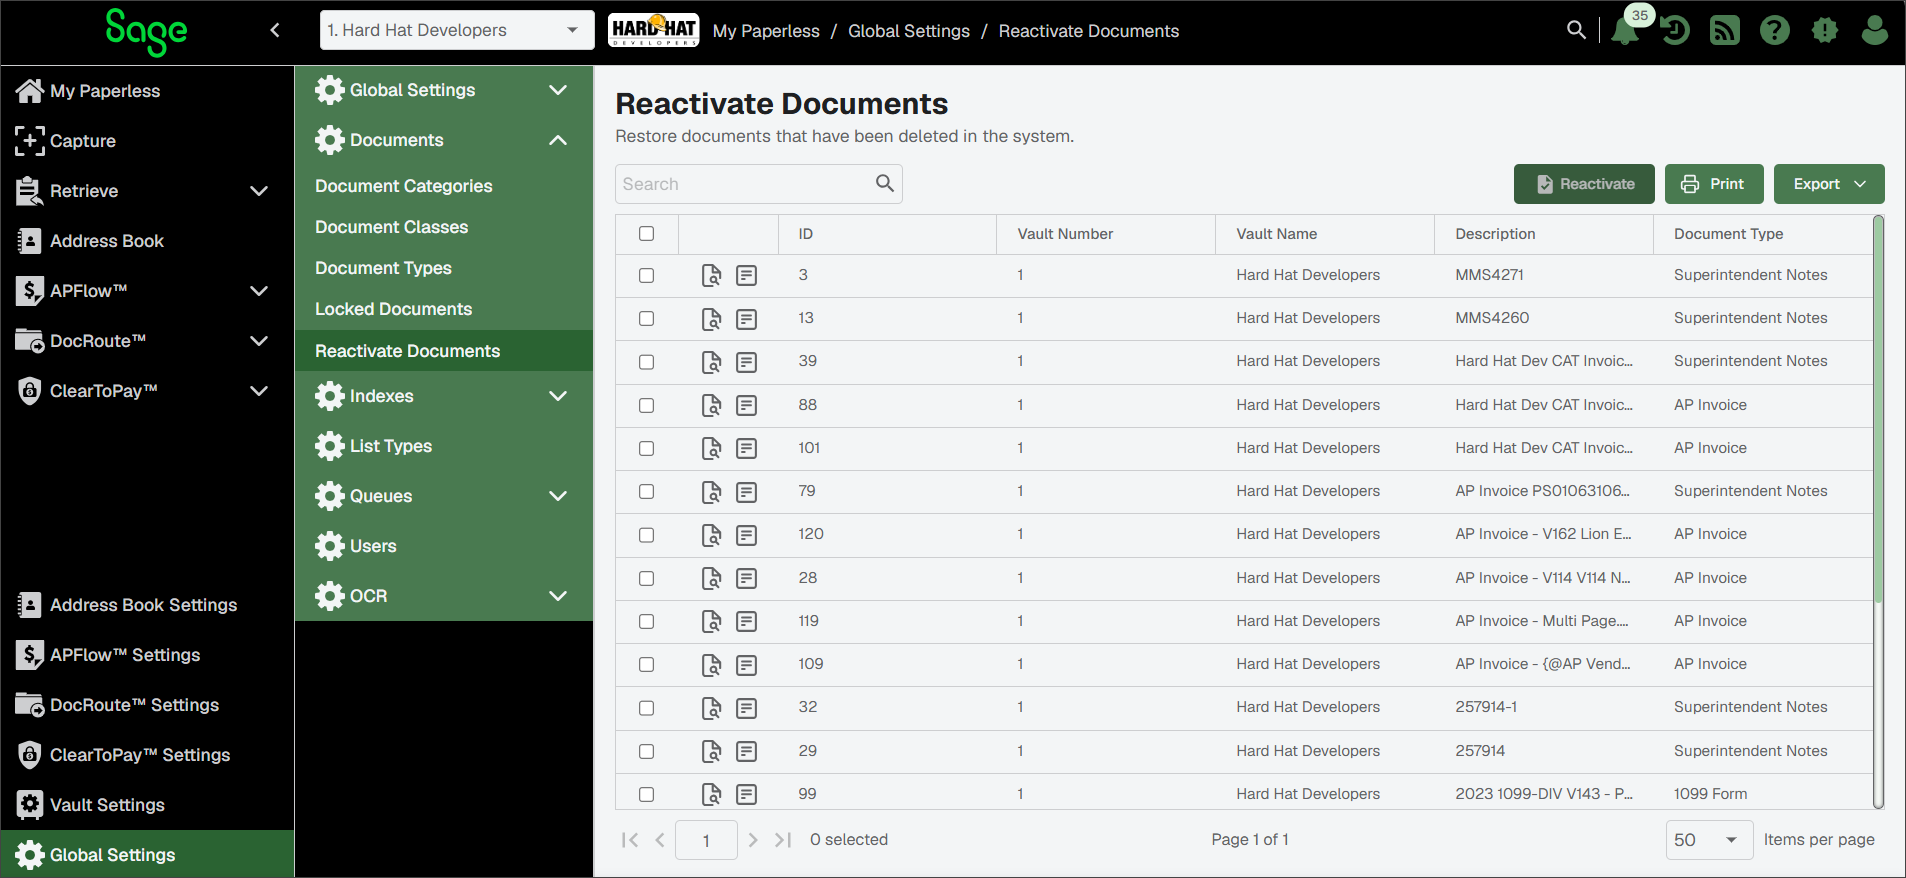
From this page, you can perform the following tasks:
View Audit Log
Click the View Audit Log
 icon to generate the Document Audit Log for the currently selected document. The Document Audit Trail dialog opens to display when an action occurred, who performed the action and what action was performed.
Note
Only one document may be selected at a time for this feature.
View
Click the View
icon to open the deleted document in a stand-alone Viewer.ID
The unique document ID of the deleted document.
Vault Number
The vault number from which the document was deleted.
Vault Name
The vault name from which the document was deleted.
Description
The description of the deleted document.
Document Type
The document type of the deleted document.
Reactivate
Click the button to make the selected document(s) active.
Excel Export
Click the button to create an excel document ready to export.
CSV Export
Click the button to create a CSV document ready to export.
PDF Export
Click the button to create a PDF document ready to export.
Print
Click the button to create a document ready to print.