Sage 100 Contractor
Before bridging Sage Paperless Construction to Sage 100 Contractor, the following accounts need to be configured with the proper permissions.
Account | Required? | Use |
|---|---|---|
Accounting System Service User Account in Sage 100 Contractor Database | Yes | You must have an administrator account configured to serve as a dedicated, non-person account to use to set up the bridge integration with Sage Paperless Construction. |
Windows Domain Service Account | Yes | You must have a username and password for a domain service account that is a local admin to the server where Sage 100 Contractor is installed. |
Create an Accounting System Service User
Important
You must be an administrator to complete the following procedure.
Complete the steps below:
Open and sign in to Sage 100 Contractor Database Administration.
In the left navigation bar, select .
From the Authentication dropdown, select .
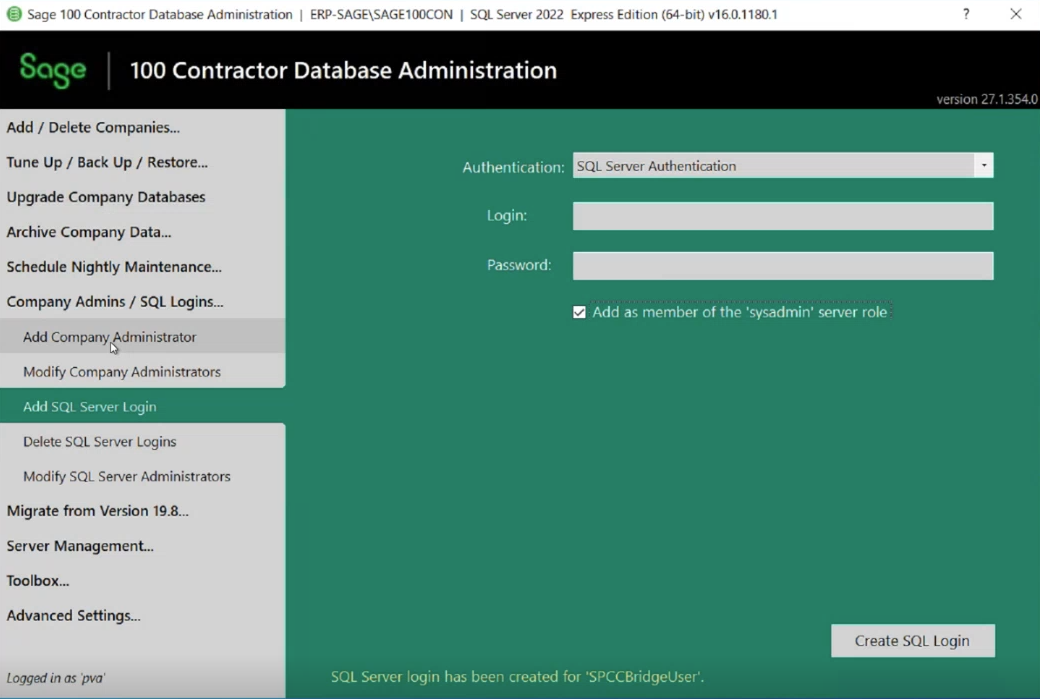
In the Login field, enter a name for your non-person account.
For example, "SPCCBridgeUser."
Note
It is recommended that you do not include the word "paperless" in the login name.
In the Password field, enter a password for this account.
Note
Passwords are not stored or retained by Sage or Sage Paperless Construction.
Select the check box.
Click .
In the left navigation bar, select .
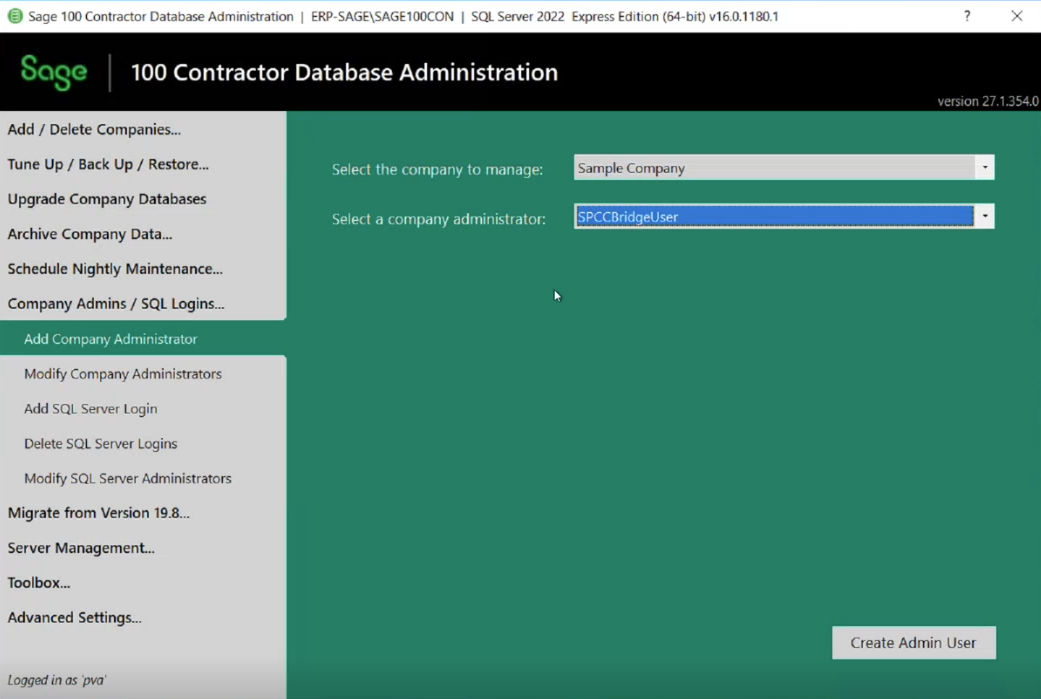
From the Select the company to manage dropdown, select the company you want to bridge to Sage Paperless Construction.
From the Select a company administrator dropdown, select the account you created in step 3, above.
Click .
(Optional) Repeat this process for each company you are bridging to Sage Paperless Construction.
Open and sign in to Sage 100 Contractor as an administrator.
In the Company List dialog, select the company you want to bridge and make sure the check box is selected.
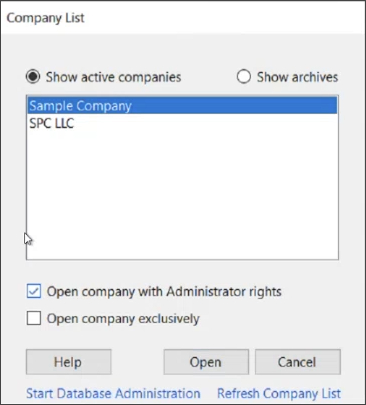
Click .
In the left navigation bar, select .
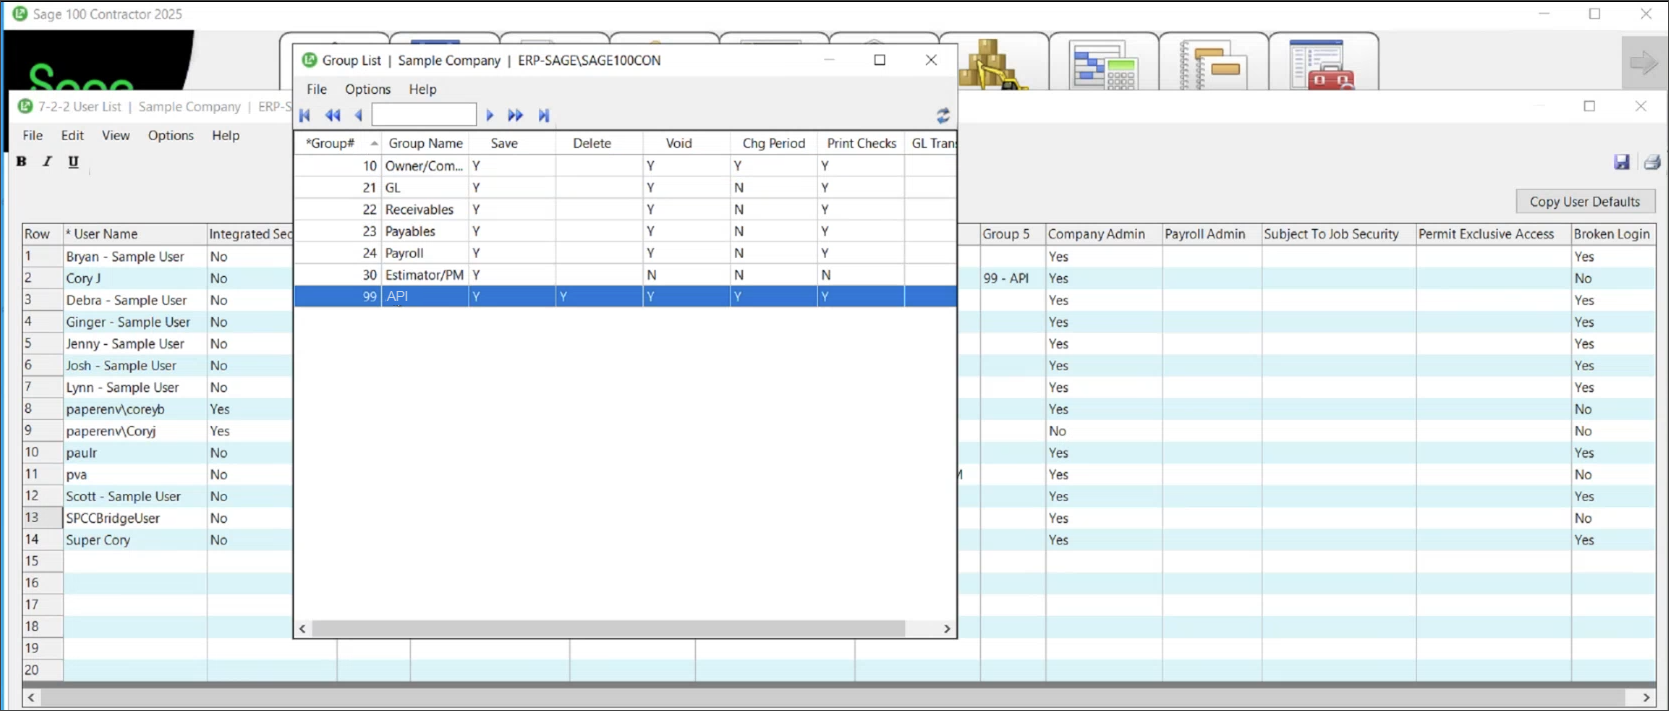
If there is not already an API group created, you must enter the values shown below:
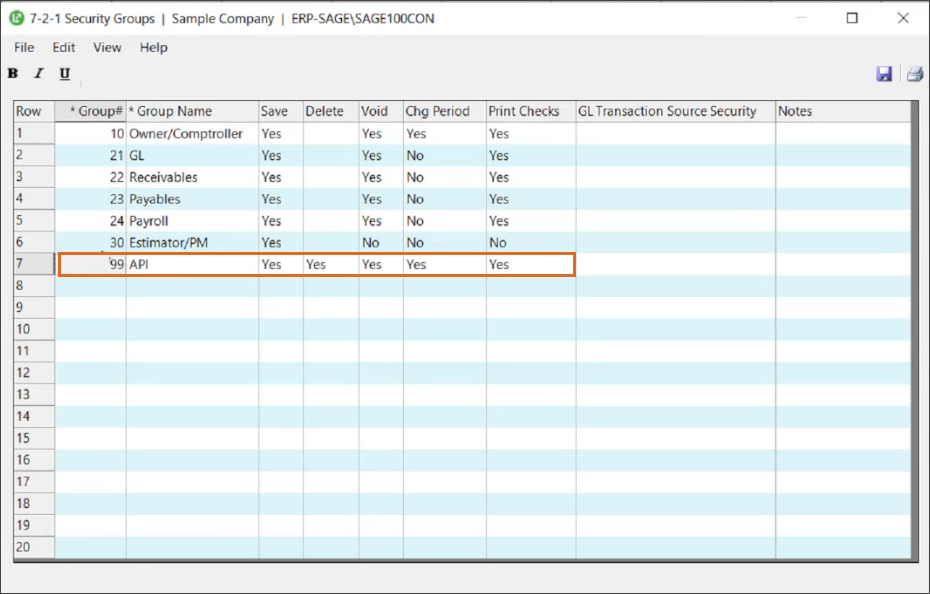
Group#: 99
Group Name: API
Save: Yes
Delete: Yes
Void: Yes
Chg Period: Yes
Print Checks: Yes
In the left navigation bar, select .
Locate your newly created user account in the list (example: SPCCBridgeUser) and click in the Group 1 column for that row to display a lookup option.
In the Group List dialog, highlight the group, then click Close
 .
Click .
(Optional) Repeat steps 6-13 for each company you are bridging to Sage Paperless Construction.
Create a Domain Service Account
To install the Server Agent to your Sage 300 CRE or Sage 100 Contractor server, you must have a username and password for an account that meets the following requirements:
Is a domain service account (a standard domain user)
Is configured as a dedicated, non-person account (not tied to any employee)
Is a local admin to the server where Sage 300 CRE or Sage 100 Contractor is installed
Important
This account must have full access to the accounting system's data folders; however, it does not need to be a domain admin account.
Note
It is recommended that you use a naming convention like svc_paperless or spc_paperless to make it clear that this is a service account so it is not deleted by mistake.
Important
Be sure to set up a service user account as described in Create an Accounting System Service User prior to starting the procedure below.
Log in to Sage Paperless Construction to set up the connection or "bridge" between a particular vault in your Sage Paperless Construction system and your Sage 100 Contractor accounting system.
This "bridge" provides data lookups for indexing documents and throughout APFlow™ Invoice Entry (including Routing and Approval).
Important
Make sure you are working in the vault you want to bridge to Sage 100 Contractor. Before you successfully bridge to an accounting system, None displays in the visible fields.
From My Paperless, click .
In the Vault Settings navigation bar, click .
The following page displays:
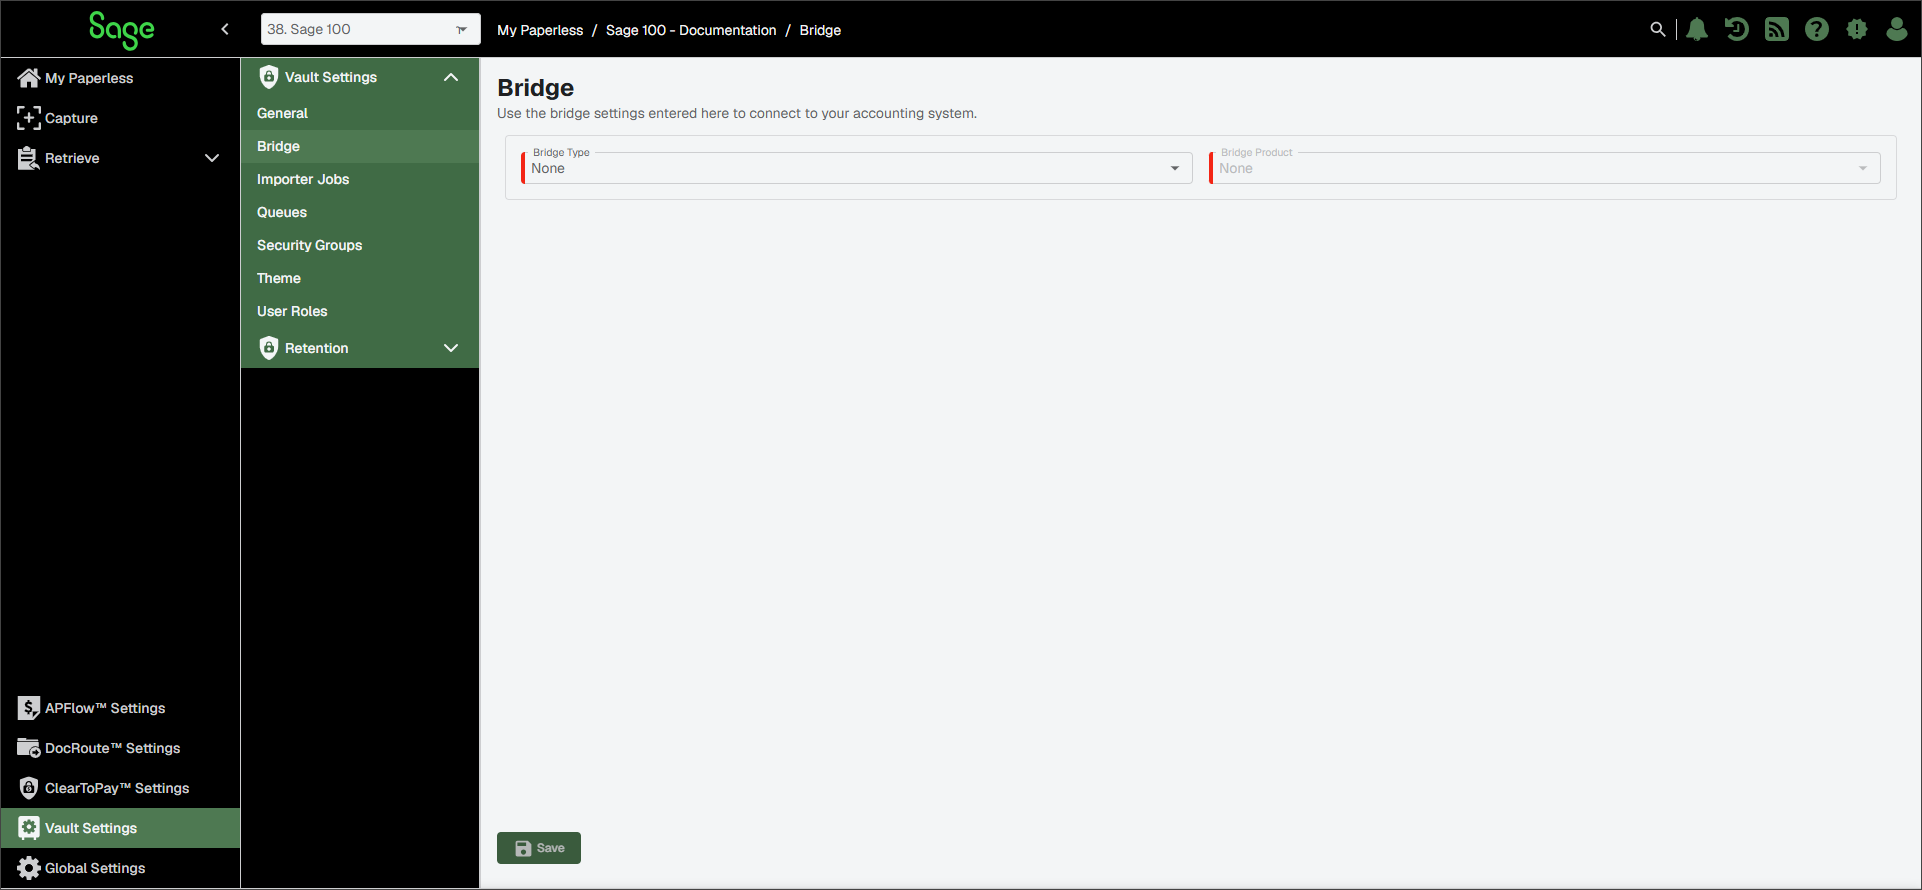
From the Bridge Type dropdown, select .
Note
The Bridge Type dropdown reflects the different business categories Sage Paperless Construction is integrating with. If the Bridge Type field is set to , the Bridge Product field is inactive.
From the dropdown, select .
Once the Bridge Type and Bridge Product fields are populated, the remaining configuration fields become accessible.
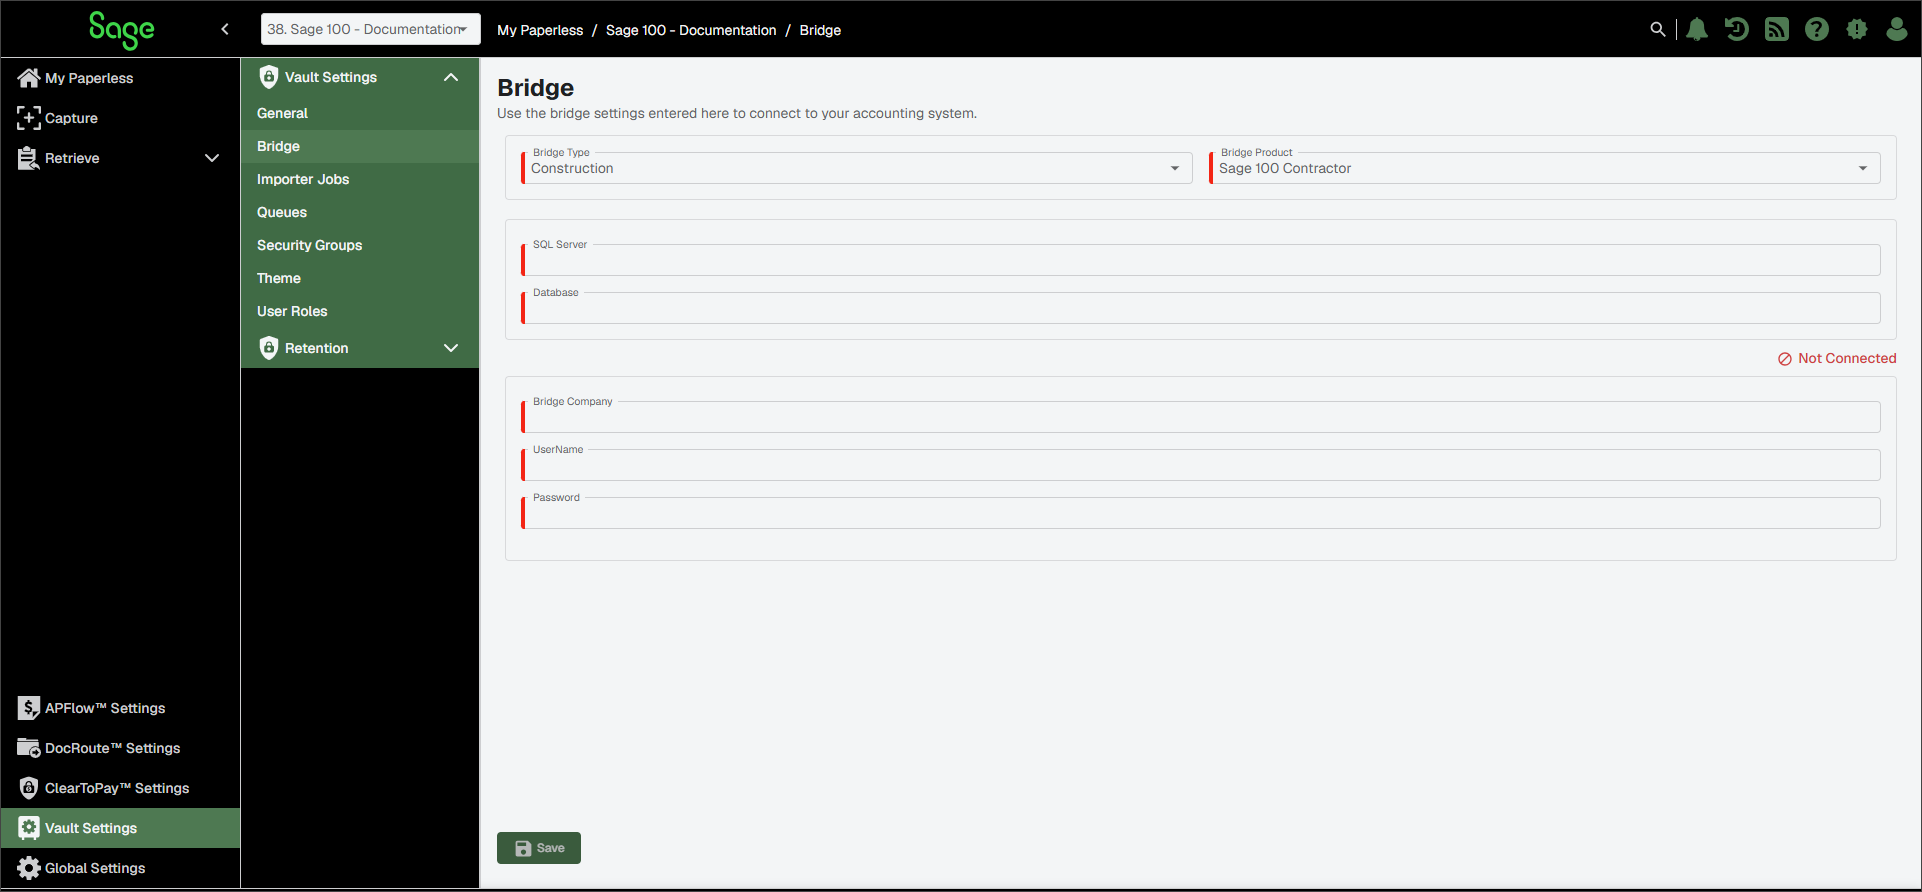
In the SQL Server field, enter the name of your SQL server instance of your Sage 100 Contractor database.
For example:
ERP-SAGE\Sage100Con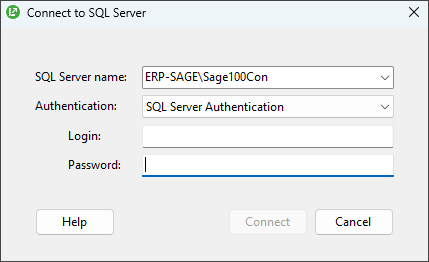
In the Database field, enter the name of your database as it displays in the Company Info dialog:
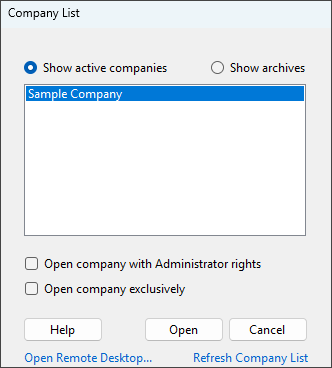
In the Bridge Company field, enter the company name as shown in Utilities (7) > Company Information (1):
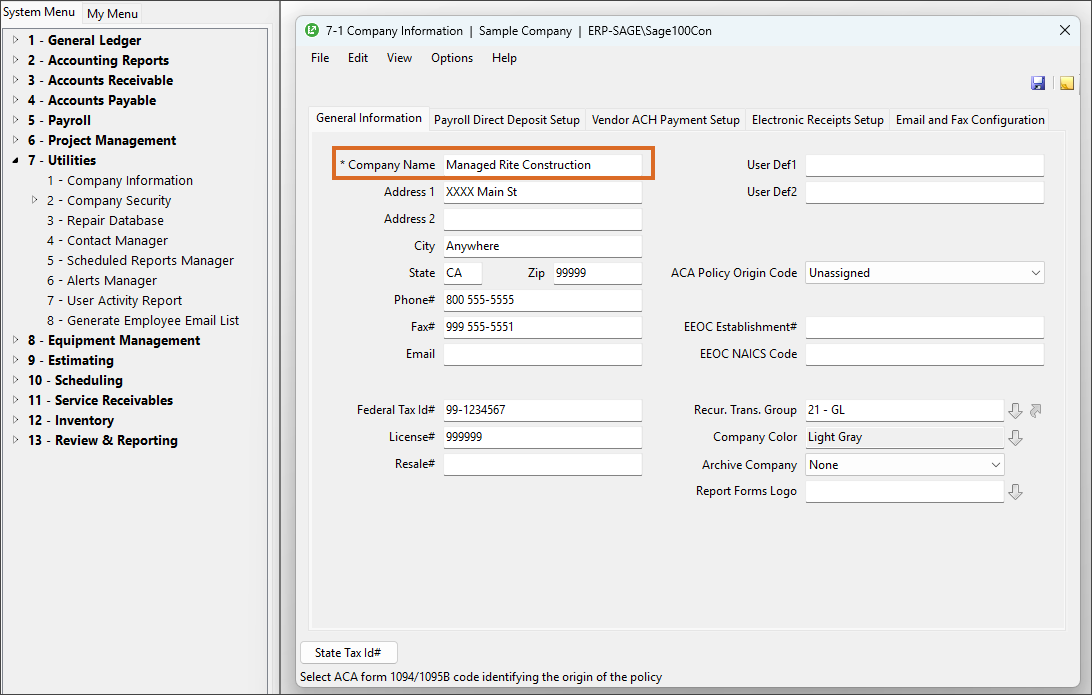
In the UserName field, enter the username for the service account you created in Create an Accounting System Service User.
Important
This must be an administrator account configured to serve as a dedicated, non-person account.
In the Password field, enter the password you created for the account described above.
Click .
The Not Connected indicator changes to Connected if the set up was successful.
Proceed to Configure Server Agent to complete the bridging process and begin importing data.
Configure Server Agent
Complete the bridging process by downloading and configuring the server agent:
Click .
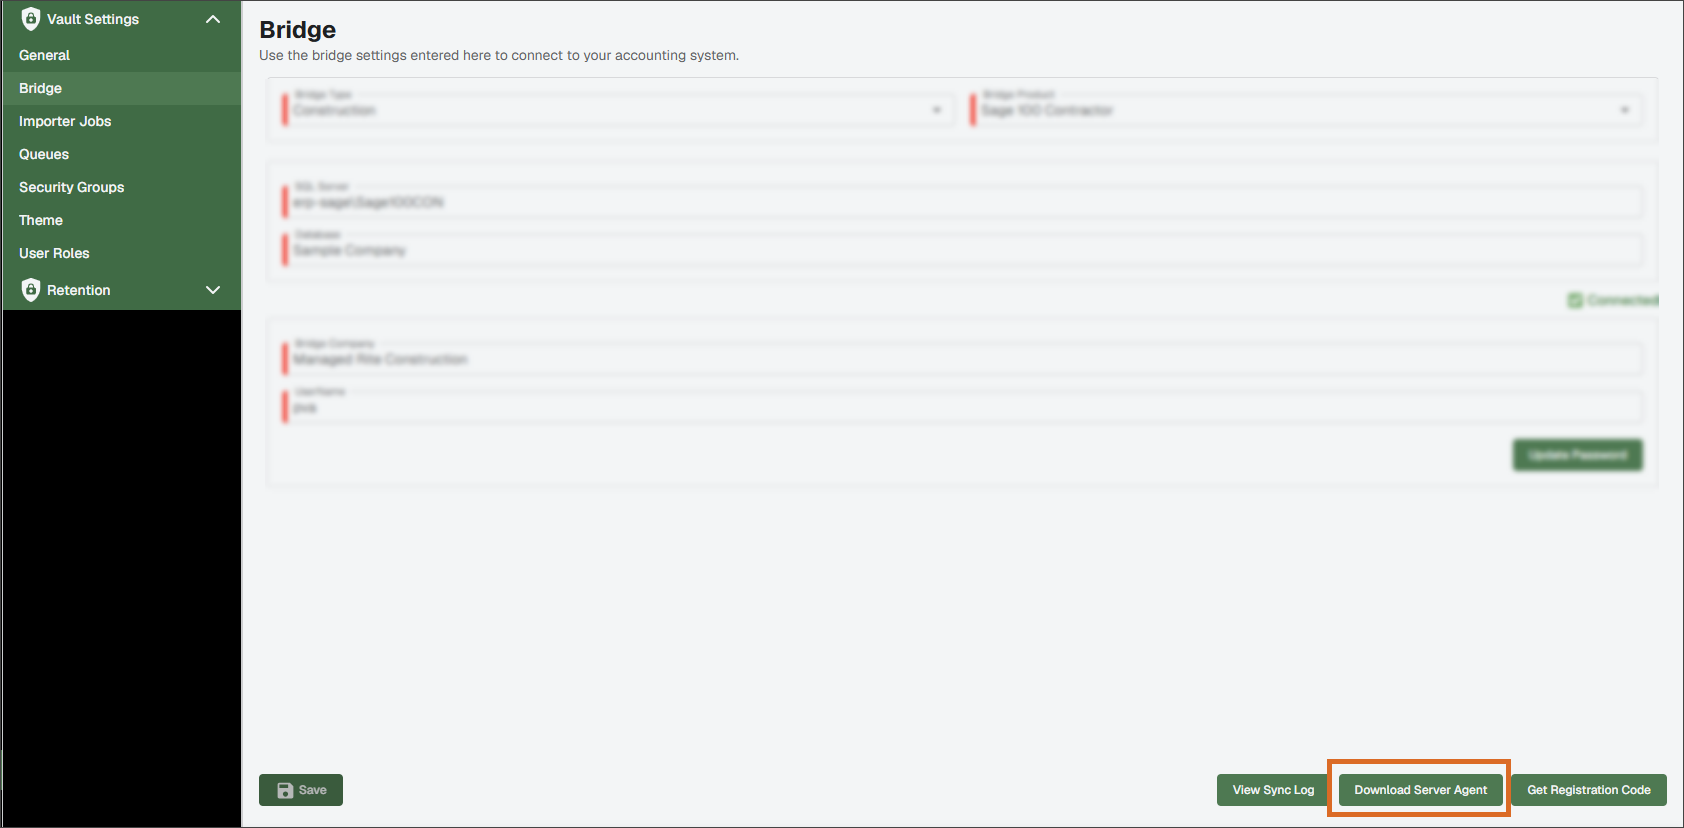
Access the file from your local drive and move to an appropriate shared network folder.
Note
Windows defaults the location to your Downloads folder. The file must be relocated to a shared network drive to make it accessible to others at your company. It is recommended that the server agent is installed on the same server as your Sage 300 CRE/Sage 100 Contractor instance.
Run the ServerAgent.exe file that downloaded.
If needed, right click to unblock the .exe file. The server agent opens and prompts you for a registration code:
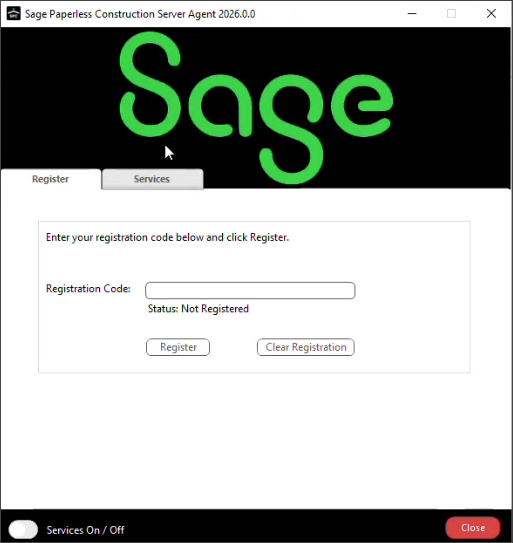
Return to the Bridge page and click .
The code is copied to your clipboard.
Return to the server agent dialog and paste the code in the Registration Code field.
Click .
A Success dialog displays and the status displays as Registered.
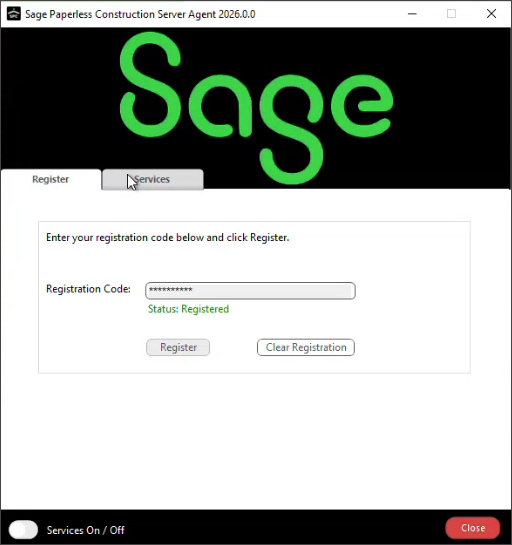
Click the tab.
Click .
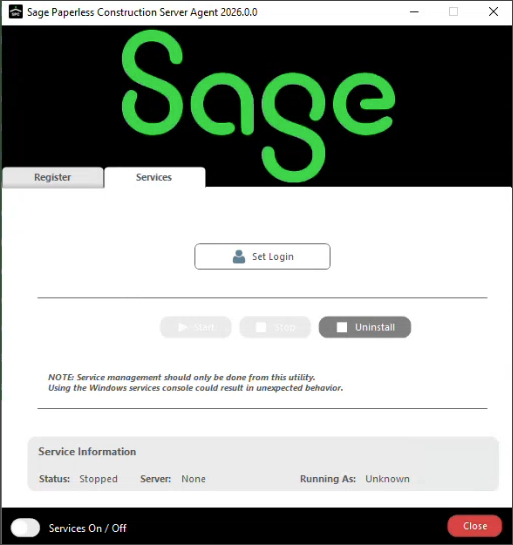
Enter the username and password for the domain service account described in Create a Domain Service Account to complete the installation of the Server Agent.
Click .
The Services On/Off toggle at the bottom left displays as on.
Once the server agent is up and running, the bridge process is complete. To verify that the sync process is underway and the system is ready for you to begin entering data, you can click . It may take up to fifteen minutes to complete the sync process.
As data is added to the Sage 100 Contractor accounting system, that information is systematically synced to Sage Paperless Construction. The Bridge Sync Logs dialog is where you can view data sync progress, configure syncing frequency, manually initiate the sync process and check for errors.
From the Bridge page, click .
The Bridge Sync Logs dialog displays with the Bridge Lists tab active.
Make sure the expected lists populate, then review their syncing frequency in the Refresh Interval column. To make changes to the refresh intervals:
Note
The default refresh internal is once a day.
Select the check box(es) for the lists you want to update.
Click .
In the Refresh Interval dialog, select the radio button, then enter list sync frequency in the Hours and Minutes fields.
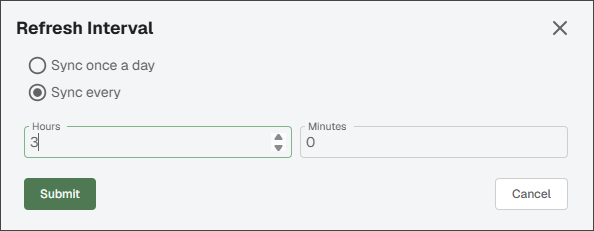
Click .
From the Bridge Lists tab, you can also do the following:
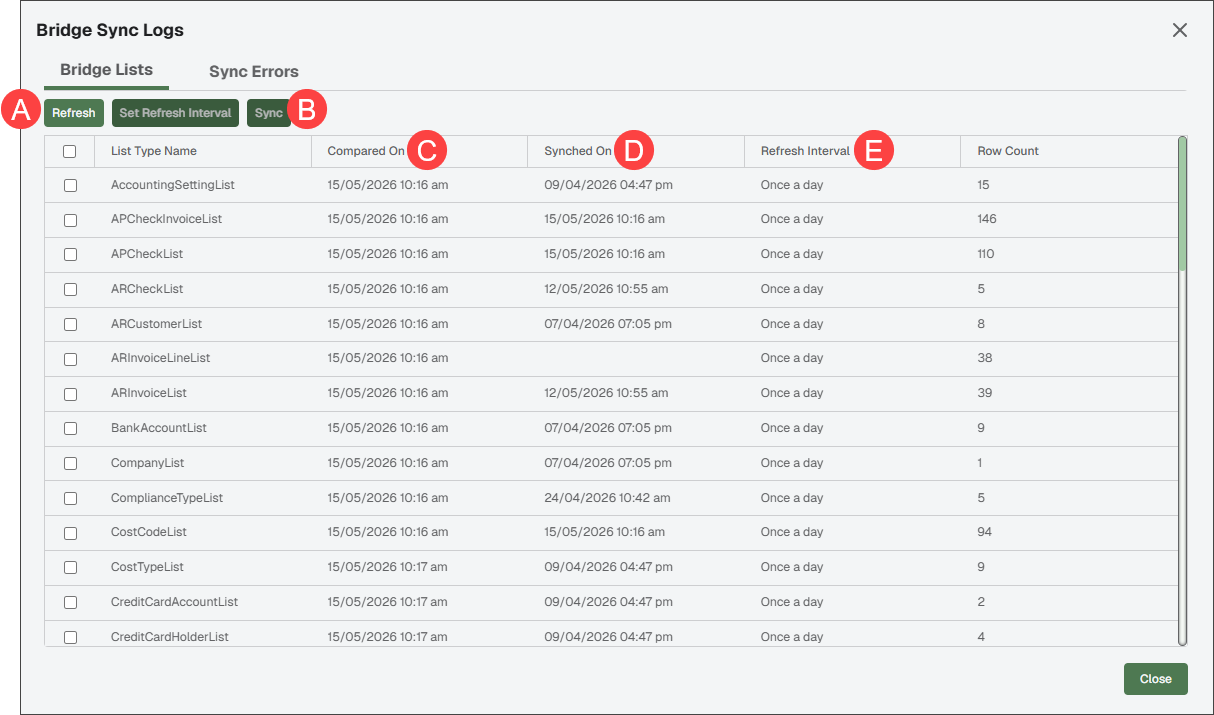
A: Click to update all items in the grid to reflect changes or display the latest information. B: Select one or more List Types, then click to manually initiate a data sync for the selected lists. C: View the last time the agent compared data to check for updates. D: View the date and time in this column to see when lists synced most recently. E: View the information in this column to see the current data refresh settings. (Optional) Click the tab to view the data that support personnel use to troubleshoot issues. This tab shows when a list is encountering issues while syncing.
Use the Bridge Settings page to customize certain aspects of the APFlow workflow for your Sage Paperless Construction system.
Important
The bridge settings that display are only valid for your current vault.
Complete the following steps to access the Bridge Settings page:
From My Paperless, click .
In the navigation bar, click .
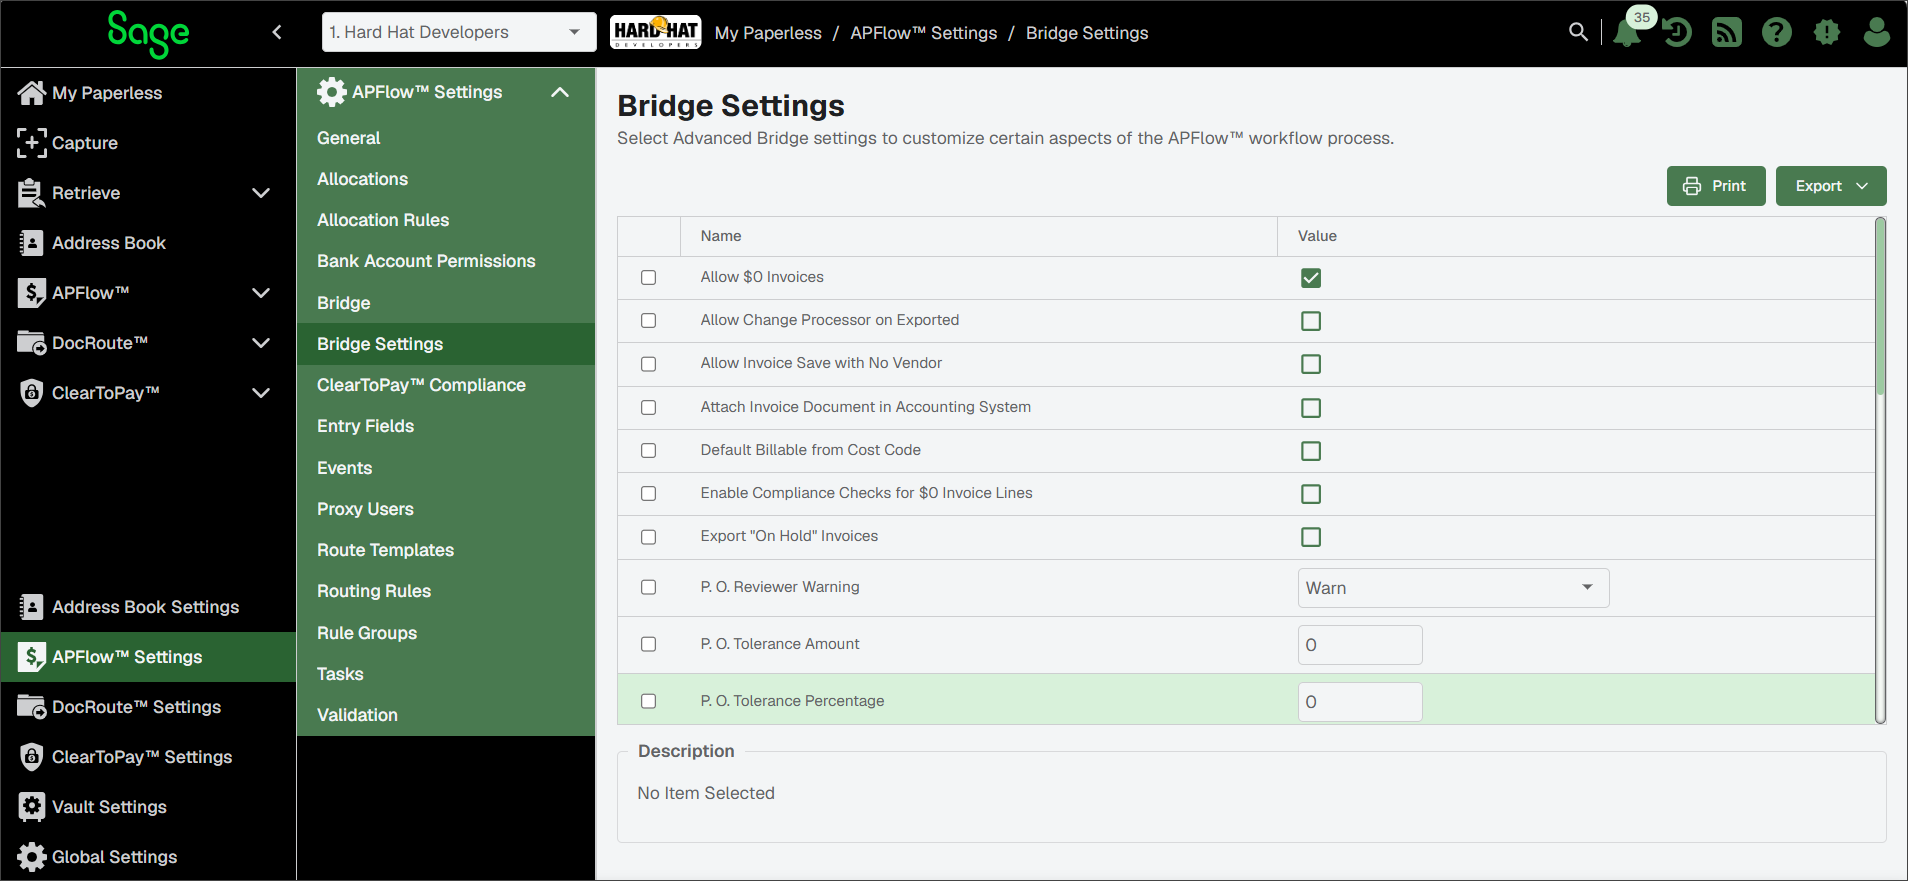
Update the bridge settings as appropriate. Some settings are universal and are present for all accounting systems, while other settings are specific to the Sage 100 Contractor accounting system.
Allow $0 Invoices | With the check box in the Value column selected, this bridge setting is active and invoices may be approved with an invoice total set to $0 (zero). With the check box in the Value column blank, invoices set to $0 (zero) cannot be approved. | |
Allow Additional Line Types on PO/Sub Invoices | With the check box in the Value column selected, the user can add an expense or job line to an invoice entry already containing PO/Subcontract lines. | |
Allow Change Processor on Exported | Usually, no changes are made to invoices that are exported. This setting allows you to change only the name of the Processor associated with a specific exported invoice. With the check box in the Value column selected, this bridge setting is active and the change processor options are available in Invoice Manager for exported invoices. This also applies to Processors with the dropdown in Invoice Entry. With the check box in the Value column blank, change processor options are not available in Invoice Manager for exported invoices. | |
Allow Coding Override on PO Lines | With the check box in the Value column selected, the user is allowed to override the coding applied from the Purchase Order. NoteOverriding here does not edit the Purchase Order entry in Sage. It simply changes the coding of the invoice entry. | |
Allow GL Override on Invoice | In Invoice Entry, on non-Expense line type entries (Job, Equipment, Purchase Order, Subcontract), the populated GL Account field reflects the Sage 100 General Ledger account default. This field is read-only and cannot be modified. With the check box in the Value column selected, the GL Account field becomes active and you can override the Sage 300 default General Ledger account number. | |
Allow Invoice Save with No Vendor | With the check box in the Value column selected, this bridge setting is active and you can save an invoice without a vendor number. NoteAn invoice without a vendor number cannot be routed or approved, but this setting enables basic header information to be saved. With the check box in the Value column blank, you cannot save an invoice without a vendor number. | |
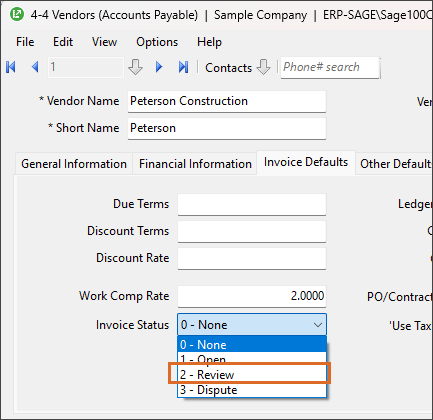
Auto Vendor Hold | With the check box in the Value column selected, the system defaults the vendor hold status based on the vendor's default Invoice Status in Sage 100 Contractor.
If the Invoice Status or Status fields are set to in the accounting system, the check box is systematically selected on the Invoice Entry page in Sage Paperless Construction. | |
CCM Integration - Use Line Description | With the check box in the Value column selected, importing credit card invoices to Sage 100 Credit Card Management uses the line description provided on the line detail instead of the invoice description in the header when creating the journal entries. ImportantThe Enable Credit Card Management Integration setting, below, must also be enabled for this setting to be used. | |
Default PO GL Account | Enter the GL Account to use at the time of export on PO Lines not included on the invoice in Sage Paperless Construction. Sage 100 Contractor requires all PO lines to be sent over via the API so any PO lines not included on the invoice go over as zero amount lines with this default GL Account. If you do not provide a value, the system uses the GL Accounts designated for O/H Cost for Freight and Variance found under 1-8 General Ledger Setup on the Posting Accounts tab. | |
Default PO Sub Account | Enter the Sub Account to use at the time of export on PO Lines not included on the invoice in Sage Paperless Construction. Sage 100 Contractor requires all PO lines to be sent over via the API so any PO lines not included on the invoice go over as zero amount lines with this default Sub Account. If you do not provide a value, the system uses the GL Accounts designated for O/H Cost for Freight and Variance found under 1-8 General Ledger Setup on the Posting Accounts tab. | |
Enable Credit Card Management Integration | With the check box in the Value column selected, credit card invoices are imported to Sage 100 Credit Card Management instead of AP Invoices. See Credit Card Management (Sage 100 Contractor) for more information. With the check box in the Value column blank, credit card invoices are not imported to Sage 100 Credit Card Management but are imported to AP Invoices instead. | |
Export "On Hold" Invoices | Allow invoices in an On Hold status to export. With the check box in the Value column selected, this bridge setting is active and invoices On Hold are allowed to export. This allows an invoice to display in the Ready for Export page. With the check box in the Value column blank, invoices On Hold are not allowed to export. | |
Export Job Header | With the check box in the Value column selected, if no job number is entered in the header, export the first job number identified on the invoice line item details. | |
Import Notes | With the check box in the Value column selected, invoice notes are systematically copied to Sage 100. | |
Include Closed Jobs | With the check box in the Value column selected, closed jobs display in the Lookup list. | |
Job Budget $0 Warning | With the check box in the Value column selected, the job budget warning is active and generates if a budgeted amount is zero ($0). NoteWith a Warning, the recipient can still approve. | |
Job Budget Reviewer Warning | Determine what type of prompt generates to the Reviewer when a job type/job cost entry exceeds the budget. Prompt Types:
| |
Job Budget Tolerance | This is the amount beyond the established budget amount that is still considered acceptable. Any amount above the entered figure triggers the generation of a budget warning. 0 is the default. NoteWith a Warning, the recipient can still approve. | |
Job Budget Warning | Determine if a prompt generates to the Processor that a job type/job cost entry exceeds the budget. Prompt Types:
| |
P. O. Reviewer Warning | Determine what type of prompt generates to the Reviewer when a purchase order amount exceeds the committed amount. None is the default. Prompt Types:
| |
P. O. Tolerance Amount | This is the amount beyond the established purchase order amount that is still considered acceptable. Any amount above the entered figure triggers the generation of a purchase order amount warning. $0 is the default. NoteWith a Warning, the recipient can still approve. | |
P. O. Tolerance Percentage | This is the percentage beyond the established purchase order amount that is still considered acceptable. Any percentage above the entered figure triggers the generation of a purchase order percentage warning. 0% is the default. NoteWith a Warning, the recipient can still approve. | |
P. O. Tolerance Type | Identify an amount value, a percentage value or both for the P.O. Tolerance Type. This is the amount or percentage beyond an established purchase order amount or percentage that is still considered acceptable. Any amount or percentage above the entered figure triggers the generation of a purchase order amount or percentage warning. $0 is the default. If Both is selected, both the amount and percentage tolerances must be met. If only one is met and the other is exceeded, the purchase order generates a warning. NoteWith a Warning, the recipient can still approve. | |
P. O. Warning | Determine what type of prompt generates to the Processor when a purchase order amount exceeds the committed amount. None is the default. Prompt Types:
| |
Processor Compliance Warnings | Determine what type of prompt generates to the Processor when vendor or subcontract items are out of compliance. None is the default. Prompt Types:
| |
Require Invoice "Do Not Pay" Notes | With the check box in the Value column selected, this bridge setting is active and you are required to enter a note when marking an invoice for Do Not Pay. With the check box in the Value column blank, no note is required if you mark an invoice for Do Not Pay. | |
Require Invoice Approval Alert Notes | With the check box in the Value column selected, this bridge setting is active and you are required to enter a note when marking an invoice for Approval Alert. With the check box in the Value column blank, no note is required if you mark an invoice for Approval Alert. | |
Require Invoice On Hold Notes | With the check box in the Value column selected, this bridge setting is active and you are required to enter a note when marking an invoice as On Hold. With the check box in the Value column blank, no note is required if you mark an invoice as On Hold. | |
Require Invoice Reject Notes | With the check box in the Value column selected, this bridge setting is active and you are required to enter a note when marking an invoice Rejected. With the check box in the Value column blank, no note is required if you mark an invoice for Rejected. | |
Require Invoice Reset to Pending Notes | With the check box in the Value column selected, this bridge setting is active and you are required to enter a note when marking an invoice Reset to Pending. With the check box in the Value column blank, no note is required if you mark an invoice Reset to Pending. | |
Restrict Cost Codes | With the check box in the Value column selected, only cost codes which were set up with budgets on the job in Sage are available on the cost code list. | |
Reviewer Compliance Warning | Determine what type of prompt generates to the Reviewer when vendor or subcontract items are out of compliance. None is the default. Prompt Types:
| |
Reviewer Sequence Threshold | This is the Sequence level at which the reviewer must fully code the item being approved. For example, if set to 0, the invoice must be fully coded before it can be approved. If set to 1, any Reviewer with a sequence 0 could approve the invoice even if not fully coded. Anyone above the sequence threshold set here (such as 1) are required to fully code the invoice before approval is allowed. | |
Subcontract Reviewer Warning | Determine what type of prompt generates to the Reviewer when a subcontract amount exceeds the committed amount. None is the default. Prompt Types:
| |
Subcontract Tolerance Amount | This is the amount beyond the established subcontract amount that is still considered acceptable. Any amount above the entered figure triggers the generation of a subcontract amount warning. $0 is the default. NoteWith a Warning, the recipient can still approve. | |
Subcontract Tolerance Percentage | This is the percentage beyond the established subcontract amount that is still considered acceptable. Any percentage above the entered figure triggers the generation of a subcontract percentage warning. 0% is the default. NoteWith a Warning, the recipient can still approve. | |
Subcontract Tolerance Type | Identify an amount value, a percentage value or both for the Subcontract Tolerance Type. This is the amount or percentage beyond an established subcontract amount or percentage that is still considered acceptable. Any amount or percentage above the entered figure triggers a subcontract amount or percentage warning to generate. $0 is the default. If Both is selected, both the amount and percentage tolerances must be met. If only one is met and the other is exceeded, the subcontract warning generates. NoteWith a Warning, the recipient can still approve. | |
Subcontract Warning | Determine what type of prompt generates to the Processor when a subcontract amount exceeds the committed amount. None is the default. Prompt Types:
| |
Work Order Date Cutoff Years | Enter the number of years to limit the work orders retrieved. |
From the Bridge pages in either APFlow™ Settings or Vault Settings, administrators can complete the following steps to delete an existing bridge connection.
Caution
Deleting a bridge deletes its bridge connection data from the system. You cannot save the newly added bridge connection data until all previous bridge connection data is successfully deleted.
From the Bridge Type dropdown, click .
Click .
After deleting a bridge, there may be a delay before you can add—and save—a new bridge.
If the previous bridge connection data is still being deleted when you are ready to add new bridge connection data, a message displays stating the previous bridge connection data is still being deleted and asks that you wait for a short time.